
When last I wrote about this particular project it was all sorts of good-looking, like so:
As I mentioned at the time, it looked good but it was cobbled together from a variety of materials and it was a bit on the heavy side. Plus, it suffered from an unfortunate case of being the only one I had. Since I needed to send one to someone else and I wanted to keep one for myself (and I would probably make a few to sell to friends to offset costs) I had only two choices. Either I would have to invent some sort of molecular replicator technology or I'd have to make a mold.
I went with the mold making option.
The rubber I'm using in this case is AM128 Silicone RTV (Room Temperature Vulcanizing) moldmaking rubber from aeromarineproducts.com. I buy from them because theirs is the lowest price I've found for silicone anywhere. Even with the cost of shipping.
AM128 moldmaking silicone also smells like grape-flavored bubble gum. Don't eat it.
Silicone is a wonderful thing. It has the ability to stick to nothing at all. This is why you see so many cooking utensils made out of different grades of silicone. In fact, the only thing that can stick to silicone is more silicone. When you make a mold out of it, that means you can pour resin into the mold, wait for it to cure, and pull the cured part out without using any grease or mold release to prevent it from sticking to the mold. It also has amazing detail reproduction properties. There are actually certain grades of silicone that are used to duplicate cellular structures for later study in medical applications.
There are a lot of different ways to go about making molds and each is great for certain things. In this case, I opted for making a simple, two-piece box mold. This means I'll have two chunks of rubber that fit into a box and there will be a hole in between them that's exactly the same shape as the original model. When you pour resin into that hole and allow it to cure, it will form a copy of the model. Here's how.
To make a box mold, you start by making a box:
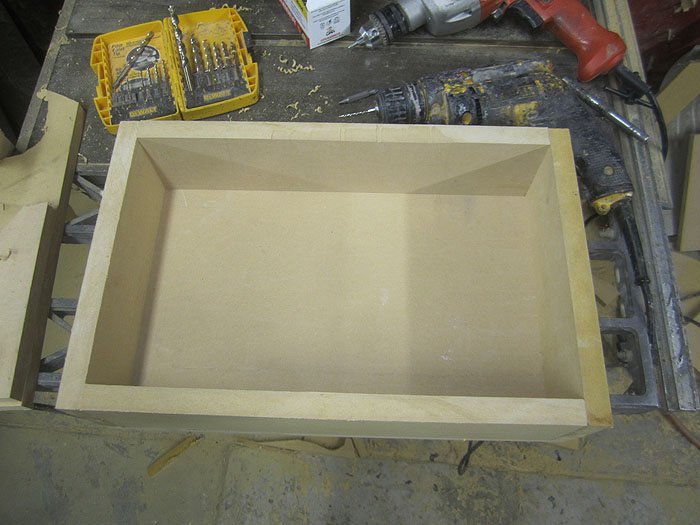
This particular box if made out of Medium Density Fiberboard (aka "MDF") that's 3/4" thick. There are better options for these applications, but none of them were laying around in oddly sized and shaped scraps all over my workshop. So MDF it was.
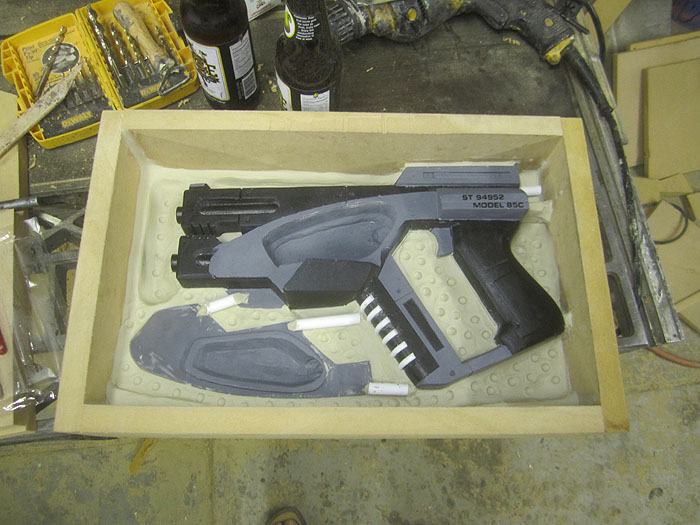
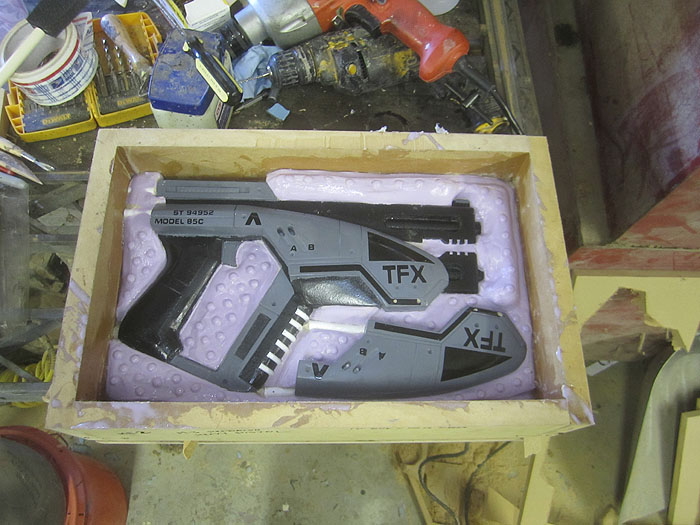
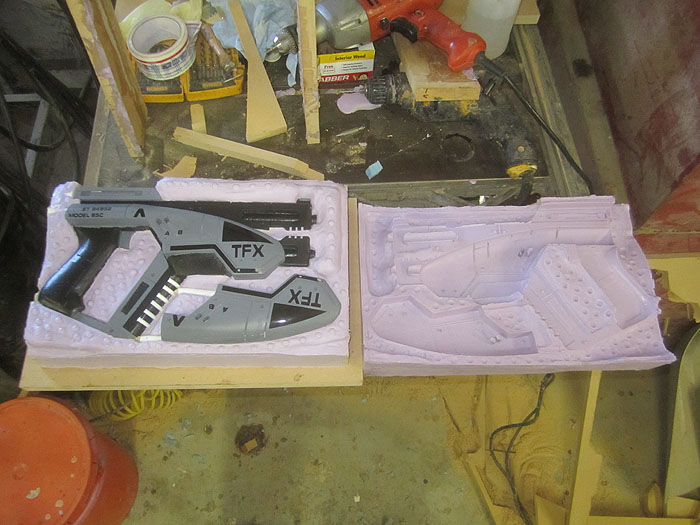
When building the box, the key thing to do is make sure you've got 1/2" of clearance all the way around the original model:
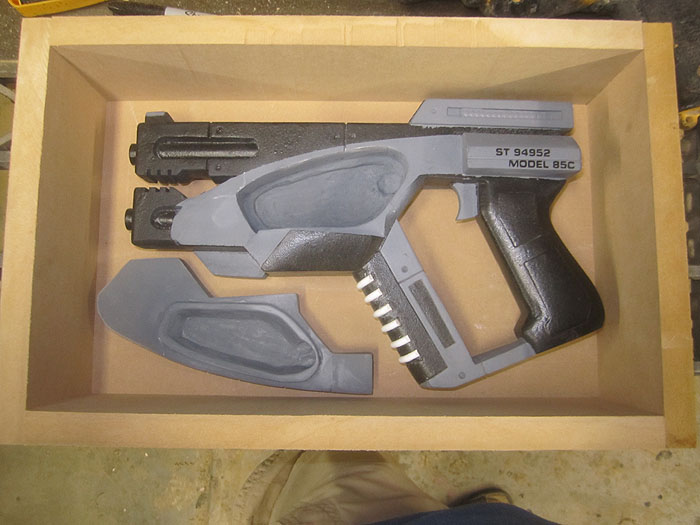
As you can see, I'm making both parts of the pistol in one mold. This way I don't end up wasting a bunch of time and silicone making a whole 'nother mold. You also want to make sure that the box won't leak. For that, I just pushed a bit of oil-based clay into the seams to act as a sort of caulking. Finally, you'll be taking the box apart a couple of times during the process, so use screws to hold it together.
Once I'd decided I liked the layout, the next step was to lay down a bed of clay to hold the model in place. Since you'll be making a two-part mold, the shape you're making the clay in now will become the shape of the second half of the mold.
The first priority at this point is making sure that the model is tightly sealed in place. At this point you're also deciding where the two halves of the mold will separate. I try to follow along the edges of the model so that the seams will be easy to clean off.
Here's what the clay wall looks like once it's mostly formed:
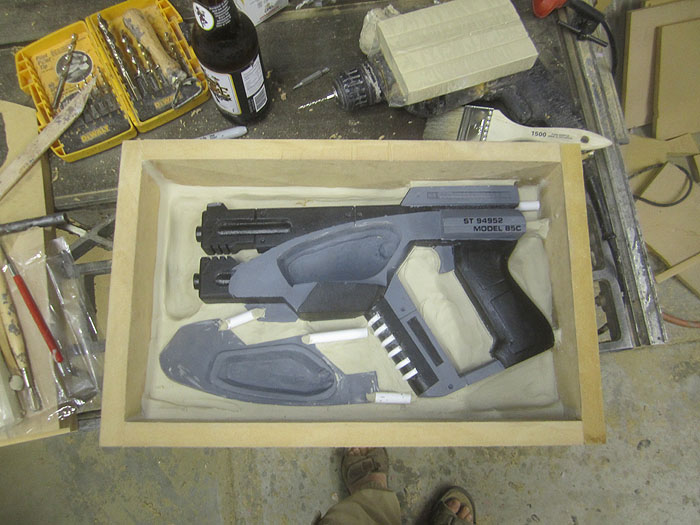
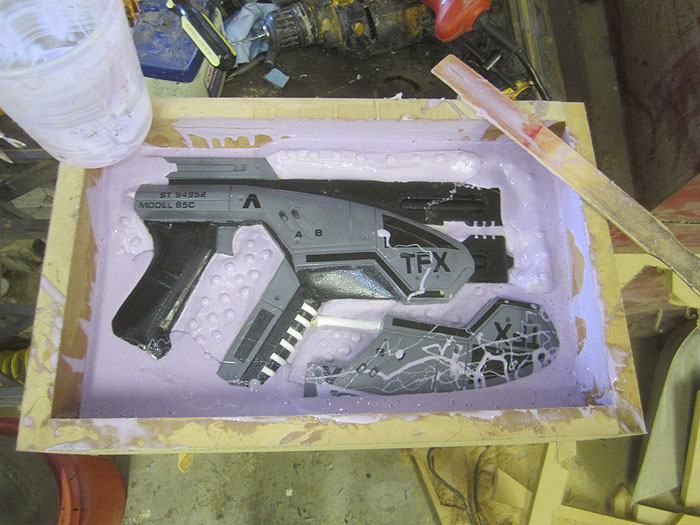
When designing a mold, you have to give ample consideration to how the resin will flow into the mold as well as how air bubbles will flow out of the mold. In this case I plan to pour the resin into the back end of the pistol next to where it's labelled "model 85C" above the grip. Because air bubbles are likely to get trapped at the high points at the back of the grip and the rear sight, I've added vents there. I've also set up "sprues" which act as pour spouts and vents between the main portion of the pistol and the removable body panel. Those are the white plastic tubes running between the two pieces.
Finally, you need to set up "registration points," which are little holes that will line up with the little bumps on the other half of the mold to ensure that the two halves are properly aligned. In this case, I simply pressed the rounded end of one of my sculpting tools into the surface of the clay to make oodles of little dimples:
Satisfied that the clay wall was just right, the next step was to pour the first batch of silicone. This is often called the "print coat" as it picks up all of the minute details on the surface of the original. Here's the first pour of about 23 fluid ounces of silicone RTV moldmaking rubber:

A note about silicone: READ THE INSTRUCTIONS. If the manufacturer says the material must be mixed to a certain ratio by weight, you're going to need a scale in order to do it right. Do not try to eyeball it or you're going to end up wasting a lot of material in the best case. Worst case you'll waste a lot of material and ruin your original model in the process. There are some types of silicone that can by mixed by volume. They tend to be weaker and softer and wear out faster. If you've got a mold that has finally failed due to age or overuse, don't throw it away. You can cut it up into chunks that can be re-used as filler.
Anyhow, after the second or third batch of silicone, it was becoming clear that this mold was going to use up a small fortune in rubber goo. Fortunately, I've got a few other molds laying around in the shop that have long since given up the ghost. So I hacked one of them into bits and sunk the bits into the still-liquid silicone to take up space. They were a different brand of silicone, so you can see them as blue chunks:
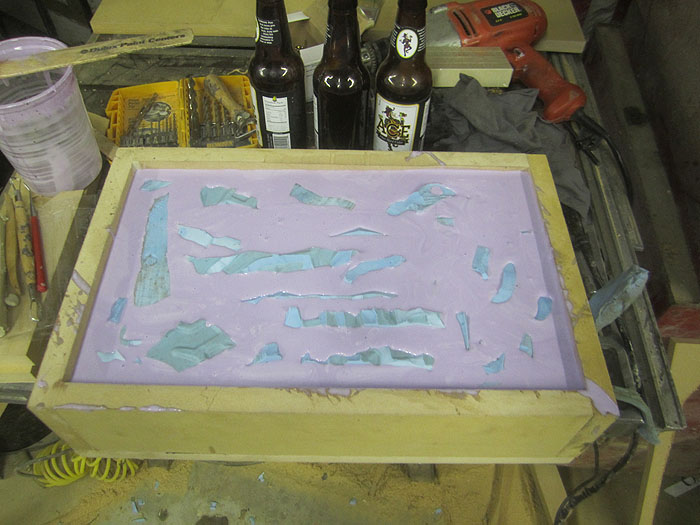
Once I'd squeezed as many rubber chunks as I could into the silicone, I poured one more batch on top just to hide the fact that I had recycled rubber inside:
The main challenge at this point is to leave it the hell alone long enough to properly cure. I actually had to take a whole day off from being in my workshop just to resist the urge to pull the mold apart before it had properly cured.
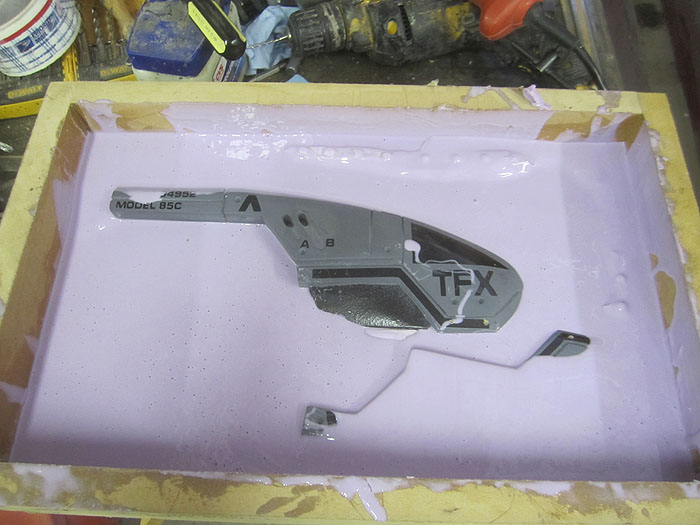
The next day, I flipped the mold over, unscrewed the bottom of the box, and started pulling the clay off of the underside:

With the box and the clay removed, the first half of the mold looked like so:
Notice that everywhere I put a dimple into the clay, there's now a bump in the rubber.
As I mentioned before, silicone doesn't like to stick to anything except more silicone. Now we have to pour the other half of the mold, but we don't want to have the two halves stick together and ruin all of the cute little dimples and bumps. In order to prevent them from touching you'll need some sort of mold release. There are all sorts of commercial options available, but I've found that a very light coat of Vaseline works just fine.
Once you've coated the first half of the mold with silicone, the next step is to reassemble the sides of the box around the mold:
When you do this, you want to set the sides of the box a bit higher than they originally were. This way, after you pour everything, the box won't be quite as tall as the rubber mold. When you reassemble the box, you can clamp it together a bit and help seal the two halves of the mold together.
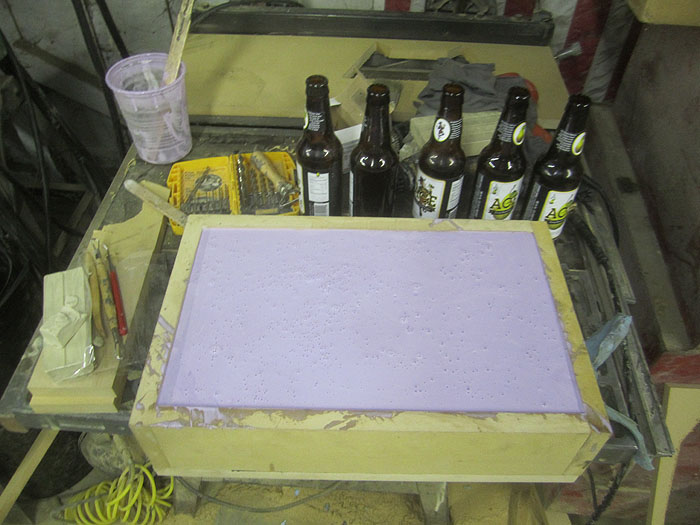
Once the box is sealed around the first half of the rubber mold, it's time to pour more grape-scented goop:
And more:
And even more:
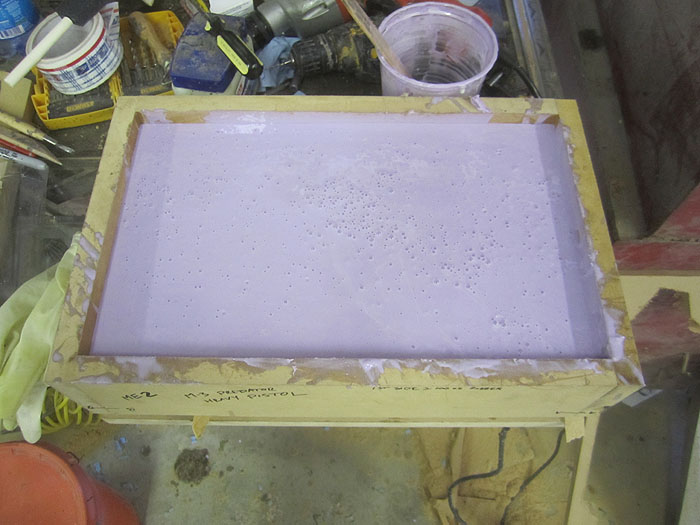
You may have noticed all of the bubbles in the pictures above. One benefit of building the box mold like this is that the bubbles rise away from the surface of the original model. You can do a lot of other things to eliminate the formation of bubbles in the silicone (such as putting the mixed silicone in a vacuum chamber) but with this method you really don't have to worry about it too much.
After allowing proper cure time (in other words, resist the urge to screw with it), the next step is to disassemble the box and pull the two halves of the mold apart:
Now you need to pull the original out of the mold, clean off the Vaseline, and allow the rubber some time to dry out. Even so, your first pull will likely end up with a bit of Vaseline residue or tiny bits of clay stuck to it. I usually call the first cast a throw-away.
Once you've let the mold sit for a few hours, reassemble the box with the rubber mold inside. At this point, you'll leave off the side of the box where your pour spout is. Make sure to tighten the lid on the box just enough to squeeze the two halves of the rubber together so they won't leak. If you make it too tight, you'll likely distort the shape of the hole you're about to fill.
Then set the box on end and pour resin into the pour spout until it fills up to where you can see it coming out of the vents. As you pour, tap the mold or shake it gently to help any trapped air bubbles work their way out. The resin I'm using is also from aeromarineproducts.com. They have urethane casting resin in off-white (cheapest) black (a bit more expensive, but more reliable and faster to cure) and clear (most expensive, very temperamental and hard to work with). In this case, I used their off-white resin with some black pigment added in to make the casting grey and microballoons added in to make it a bit lighter in weight.
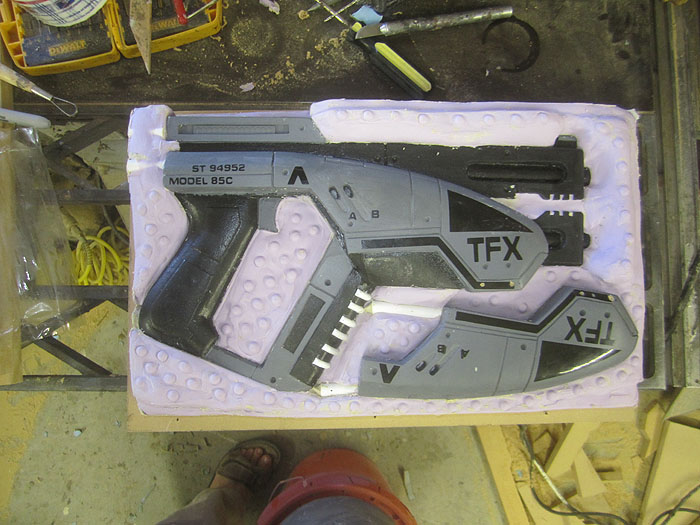
Here's the first cast coming out of the mold:
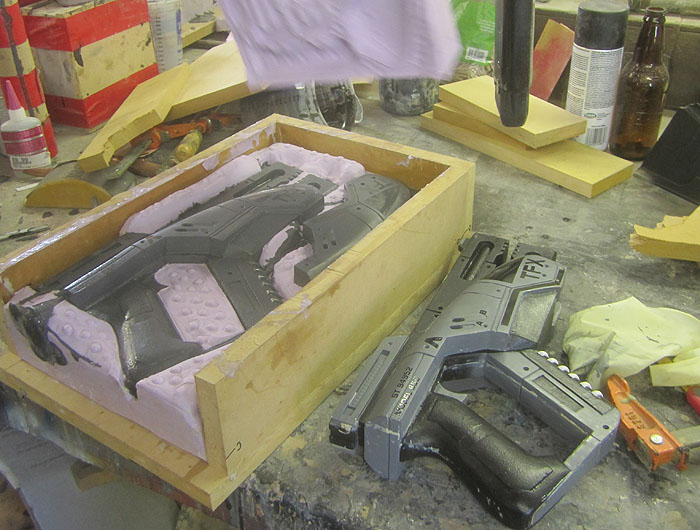
When I mentioned that the silicone picks up details very well, I wasn't kidding. The lettering and logos you see in these pictures were vinyl decals that were stuck onto the prototype. They're no thicker than a sheet of paper and you can clearly see them and feel them on the castings.
For those of you keeping track, the mold took up something like 100 fluid ounces of silicone plus some leftover chunks of older molds. The casting itself used up about 42 fluid ounces of mixed resin.
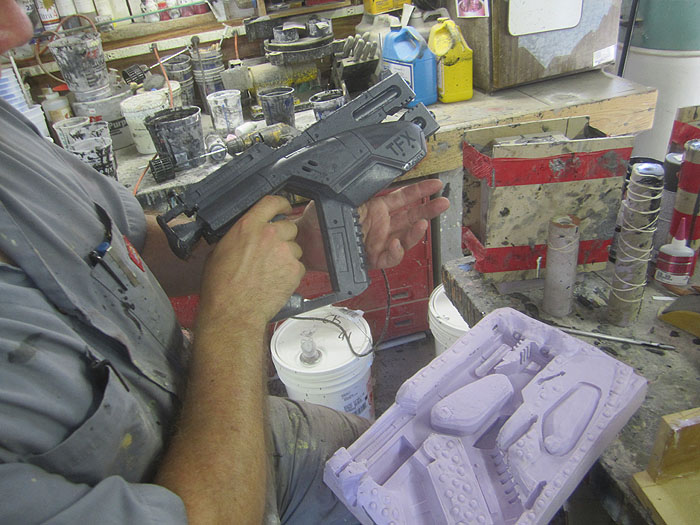
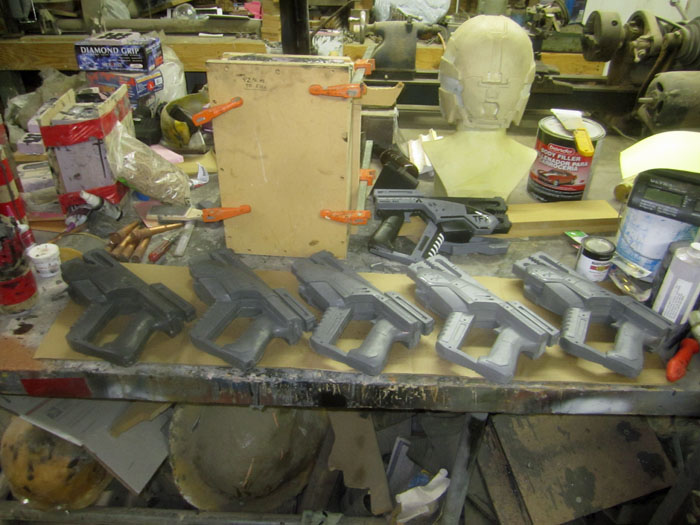
At this point, all that's left to do is cut off all of the "flashing" where a bit of resin has seeped into the seams of the mold as well as removing the extra plastic formed at the vents and pour spout. That, and make another cast:
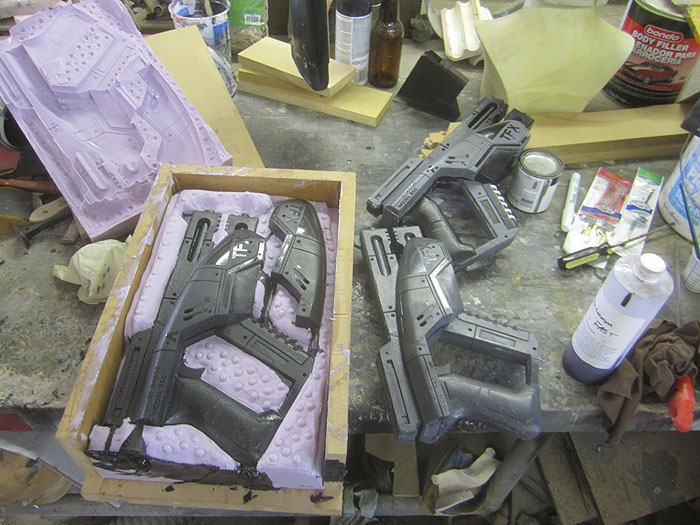
Or lots of casts:
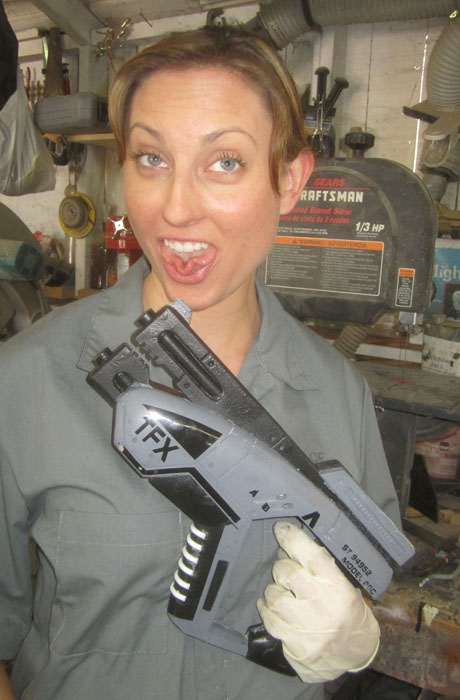
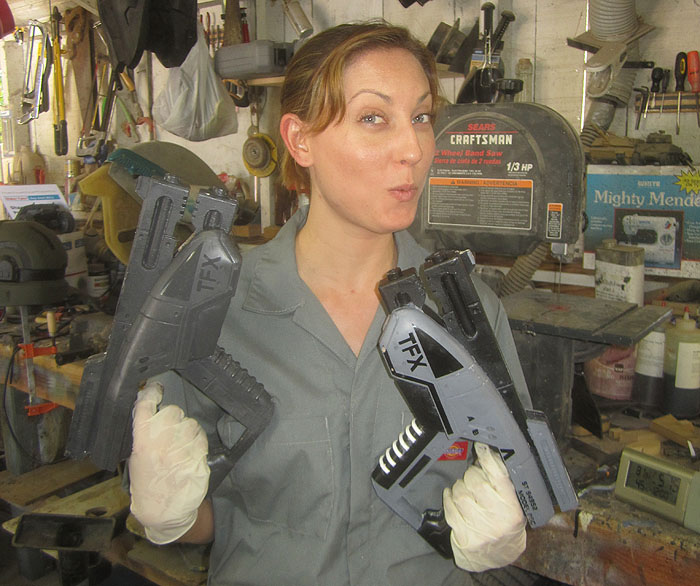
Then all you need to do is find an appropriately attractive model to help show off your creations:
Stay tuned for Part 3: Wiring, Blinky Lights, and Painting.
.
hoe do you mould plastic soldiers
ReplyDeleteI am so glad you posted this project. I am working on building a few ME2 weapons of my own but I didn't know several of the tricks you described.
ReplyDeleteThanks!
When pouring the silicone into the mold, if you hold the pouring cup rather high and letting a thin stream flow into the mold box, a lot of the bubbles are eliminated.
ReplyDeleteI've also used small chunks of styrofoam to take up room so I didn't have to use as much rubber (for molds that don't have to take too much bending), and added strips of fabric netting inside for flexible strength.
Very cool to see the process!
I love the way the pear cider bottles add up during the first stage, hahaha. Excellent. That tells me a lot about the time taken. Nice job, by the way.
ReplyDeleteDo you think a matrix mold would have saved you some money with the amount of silicone you are using?
ReplyDeleteYou mentioned using micro balloons to reduce the weight, I assume that is inside the molded, how do you keep them from contacting the sides when the casting material is poured?
ReplyDeleteFor me It is a cool model you've Made re-rubber is a good choice. Excellent work..
ReplyDeletesynthetic turf
Superchick: If you're dealing with a small enough piece and you're not making very many casts, you can manage with one-piece box mold.
ReplyDeleteRyan: I tend to have mixed luck with matrix molds. I'm making an Assault Rifle from Halo3 next. I might go that route when I mold that.
Anonymous: Microballoons are tiny little hollow glass spheres. So tiny that they're basically dust. When I mix the casting resin, I blend in the microballoons so that they're evenly mixed within the finished piece.
you wouldn't happen to be selling these somewhere would you? cause i would be super interested in having one.
ReplyDeleteIf you'd like to know how to get your own, shoot me an email at sthorsson99@yahoo.com.
ReplyDeleteDude I want one so bad!! I was looking into making one but just purchaseing one would be legit.
ReplyDeleteVal
Thanks! So what type of paints do you use? Oh and do you use a gloss or top coat of some sort? :)
ReplyDeleteVal
Great write up and a great looking cast. Oh and nice choice on the adult beverage. I'm partial to the Pear Cider myself.
ReplyDelete