
Like many Star Wars fans, while watching Ahsoka on Disney+ I was really taken with this particular character's look:

I knew right away that I was going to have to make myself this helmet.
Some time earlier I'd made a mold off of a Black Series stormtrooper helmet from Hasbro so I could mod copies to make a variety of stormtrooper variant helmets. So I pulled a casting out of that mold for a starting point:

Then we 3D scanned it:

We're getting pretty good at the whole digital scanning thing.
Once the scan data was cleaned up a bit, I hit up my friend Jeff Santos for some digital sculpting. He sculpted out the necessary pieces to convert the cast helmet into Enoch's helmet:

In no time at all, I'd printed the key parts, trimmed off the face of the Stormtrooper helmet casting, and fit the parts together:

Not too shabby:

Happy that the models looked right, I got started on prep work. Here's the face after the initial 150-grit sanding:

And after the first round of filler primer:

Every time I found myself waiting for paint to dry on the 3D printed face pieces, I would spend a few minutes laying out and carving in the kintsugi* lines on the resin cast helmet part:

Once I was convinced that we'd matched all of the cracks in the screen-used helmet, the cheeks were installed and the whole thing was primed and given a gloss coat of lightish red paint:

Here it is from the side:

And the front:

In order to make molding, casting, prepping, and painting easier, I decided to keep the faceplate separate:

So at this point, the masters were done:

Both pieces were mounted to a base with cardboard and hot glue, the wrapped in plastic food wrap before a 3/8" layer of clay was built up over the whole thing. The clay matrix was coated with PVA release agent and then I laid up the first half of the fiberglass mothermold:


Once that had cured I went ahead and set up the second half for fiberglass. Here's the mothermold after the second half was laid up:

The same thing was done with the mold for the faceplate:


Here's both mothermolds curing:

The next day I removed the mothermold and the clay matrix, being careful not to disturb the master inside:

Then I worked some clay around the edges where I was going to need a parting wall later:

The edges were dimpled to make registration keys to help keep the silicone parts aligned during casting. At this stage I usually like to add some signatures and graffiti to the parts that will be cut off:

With the parting line set up, I bolted the mothermold in place and sealed it all the way around the edges:

Same for the faceplate:

Then I had Rachel go ahead and fill the molds with silicone:

Once that had cured, I flipped over the mold for the main body of the helmet. Then I removed the wood base and the clay that made up the parting wall. Then the whole thing was given a generous coat of release agent before I poured silicone for the bottom section of the mold:

The faceplate mold was ready to go:

Before casting, I dusted the mold with a gold metallic powder:

This powder clings to the surface of the mold, but once the casting resin adheres to it, it sticks better than most paint coatings:

This way there will still be gold visible underneath if the surface finish gets scratched or chipped.
So the next step was to rotocast a copy of the faceplate. This meant pouring just a few ounces of mixed resin into the mold an sloshing it around until the whole surface is evenly coated:

This gets repeated until adequate thickness is built up:

Here's the first casting as soon as it was pulled out of the mold:

I'm very happy with it:

Here it is alongside the master:

Once the bottom section of the silicone had cured, I notched out the four tabs at the bottom of the rubber mold jacket:

Then I applied a heavy release agent and laid up fiberglass to make the bottom section of the mothermold. Here it is fitted with bolts after it had cured:

After a bit of trimming and cleanup, I used that mold to cast the first helmet body:
Here's the first casting as soon as it was pulled out of the mold:
I'm very happy with it:
Here it is alongside the master:
Once the bottom section of the silicone had cured, I notched out the four tabs at the bottom of the rubber mold jacket:
Then I applied a heavy release agent and laid up fiberglass to make the bottom section of the mothermold. Here it is fitted with bolts after it had cured:
After a bit of trimming and cleanup, I used that mold to cast the first helmet body:

Here it is alongside the mold and the masters:

Here's the complete set of parts including a set of custom-formed acrylic lenses and the chin details:

After a bit of trimming, I dry fit the parts together:

Naturally, I couldn't resist the urge to try it on for a while:

I'm pretty happy with it. This is my happy face:

Of course, I never make just one of anything. So I cranked out a few more castings:

To get the finish I wanted for the gold bits, I decided early on that the best option was gold leafing:

For the main body of the helmet, I started with a gloss white basecoat:

Then the helmet was masked off and the grey parts were painted either Gloss Smoke Gray, or Satin Granite from Rustoleum:

It's a bit more obvious after the masking was removed:


Here's the complete set of parts including a set of custom-formed acrylic lenses and the chin details:
After a bit of trimming, I dry fit the parts together:
Naturally, I couldn't resist the urge to try it on for a while:
I'm pretty happy with it. This is my happy face:
Of course, I never make just one of anything. So I cranked out a few more castings:
To get the finish I wanted for the gold bits, I decided early on that the best option was gold leafing:
For the main body of the helmet, I started with a gloss white basecoat:
Then the helmet was masked off and the grey parts were painted either Gloss Smoke Gray, or Satin Granite from Rustoleum:
It's a bit more obvious after the masking was removed:
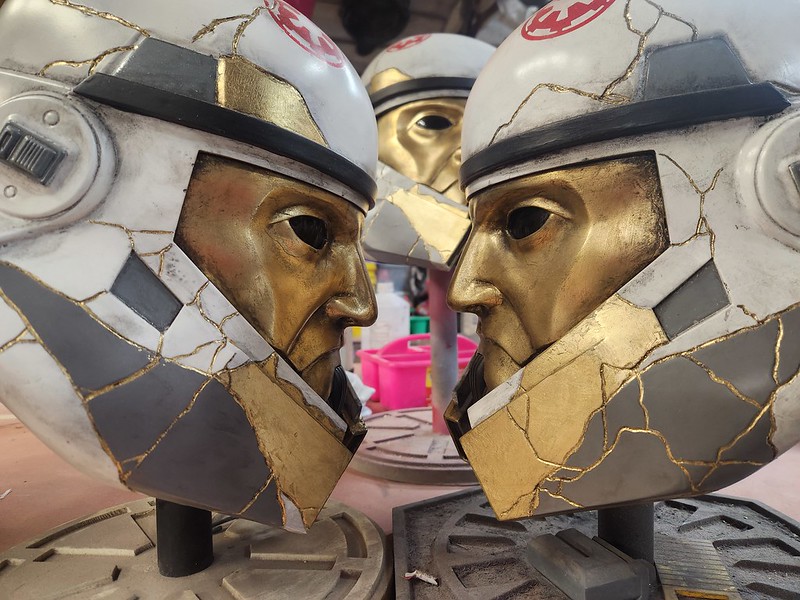
Then the gold leafing was applied to the cracks and patches to match the kintsugi look of the screen-used helmet:

The main thing I learned from gold leafing the faceplate was that I really don't like doing gold leafing.
To make it easier, I asked Rachel to do it:

She pretty much nailed it:

Once the leafing was done, we picked out the brow trim by hand with flat black oil-based paint. Then we made vinyl stencils to paint on the Imperial cog logos:

Rachel was also happy with the result:

They were definitely coming along, but they were still too clean:

The final step was to blackwash everything to help the details stand out and give the whole thing that signature Star Wars "lived in universe" look:


Jeff got to keep one of the helmets. Here's the last pic with all four in the same room:

Here's my copy sitting on display in the office:

At some point I'll get a wild hair and decide to make the rest of the armor to go with it:

Plenty of other things to keep me busy in the meantime.
Stay tuned...
Like a samurai mask storm trooper.
ReplyDelete