
A few years back we made a handful of Starship Troopers Morita assault rifle replicas. They were pretty nifty:
But there were a few other weapons available in the Mobile Infantry's arsenals. Since I'm apparently on track to fit out an entire platoon of troopers, I'm going to need more different armaments.
So we cast another copy of the Morita assault rifle and hacked off the front end and the shotgun mag tube. I also trimmed off the shotgun barrel and the magazine nut from the muzzle piece and shortened the longitudinal trim pieces that slot into either side:

The next day I couldn't resist the urge to test the fit:

After that, this shiny pink prototype sat in the shop, hanging from a hook in the corner and largely forgotten for months. Then Andrew the Intern asked about how to make molds and we had a just right thing for him to learn on.
We started him out with a flat surface to mount it to, in this case a piece of MDF, then built up a layer of foam sheet. That built up the split to about the midline of the prototype. That's where we set up a scrap of ABS sheet trimmed to fit close around the prototype. Then he built up a layer of clay about 3/8" thick over the whole thing. Then I went ahead and added the needed ridges and registration keys before we have it all a generous coating of PVA release agent:

A couple days later we went ahead and layered over the whole thing with fiberglass:

Once that had cured, the whole thing was flipped over and the process was repeated on the other side. Then Andrew the Intern got to separate the two halves of the fiberglass mothermold. They prototype was left in one side's clay bed:

Andrew picked out the clay, smoothed the bottom half of the clay bed, and added registration keys:

Then the first half of the mothermold was bolted back in place and filled with silicone:

Once that cured, we flipped the mold over, removed the mothermold, and cleaned out the clay that was inside:

After spraying on a healthy coat of release agent, the mothermold was bolted back in place and filled with silicone:

The last then was to remove the lump of clay that was in the magazine well, cut a hole in the mothermold, spray in more release agent, and then fill the hole with silicone to create a plug:

The silicone was poured through a hole cut in the mothermold. You can see the plug here after we'd poured the first casting:

It's up and to the right of where I'm pointing. I don't know what I was pointing at there or why.
The little detail bits were mostly the same as the full-sized Morita assault rifle. We had to trim the side details and make new molds for those. We also made a new muzzle assembly without the shotgun barrel and magazine tube cap:

Here's two sets of parts dry fitted together:

Note the magazines are already painted and weathered because they were left over from an excess we'd made back when we made the full-sized assault rifle version.
After a bit of trimming and cleanup, the casts were primed:

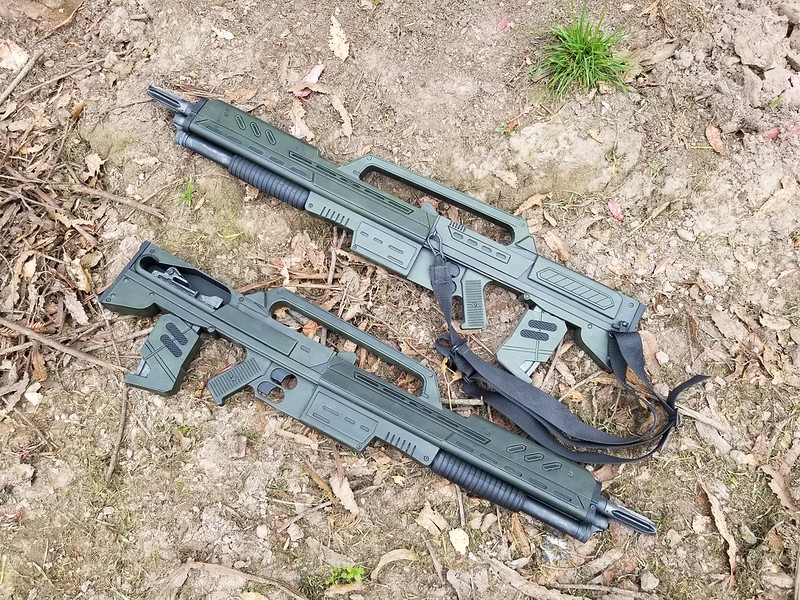
Then the body was painted with a dark green drab color from the Krylon camouflage line and the action and muzzle were painted with some dark metallic shade from Dupli-Color. Once the paint dried, everything was assembled, weathered, and ready for us to install a sling:


With these two done, I put one in the box with the rest of my Mobile Infantry costume. The other one gets to hang on the wall in my office until further notice:

Now it's time to get back to work on my prosthetic hand:

And there's always the M-55 Tactical Nuke Launcher:

The plan is to get a squad together in time for Wondercon in Anaheim at the end of this month.
Would you like to know more?
You're doing your part.
ReplyDeleteThese are amazing man always wanted one of these bad boys
ReplyDelete