
When I last posted about this project, I'd just done my first test fitting. But something was off:

And before too long there were even more parts:

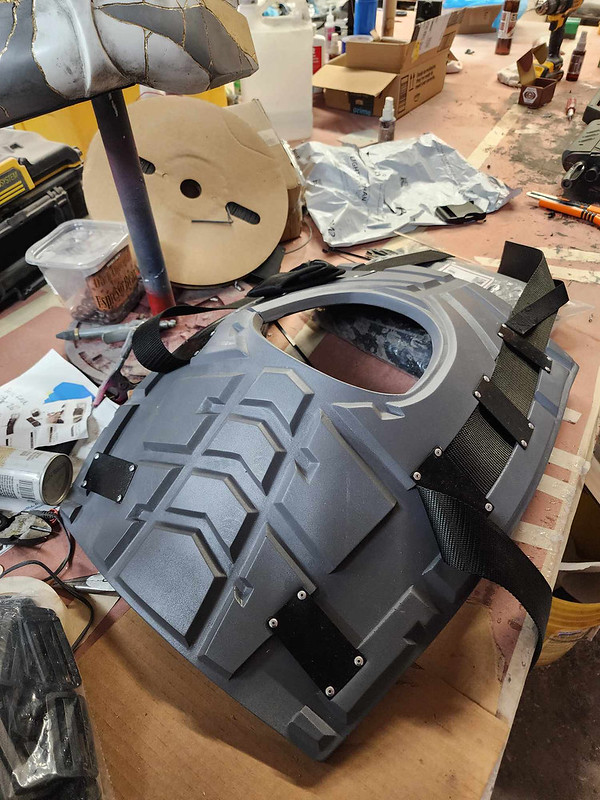
I also went ahead and had some laser cut and folded brackets made to go with the foam cast armor:

The first step in making the armor wearable was to paint all of the brackets with satin black spraypaint.
The next step was to trim all of the excess flashing and fabric backing off of the foam cast armor. This was slated to be a huge pain in the ass that was going to take me all damned day. Fortunately for me, I have the perfect tool to make this easy.
That tool is Jeff:
That tool is Jeff:

Once the excess was cut off, the next step was to use an old soldering iron to poke holes into the foam to make it easier to fit the rivets into place:

The holes were poked everywhere we'd need one of the steel bracket pieces riveted on. We used the brackets themselves as a template and marked the hole locations by poking a Sharpie through the bracket's holes, but I didn't take pictures of that step. You get it.
In the end, we had all these holes:

Most notably, we also used a sharp knife to cut these slots for the straps to pass through:

Then the parts got painted with the same custom-mixed shade of greay paint (color matched to Pantone 425c) that we used for the helmets:

Most notably, we also used a sharp knife to cut these slots for the straps to pass through:
Then the parts got painted with the same custom-mixed shade of greay paint (color matched to Pantone 425c) that we used for the helmets:
Then each hole got a dab of CA glue*, the metal strap keepers were placed, and a rivets were installed:

NOTE: On the screen-used armor the rivets passed all the way through and had a square washer on the inside for a better hold. We tried this a few times, but each time the rivet would pull the metal plate down into the foam, compressing the surface details and making it too tight to pass the straps underneath. After experimenting with a few different options, we ultimately decided that the rivets glued into the foam before popping them gave more than enough holding power. These plates are basically just belt loops that keep the straps in place, so it's not like they'll need to take any real strain.
The straps for the waist section were a little bit interesting. The upper horizontal strap passes through a cutout on either side of the belly:


Then the vertical straps go into a cutout on the lower end of the belly:

These vertical straps get glued down to the inside of the waist armor. This would be perfectly clear if Jeff hadn't strategically placed a bunch of stuff directly in the camera's line of sight:

Dammit, Jeff.
Dammit, Jeff.
OK, here's the glued bit inside the belly:

Once he had all of the keepers riveted in place and the waist straps installed, he went ahead and added the upper straps to the back plates. These also went through a cutout:

And both ends were glued into the inside of the armor, capturing the female end of the parachute buckles:

The horizontal straps were cast into the back piece so they were captured in the foam from the get-go.
So at this point, we had the straps installed on the backs and waists and strap keepers riveted onto the Shoulders:

To make the shoulders werable, we start by gluing the left shoulder seam:

NOTE: only the outer 2/3rds of the seam gets glued. The inner third is left unglued in order to make it easier to get the armor on and off over the wearer's head.
Here's the shoulder seam stucked:

Since this seam will take some strain and I'm not willing to trust the glue holding a foam-on-foam seam, the backside gets reinforced with a scrap of 2" nylon webbing:

Easy peasy:

Lemon squeezy:

For the little ration pouch that goes on the front left side of the chest, we bought these little guys LINK.
Since this seam will take some strain and I'm not willing to trust the glue holding a foam-on-foam seam, the backside gets reinforced with a scrap of 2" nylon webbing:
Easy peasy:
Lemon squeezy:
For the little ration pouch that goes on the front left side of the chest, we bought these little guys LINK.
They're not perfectly accurate, but they fill the hole where they go:
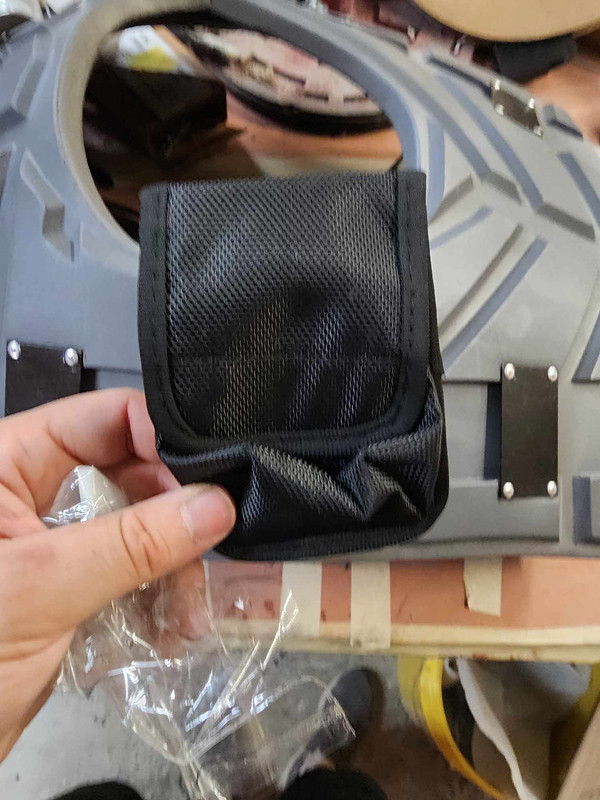
Problem is, these are set up with MOLLE system straps and the Starship Troopers gear was originally made before MOLLE gear was really in use. So the backside has this strap arrangement:

Since it won't line up with the straps on the shoulder, we simply remove the vertical strap:

Then, after we rip the stitches that hold down the horizontal straps, the pouch is good to go:

To rig the chest, we thread the nylon webbing under the keepers and through the pouch straps:

Then under the rest of the keepers:
Before we thread through the last pair of keepers on the back, we slip on one of these tri-glide strap adjusters:

Then thread it the rest of the way:

There's no tri-glides on the front side of the chest straps. No idea why, but that's the way they were in the movie:

With the straps fed through, we install the male end of the parachute buckles on each end of the straps:

Then feed the leftover tails back under the strap keepers:

In the back, they get threaded through the tri-glides again:

but in the front they just get tucked back into the keepers:


Then everything is all neat and tidy:

With that done, it was just a matter of buckling everything together and adjusting the straps for fit. Here I am trying on a set of the armor before we'd trimmed excess length off of the vertical waist straps:

Aside from still needing to tuck in the strap ends, everything looked pretty good:

Here's a set on a mannequin while the rest were being rigged:

The neck ring was purchased from Katarra8 on ebay: LINK
For the helmets, the edges were trimmed off of the raw casts, the mold flashing was sanded off, and they were primed and painted. Then we glued in the cheek parts:

And the ear bits:

Forgot to mention, I drilled a hole through the rubber cheek bit and installed a snap using a rivet since they don't make snaps with shafts long enough to go all the way through this chunk of rubber:

The only really tricky part of the helmet to put together is the chin strap. It comes in two laser cut pieces, a leather outer part and a foam inner pad:

Since we were cutting things on the laser cutter, we maked a bunch of them:

And the ear bits:
Forgot to mention, I drilled a hole through the rubber cheek bit and installed a snap using a rivet since they don't make snaps with shafts long enough to go all the way through this chunk of rubber:
The only really tricky part of the helmet to put together is the chin strap. It comes in two laser cut pieces, a leather outer part and a foam inner pad:
Since we were cutting things on the laser cutter, we maked a bunch of them:
To build a chin strap, we start by gluing together the ends of the foam bit with a tiny bit of CA glue like so:

Then butt the vertical part up against the edge like so:

And then we have us a foam chin cup:

Then, we use contact cement to cover it with the leather like so:

Finally, the center piece is glued in place on top to finish it off:

And that there is a chin strap:

All that's left to do is thread the ends onto the snaps like these: LINK

And just like that, the thing is done:

We got three of these kits together in time for Rose City Comic Con in Portland, Oregon earlier this month:

Folks seemed to like them:

The best part about this costume is it's versatility for comfort's sake. We ended up wearing the armor with and without the jackets, and also the uniform without the armor. The whole thing is lightweight and reasonably comfortable and everybody we ran into seemed to get a kick out of it.
Naturally, we didn't get enough pictures, so we'll have to put together a bigger squad for another outing. But we did get this winner:

Stay tuned for more and better photos whenever I get around to that.
*"CA glue" is CyanoAcrylate glue, or basically superglue. I once had someone who read one of my writeups ask me where to buy "California glue" and all I could tell him was "go West, young man." It wasn't until days later that it occurred to me I was being kind of a jerk and no kind of help. You can get youself a nifty taste tester** kit of the brand of CA glue I use here: LINK
**It's not actually a taste tester. Don't taste the glue. Don't sniff it either. You won't like it.