
This is Part 3 of the T-60 build. Part 1 "Determining Scale" is here: LINK. Part 2 "Prototyping with Carvewright" is here: LINK.
Now if you'd like more details on how I turned a big pile of sawdust, bondo, plastic, and garbage like this:
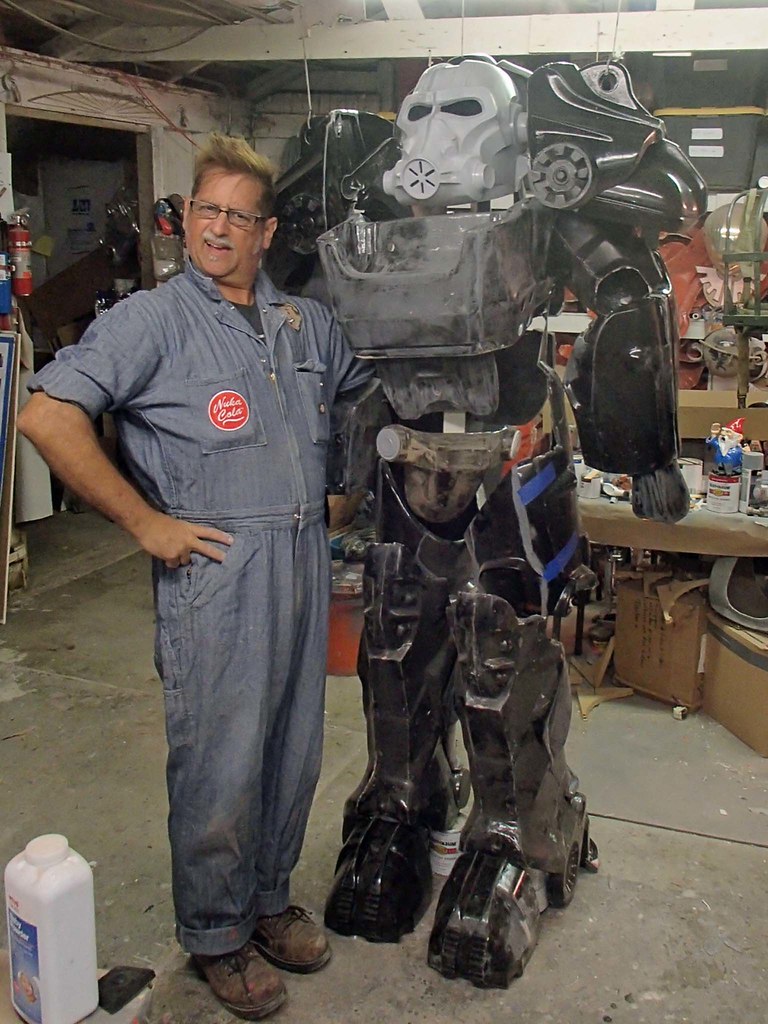
Into a lightweight, durable, wearable work of art like this:

Once the carved parts from the Carvewright were all assembled, smoothed, painted, and polished, they were ready to mold. As an example, here's the butt plate:

I'm not exactly sure why, but for some reason for this project and several others since this one, I've decided to start by molding it butt first. So that's a thing you know about me now.
Now it was a matter of deciding what material to make the costume parts out of. As you can imagine, the carved wood parts are really heavy and because I made them from MDF, they're not particularly sturdy either. If the shapes were simpler, I could have vacformed them in high-impact styrene or ABS plastic like I did with my Space Marines and Sororitas armor, but the many undercuts and occasional small details made that a bad idea. Fortunately, the surfaces weren't so covered with details that I would have to make expensive rubber molds and cast the armor in similarly expensive urethane resin like I did with my HALO armor.
In order to make durable, lightweight parts, I opted to go with fiberglass. Making the parts is more labor-intensive than vacforming or resin casting, but the materials are relatively inexpensive (especially when buying in bulk) and the finished product is significantly more sturdy than either of those other options.

Stay tuned...
I'm not exactly sure why, but for some reason for this project and several others since this one, I've decided to start by molding it butt first. So that's a thing you know about me now.
Now it was a matter of deciding what material to make the costume parts out of. As you can imagine, the carved wood parts are really heavy and because I made them from MDF, they're not particularly sturdy either. If the shapes were simpler, I could have vacformed them in high-impact styrene or ABS plastic like I did with my Space Marines and Sororitas armor, but the many undercuts and occasional small details made that a bad idea. Fortunately, the surfaces weren't so covered with details that I would have to make expensive rubber molds and cast the armor in similarly expensive urethane resin like I did with my HALO armor.
In order to make durable, lightweight parts, I opted to go with fiberglass. Making the parts is more labor-intensive than vacforming or resin casting, but the materials are relatively inexpensive (especially when buying in bulk) and the finished product is significantly more sturdy than either of those other options.
Fiberglass is what's called a "composite" material. This means it's made up of a combination of lesser materials. In this case I'm using a polyester resin and a thin mat made of pressed together glass fibers. The resin by itself is brittle and tends to fail in tension. The glass is very flexible but doesn't resist compression. By combining the two of them together we get the best of both worlds. You can think of the glass fibers like the rebar in concrete construction. It's just a question of making sure the materials work together optimally for the strongest, lightest possible part.
The fun but occasionally challenging part about this process is that the molds and the parts are made of the same rigid composite material. This means that you have to plan for a way to get the parts out of the mold and coat them with a release agent to prevent the parts from sticking together when they're laid up. Here's how...
In order to minimize the chance of the mold sticking to the prototype (aka "master" or "model" depending who you ask) you need to make it as smooth as possible. I usually achieve this by putting a couple layers of gloss lightish red paint on the finished part. Once it's dried, the parts get wet sanded in stages starting at 220-grit and finishing at at least 600-grit (but usually 1500-grit). Then, the baby soft, smooth parts get three coats of PVA release wax, each buffed to a nice shine. The end result is a piece that's very hard to stick things to.
Then it's on to molding.
Then it's on to molding.
The first step in making the mold is building a margin area beyond the edges of the part. This starts with mounting the part to cardboard using a hot glue gun. Here you can see the pair of hand plates with the cardboard added to their backsides:

Next, I use cheap plasticene modelling clay to build the margins up to the edges of the parts. Here you can see me building up the edges of the front plate for a thigh:
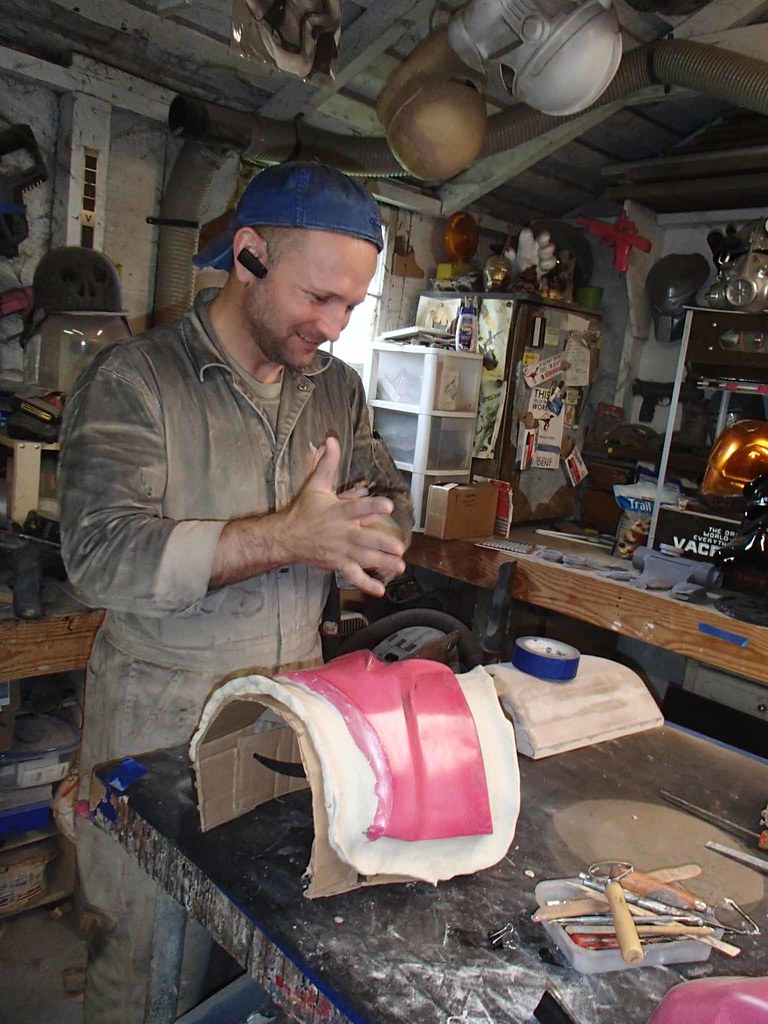
In order to give the mold a bit more rigidity, and to help with the de-molding process later, it helps if these edges curve out and away from the edges of the prototype. You'll notice the ski-jump profile visible in the top edge of the above image.
For parts that have undercuts that will lock the mold onto the parts, the molds have to be made in multiple pieces. This means I have to make a mold flange where the two (or more) parts of the mold will separate. Here you can see an inner shoulder plate (right) and a handplate (left) with the parting lines built up in clay:

NOTE: the clay parting walls were built on top of a strip of painter's tape to make it easier to remove the clay later without having a big mess of clay schmoo residue left behind on the part.
Next, I use cheap plasticene modelling clay to build the margins up to the edges of the parts. Here you can see me building up the edges of the front plate for a thigh:
In order to give the mold a bit more rigidity, and to help with the de-molding process later, it helps if these edges curve out and away from the edges of the prototype. You'll notice the ski-jump profile visible in the top edge of the above image.
For parts that have undercuts that will lock the mold onto the parts, the molds have to be made in multiple pieces. This means I have to make a mold flange where the two (or more) parts of the mold will separate. Here you can see an inner shoulder plate (right) and a handplate (left) with the parting lines built up in clay:
NOTE: the clay parting walls were built on top of a strip of painter's tape to make it easier to remove the clay later without having a big mess of clay schmoo residue left behind on the part.
Once the margins are built and any parting walls are set up, the whole part gets layered over with a generous coat of Poly Vinyl Alcohol (PVA) release agent. This is a green liquid that can be brushed or sprayed onto the surface. When it dries, it creates a thin film much like a form-fitting sheet of cellophane. This provides a barrier between the part and the mold so they don't bond together.
WARNING: up to this point, this whole process has been relatively safe. Once you get to the gelcoat and fiberglass steps, everything about this project is trying to kill you. The resin gives off horrible stinky fumes that are all kinds of toxic and have numerous long-term health risks. Wear a respirator and gloves and minimize your exposure to it by working in a well-ventilated area. If you don't want to invest in a proper respirator to protect yourself, I suppose it's your funeral and you can get there however you want to.
Also, don't wear clothes or shoes you care about during this process. You're almost guaranteed to ruin them.


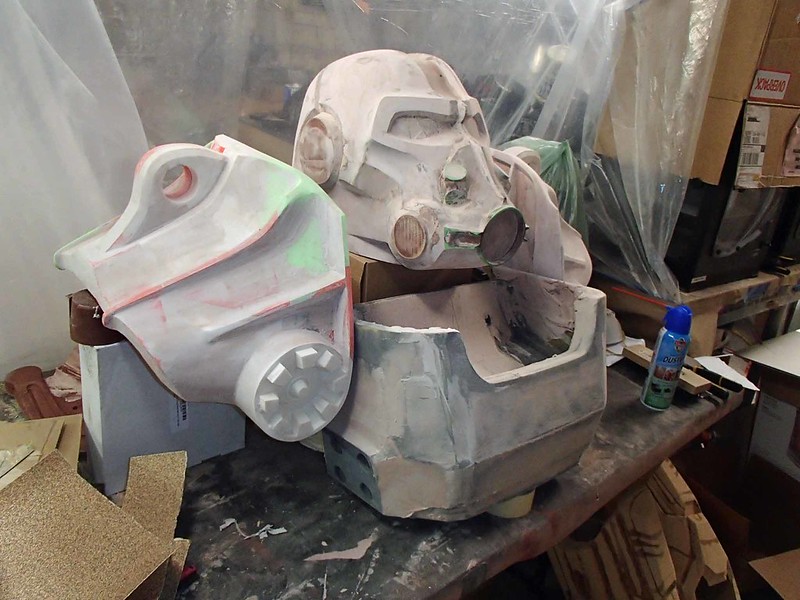
Eventually, we had a complete set of parts all taped together and taking shape:
Lewis for scale.
While that was all fun and games, there were still a metric butt ton of little detail parts and big rubber parts that needed to be prototyped, prepped, molded, cast, and added on before painting and rigging.
But that's a blog entry for another day.
Also, don't wear clothes or shoes you care about during this process. You're almost guaranteed to ruin them.
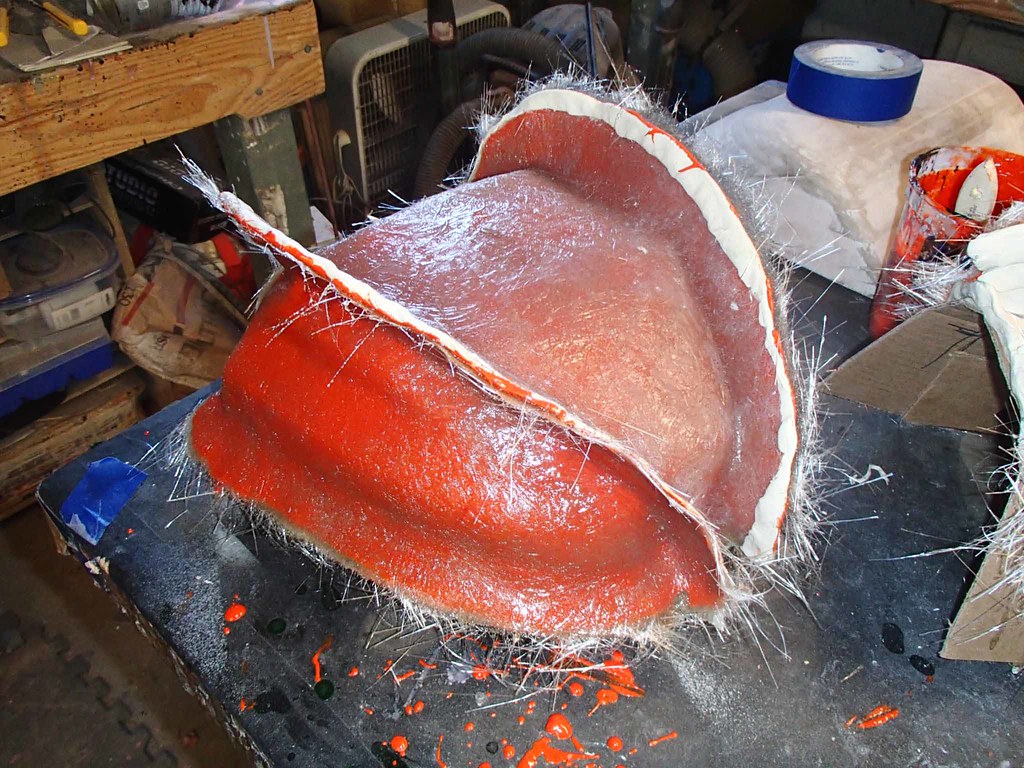
Back on topic: once the PVA has dried, the next step is a nice thick layer of orange tooling gelcoat:

Gelcoat is a liquid that hardens to form a thick, protective layer over the surface. Usually this is the outer layer that you see on a boat or other fiberglass object. Gelcoats protect the surface from scratches, ultraviolet sun damage, and moisture damage known as "hydrolysis", while also adding a shiny, smooth finish. Unlike the gelcoat that will be used later on in the building of the final parts, tooling gelcoat is formulated to hold up to the extra heat and stresses involved in the repeated molding of parts.
Once the gelcoat has cured solid, the next step is to lay up the fiberglass composite on top of it. For these relatively small, curvy shapes, I'll lay up at least three layers of 3/4-oz. fiberglass mat. I don't usually use cloth because it's tricky to get it to conform to compound curves without cutting lots and lots of tiny little pieces of cloth. The mat has the added advantage of being easy to tear by hand, so I can just have the roll hanging within handy reach of my work area and tear off patches as I need them.
I start by mixing a pint of the polyester resin. I find that this is typically about as much as I can comfortably work through before the resin starts to gel in the cup and turn into garbage. You can speed up or slow down the cure time by adjusting the amount of catalyst added to the mix, but this can also cause problems for the final part later on.
The key thing is to pay attention to the manufacturer's instructions when it comes to mixing and measuring. Anybody who tells you you can "eyeball it" is either so massively experienced that they no longer know how to properly teach a noob or so completely inexperienced that they'll never be able to explain why their parts don't cure properly. In either case, it's still a good idea to measure out your components for predictable results.
Once mixed, I start by brushing a layer of resin over the gelcoat to wet the entire surface. Then, I tear a patch of mat off of the roll, crumple it into a ball to loosen up the fibers a bit, and lay it into the wet resin. Then, using the chip brush, I press the fiber into the resin and add more resin on top. I also use the brush to force out any trapped bubbles and ensure the mat is saturated with resin throughout. This process is repeated until the whole surface has an even layer of wetted, bubble-free fiberglass mat. Once I'm sure that the whole surface is covered and there is no excess resin, I lay up two more layers on the surface in the same manner.
At this stage it's easy to lose track of which areas are already covered as the layers start to blend into each other. If in doubt, I'll just add another layer on top. Then, just to be sure there's plenty of strength, I'll add an additional layer over the edges and any mold flanges to help them hold up to any prying that I'll have to do later.
Here's the first half of one of the lower shoulder plates with the fiberglass laid up:

For simple shapes without undercuts, I was able to get away with one-part molds. There weren't a lot of those on this build. In fact, the only one that comes to mind is the belly plate that hangs off of the chest box:
Here's the first half of one of the lower shoulder plates with the fiberglass laid up:
For simple shapes without undercuts, I was able to get away with one-part molds. There weren't a lot of those on this build. In fact, the only one that comes to mind is the belly plate that hangs off of the chest box:
Most were at least two pieces. The big shoulder plates were done in six sections with a silicone rubber insert for the lug detail on the front. Here's a snapshot of that abomination in the first gelcoat stage:
Once the first section(s) of the mold have cured, the clay parting walls are removed and the next section is given a heavy coat of PVA release agent.
Then the next mold section is laid up right alongside it. Here you can see the buttplate mold in progress:
In the case of the buttplate, I laid up the fiberglass for the middle section first, then did the side sections after that had cured.
Once the final section of each mold had cured, a series of bold holes was drilled into the flanges and then the mold sections were pried off of the prototypes. Here's the lower shoulder plate mold after the prototype had been removed and most of the clay was cleaned off of the margins:

The next step was to scrub off all of the clay and residual PVA layer that was left behind. Then the interior of the mold had to be sanded and polished just like the outside of the prototypes was. Again, the key here is to make the smoothest possible surface to prevent the mold from sticking to the fiberglass part that will be laid up inside of it. So after wet sanding to at least 800-grit (and usually 1500-grit unless I was being especially impatient) each section of the mold was given three coats of paste release wax and buffed to a shine. Then each section was coated with PVA and allowed to dry before being bolted back together.
Here's the inside of the buttplate mold once it was cleaned, polished, and bolted back together:

Here's the outside of the lower shoulder mold:
In the case of the buttplate, I laid up the fiberglass for the middle section first, then did the side sections after that had cured.
Once the final section of each mold had cured, a series of bold holes was drilled into the flanges and then the mold sections were pried off of the prototypes. Here's the lower shoulder plate mold after the prototype had been removed and most of the clay was cleaned off of the margins:
The next step was to scrub off all of the clay and residual PVA layer that was left behind. Then the interior of the mold had to be sanded and polished just like the outside of the prototypes was. Again, the key here is to make the smoothest possible surface to prevent the mold from sticking to the fiberglass part that will be laid up inside of it. So after wet sanding to at least 800-grit (and usually 1500-grit unless I was being especially impatient) each section of the mold was given three coats of paste release wax and buffed to a shine. Then each section was coated with PVA and allowed to dry before being bolted back together.
Here's the inside of the buttplate mold once it was cleaned, polished, and bolted back together:
Here's the outside of the lower shoulder mold:
NOTE: I've gotten into the habit of labelling my fiberglass molds with a Sharpie. This way I have an easier time figuring out which pile of orange mold shells they belong in when I'm rearranging my shop clutter.
The part layup process is exactly the same as the mold layup process. It starts with a layer of gelcoat:

The gelcoat layer can be any color you like. I tend to choose a color that will be the least noticeable in the event that the final paintjob gets scratched. If you have a choice, it's also a good idea to choose something that will contrast as much as possible against the orange tooling gelcoat so you'll know if you missed any spots with the gelcoat layer.
Fiberglass layup for the part was also done exactly the same as the mold, but with extra care taken to keep track of how much area was covered with each layer. Extra thickness isn't the end of the world, but it does mean carrying around more weight in the final costume. So the lighter the better. Here's the lower shoulder plate laid up and curing:

Once the fiberglass has cured, the bolts are removed from the molds and the sections are pried apart. Here's the rough trimmed buttplate after it was demolded:

The gelcoat layer can be any color you like. I tend to choose a color that will be the least noticeable in the event that the final paintjob gets scratched. If you have a choice, it's also a good idea to choose something that will contrast as much as possible against the orange tooling gelcoat so you'll know if you missed any spots with the gelcoat layer.
Fiberglass layup for the part was also done exactly the same as the mold, but with extra care taken to keep track of how much area was covered with each layer. Extra thickness isn't the end of the world, but it does mean carrying around more weight in the final costume. So the lighter the better. Here's the lower shoulder plate laid up and curing:
Once the fiberglass has cured, the bolts are removed from the molds and the sections are pried apart. Here's the rough trimmed buttplate after it was demolded:
This rock hard black plastic butt was the first fiberglass part out of the molds for this project. Because my child brain thought it was funny. You're welcome.
This process was repeated process for all the other parts:

While this project was in full swing, mold polishing took up quite a lot of time and space:

Then the parts started taking up a lot of space too:


Meanwhile, the prototypes were starting to form a bit of a heap in the corner, so we decided to tack them all together:

This process was repeated process for all the other parts:
While this project was in full swing, mold polishing took up quite a lot of time and space:
Then the parts started taking up a lot of space too:
Meanwhile, the prototypes were starting to form a bit of a heap in the corner, so we decided to tack them all together:
While there was no practical reason to keep them around, the assembled stack of parts made for a nice, big, pink scarecrow to stand next to the entrance to the shop:

Eventually, we had a complete set of parts all taped together and taking shape:
Lewis for scale.
While that was all fun and games, there were still a metric butt ton of little detail parts and big rubber parts that needed to be prototyped, prepped, molded, cast, and added on before painting and rigging.
But that's a blog entry for another day.
Stay tuned...
Shawn, another fantastic article and a great read, thank you. I draw a lot of inspiration from your work and I have recently been in two-minds regarding the use of fibre-glass as the main structural component of a completed project, and you have sold me. I now have a strong urge to experiment with my new-found insight, so, spot-on, mate. Keep 'em coming!
ReplyDeleteFiberglass was just what the doctor ordered for this build. It's also what I'm using for most of my First Order stormtrooper and TIE pilot armor parts. Most Star Wars cosplayers I've mentioned it to get really weird about it and claim it's too heavy. My Phasma armor is only about three pounds heavier than the very thin vacformed ABS plastic armor folks normally troop in, so I figure there must be some maker out there who's making ridiculously thick fiberglass parts that must weigh a ton. Done right, you get much sturdier parts with only a tiny increase in weight.
DeleteMost of the time the extra strength is unnecessary. But on the flip side, if you need even stronger structural elements, you can just lay up a bit more material where you need it.