
"Build a better mousetrap, and the world will beat a path to your door."
-Ralph Waldo Emerson
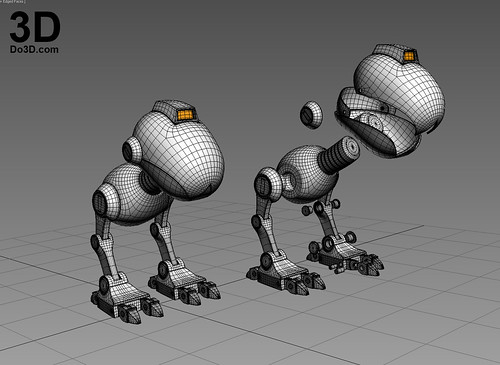
A few years back I began contemplating building myself one of these guys:

For those of you who don't recognize them, these are the vicious, ankle-biting little robots developed by the mad scientist Baxter Stockman* in the Teenage Mutant Ninja Turtles comics, cartoons, video games, and so on. Originally developed to hunt down sewer rats (not mice, oddly), they were soon repurposed for boring into bank vaults and a variety of other criminal endeavors. These guys often ran across the sewer-dwelling ninja turtles and caused all manner of damage.
I've always thought they were adorable.
Since I had a few minutes where my rapid-prototyping machinery was idle, I contacted my friends at Do3D.com and asked them to make me some STL files based on this character design. As usual, they did not disappoint:
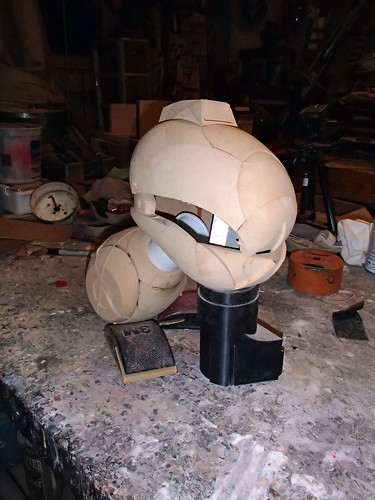
The prototypes were split between 3D printed and CNC carved parts. Here's the beginning of the head coming out of my Carvewright CNC machine:
The head, jaw, and main body were all carved out on the Carvewright. Then the slices were reassembled. Here's how they looked at that point:
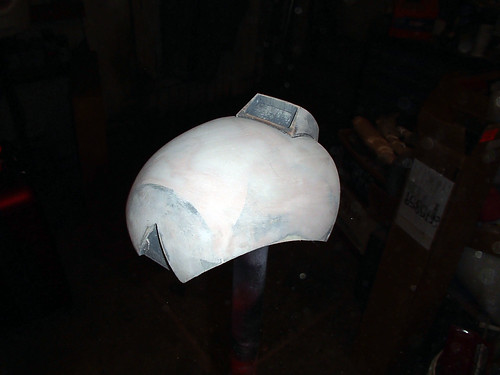
The next step was just a bit of sanding to smooth out the various seams between the slices:
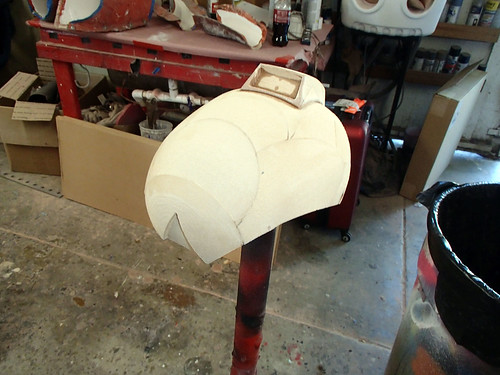
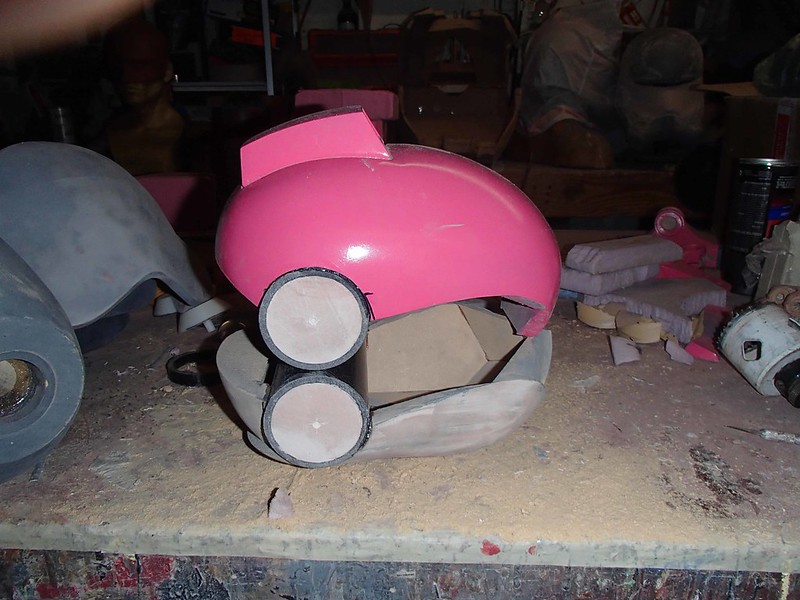
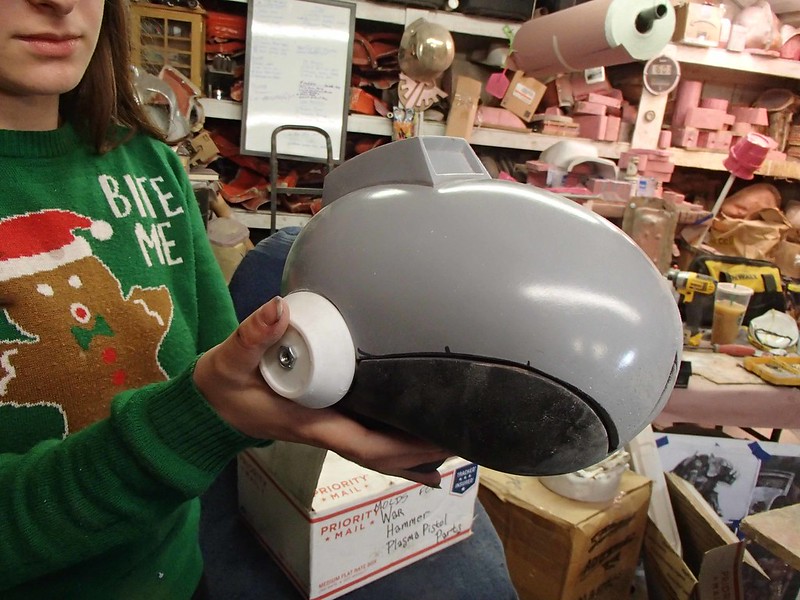
With a little Bondo, primer, and a lot more sanding, they were starting to look pretty good:
Here it is on top of the lower jaw/head part:
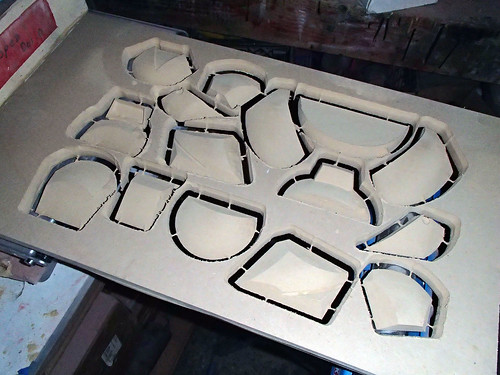
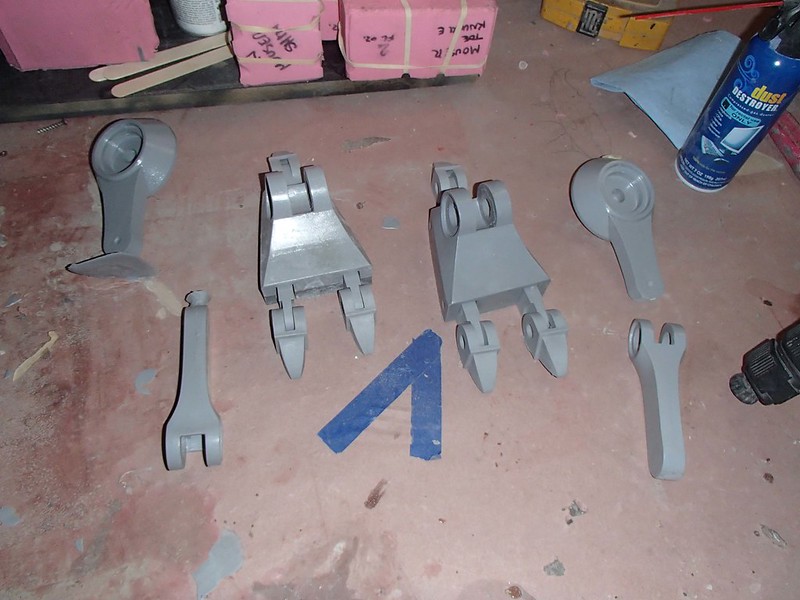
The leg and feet prototypes were all 3D printed:
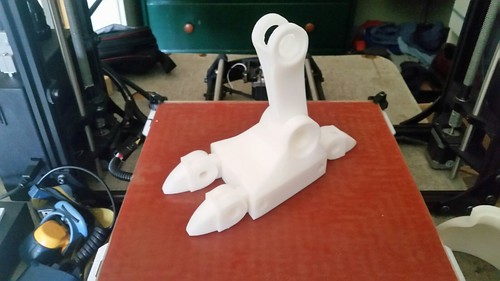
Of course, those parts also needed sanding and filling in order to smooth out the build lines:
Here's all of the leg, foot, and toe parts in primer:
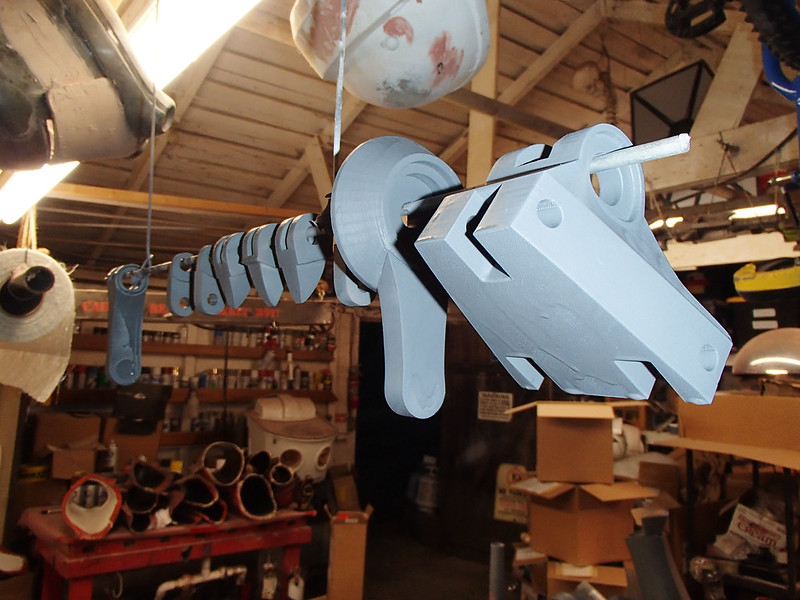
As often happens with my little hobby projects, all of the parts were set in a box and forgotten on a shelf collecting dust for longer than I care to think about. Two or three years later, when I was completely overwhelmed with other projects that needed my attention, I decided to get more overwhelmed and pick this project back up.
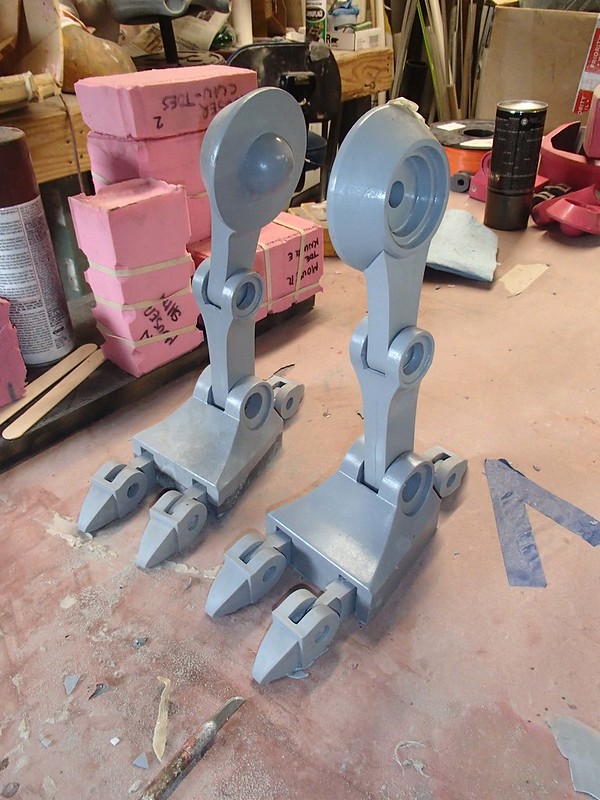
Since the feet, toes, and legs are interchangeable from left to right, I made a simple block mold of each piece and cast matched pairs of them all:
So far so good:
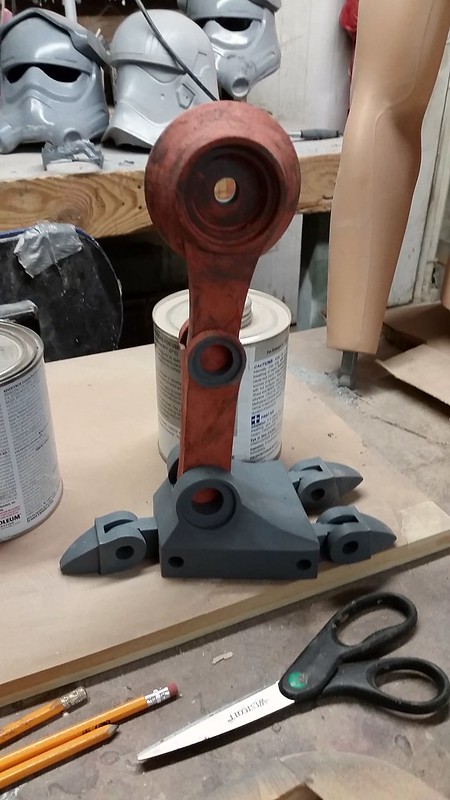
With the leg parts put together, I got back to work on the head. The first problem with the 3D models I was using was that there was no good provision for bolting together the head, jaw, and ear caps. So I started by adding a piece of pipe to make the basis for a hinge:
A similar piece was added to the jaw, but with a little less length so it would fit inside the head piece:
This will make sense later.
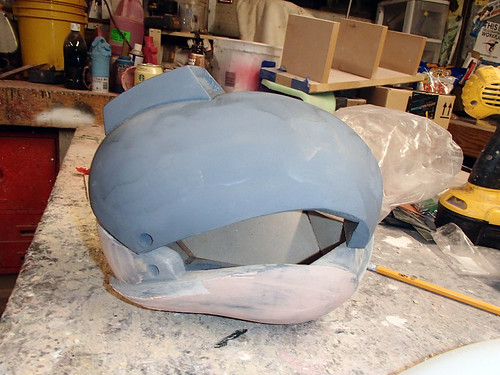
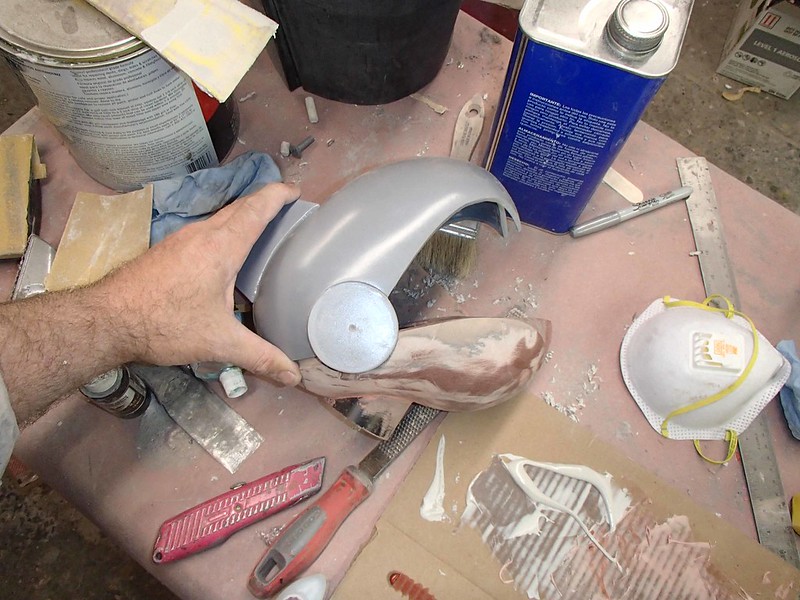
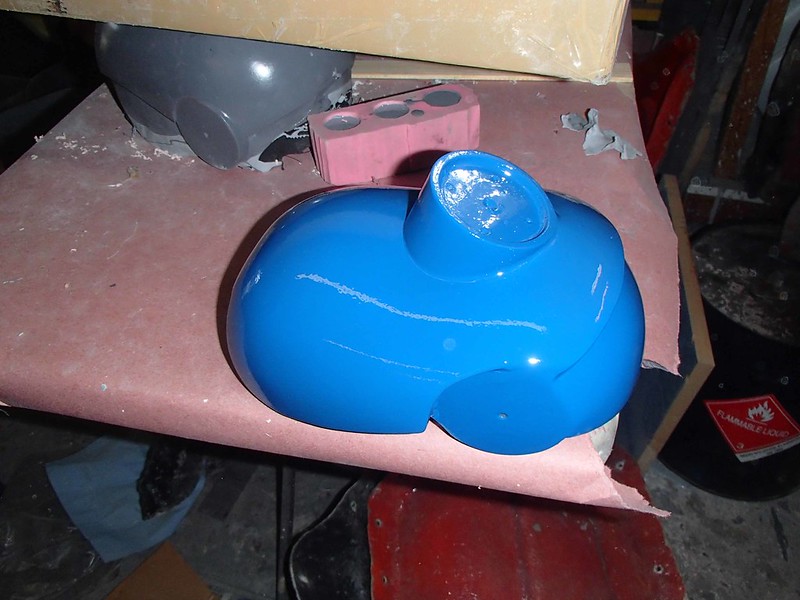
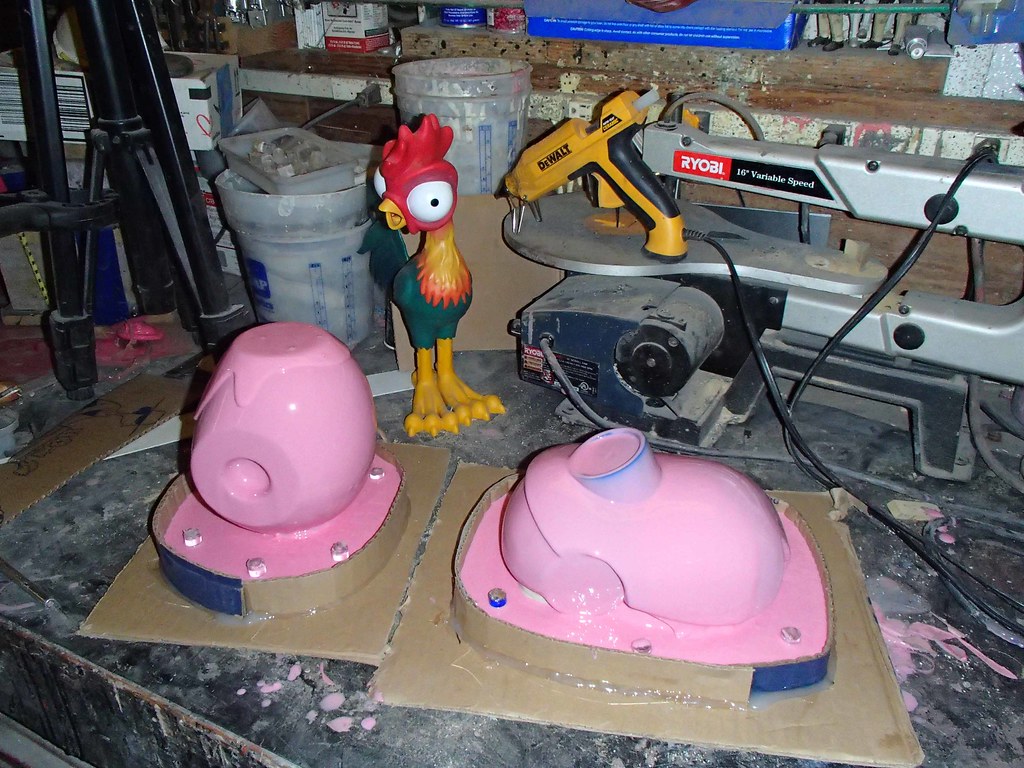
But for now, I had to make the parts weigh a lot less than the carved MDF pieces I had on hand. So after a bit more sanding, filling, and painting, it was all shiny and ready to mold:
The head was molded in silicone. Since this project was done a few years ago before I discovered the amazing effort saving process of matrix molding, so it was done the old way. Look upon this process and remember it fondly, for you shall not look upon its like again.
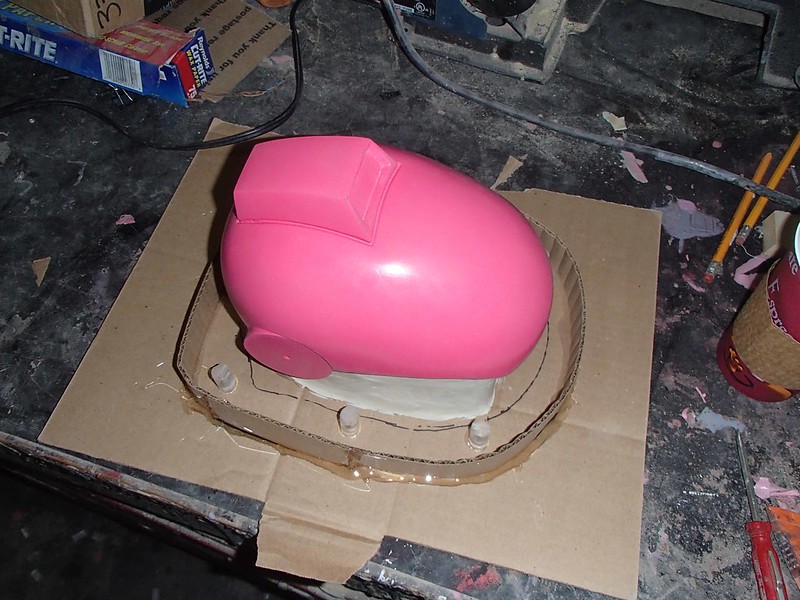
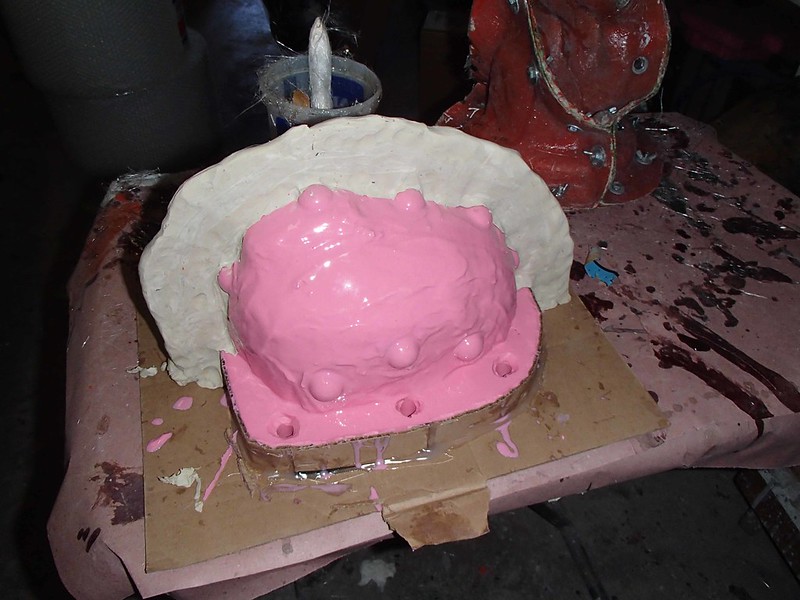
I started by mounting it to cardboard and building a cardboard drip wall, then mounting a series of acrylic rod scraps in the margin:
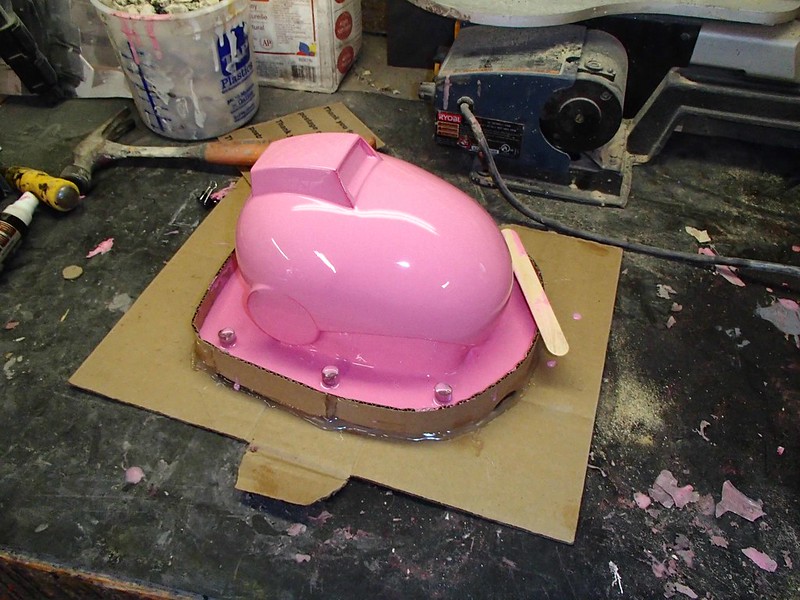
Then I poured on a print coat in silicone rubber:
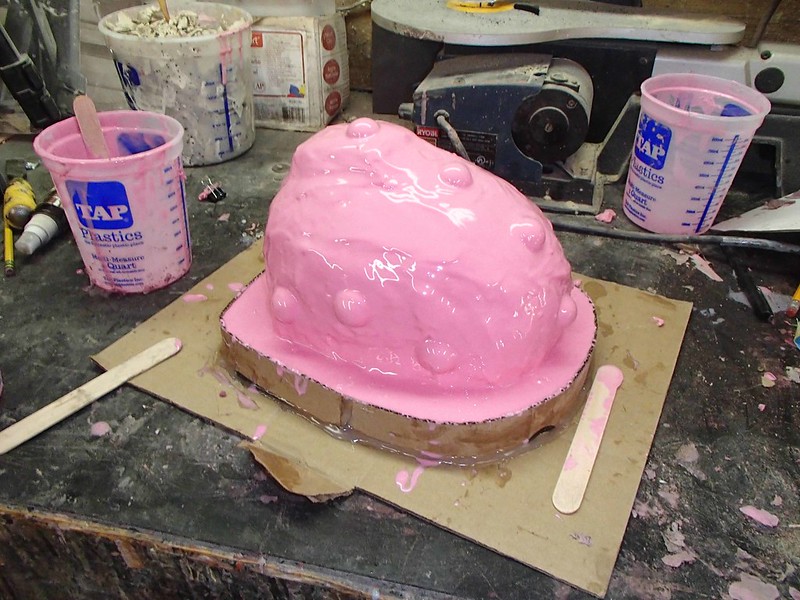
Once that had set up, I built up a few more layers of thickened silicone until the rubber jacket was about 1/2" thick. Then I added some silicone registration keys:
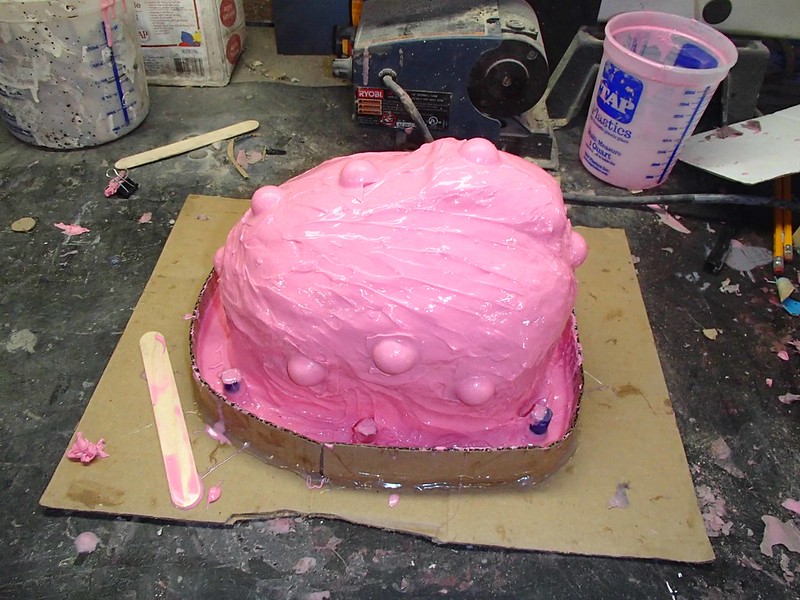
Finally, the whole thing was coated with a thin layer of silicone to smooth it out:
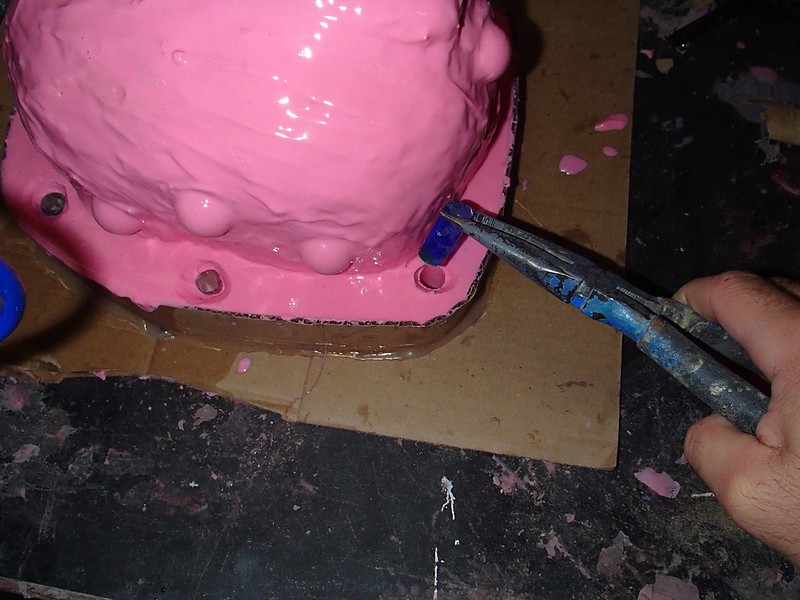
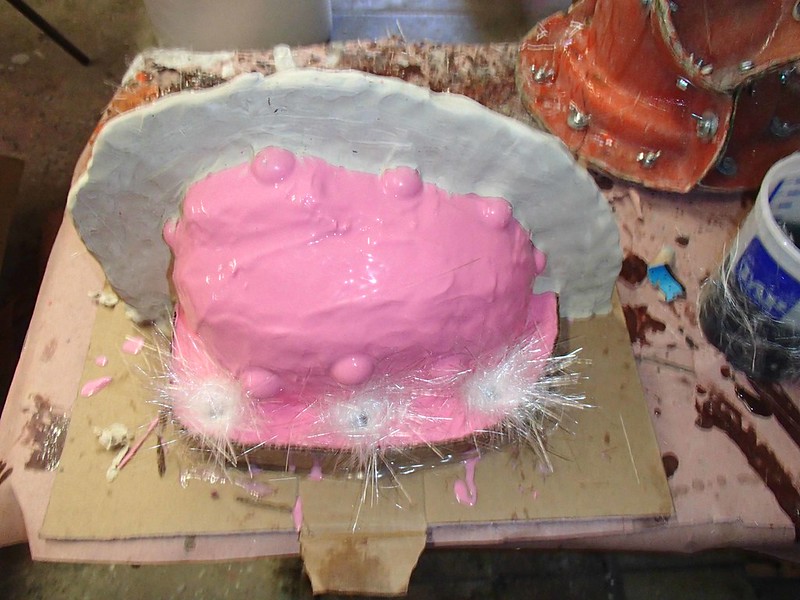
When the silicone had solidified, I cut out the portions that were covering the acrylic rods:
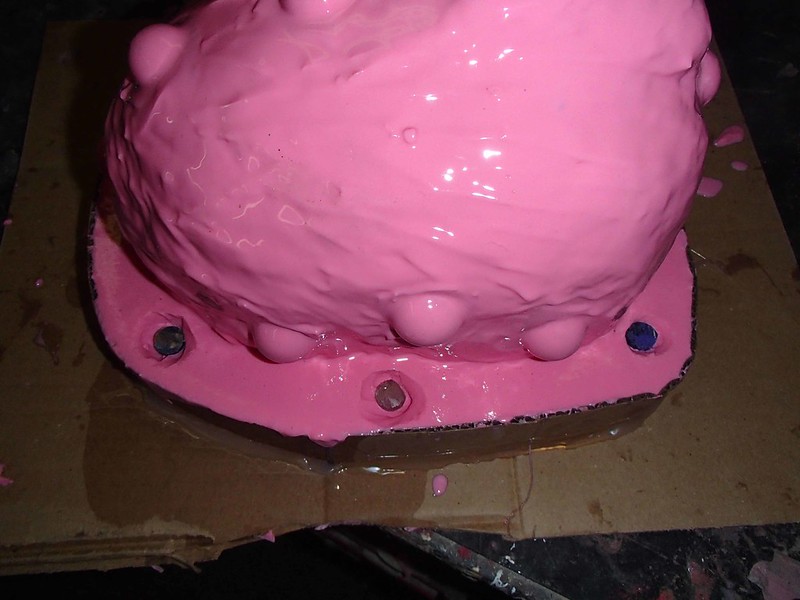
Then I plucked out each of the rods with a pair of pliers:
The next step was to build a clay wall over the top of the silicone rubber jacket:
This would form the flange where the two halves of the mothermold would bolt together.
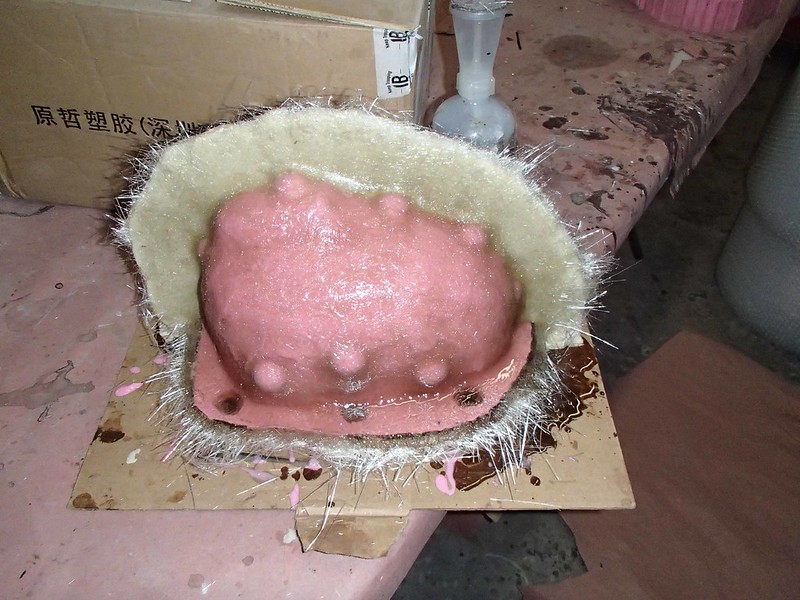
The mothermold was fiberglass. I started by pushing some loose fibers into the peg holes:
Then laid up the mothermold with three layers of fiberglass mat:
Once that had cured, I removed the clay wall, smeared the flange with petroleum jelly, and laid up the second half:
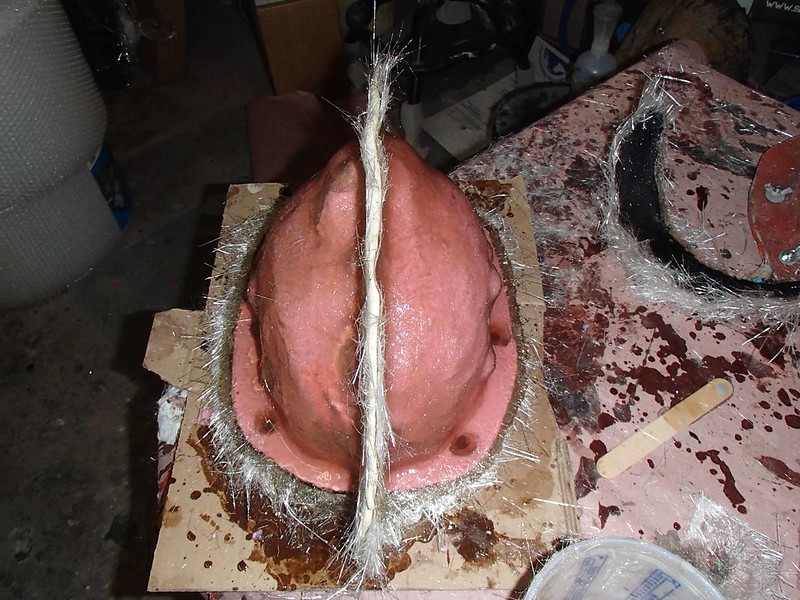
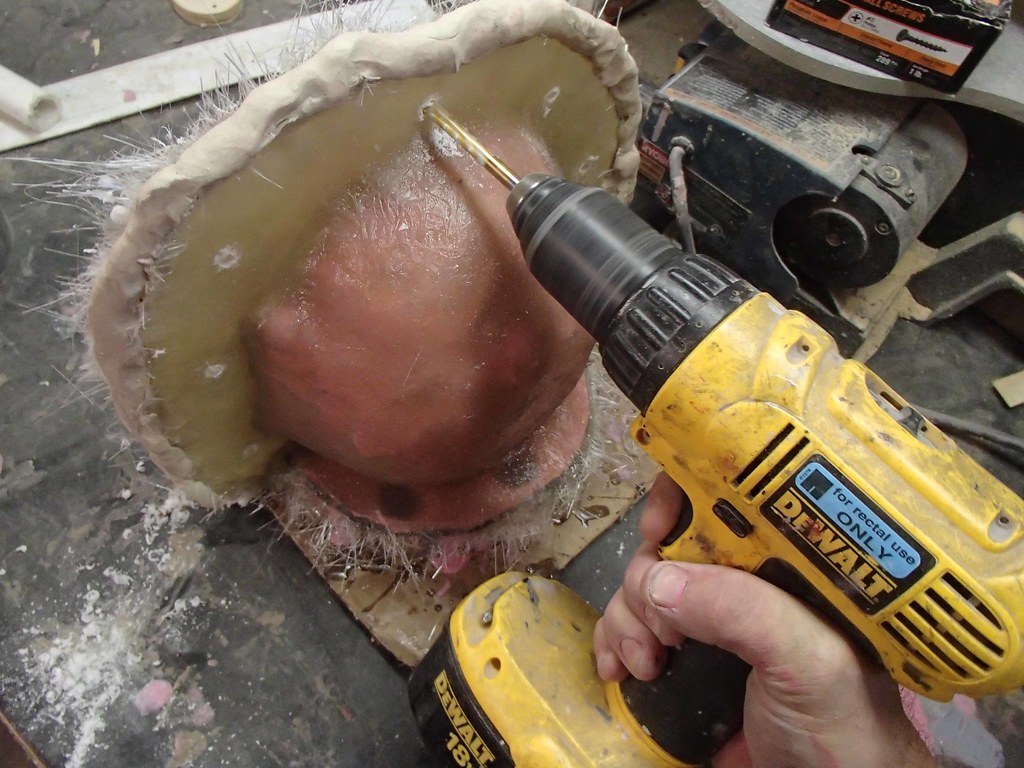
When that had cured, it was time to drill holes along the flange, then pry it off of the mold:
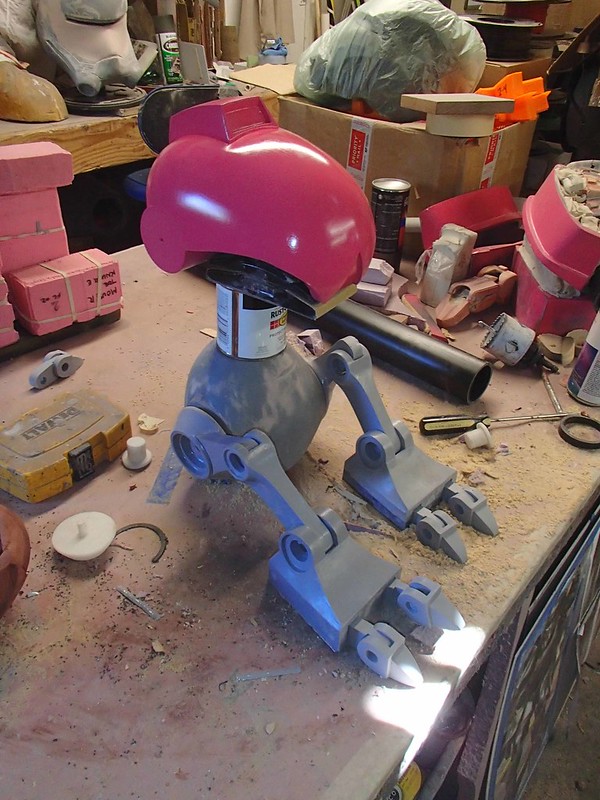
After demolding the prototype, I rotocast a quick copy in urethane resin. Here it is fitted onto the other prototype parts in progress:
A quick mockup with the other parts and things were starting to really take shape:
So far so good.
Since I only cast the ends of the round hinge part, it gave me enough clearance for the lower jaw to fit inside as planned:
Then I printed new ear cap prototypes:
Finally, I added a piece of pipe to the bottom of the jaw to give me something to attach the neck to:
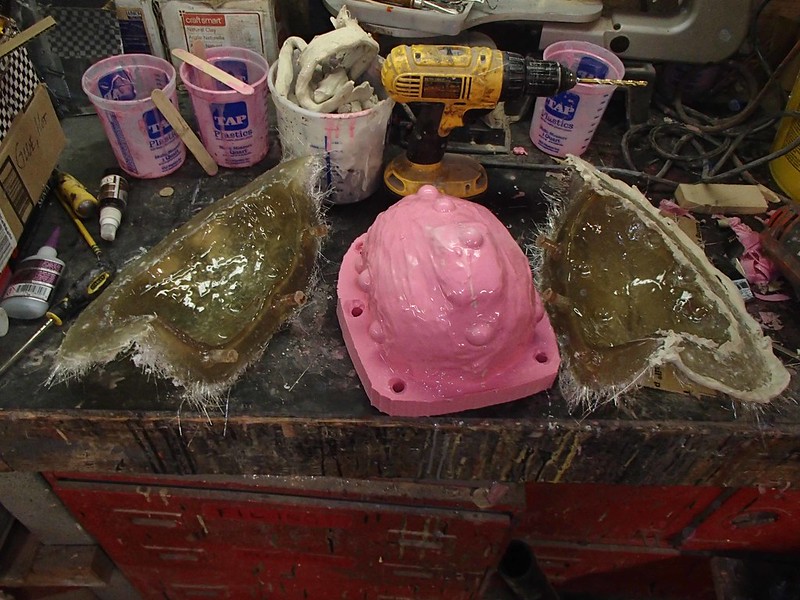
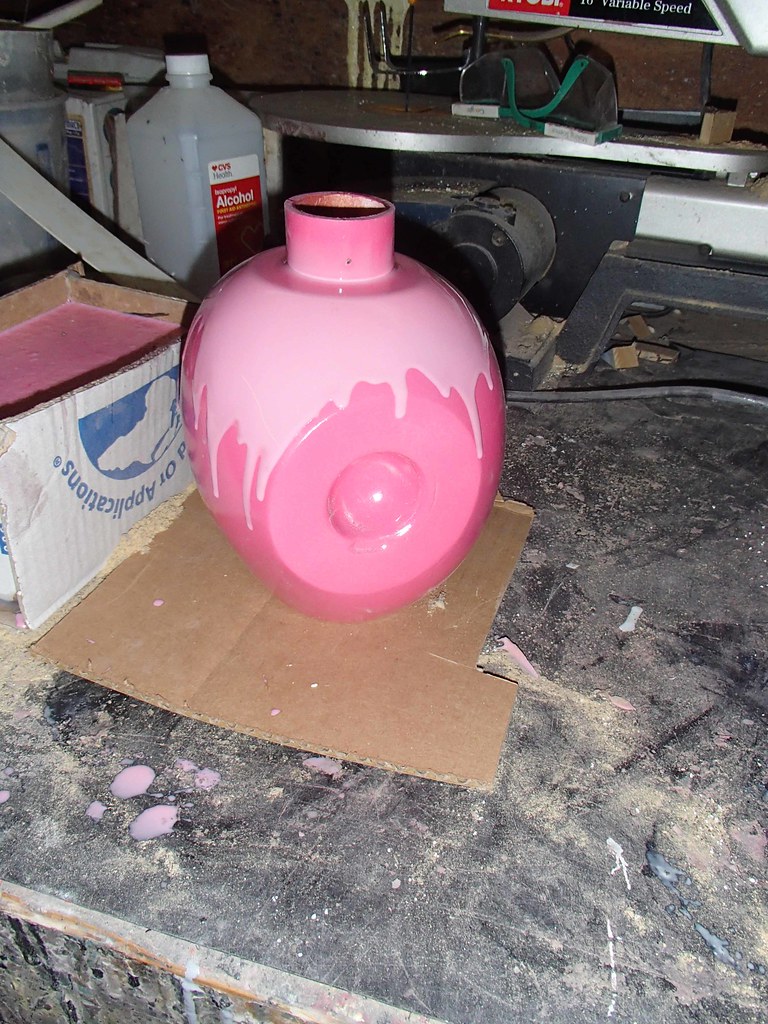
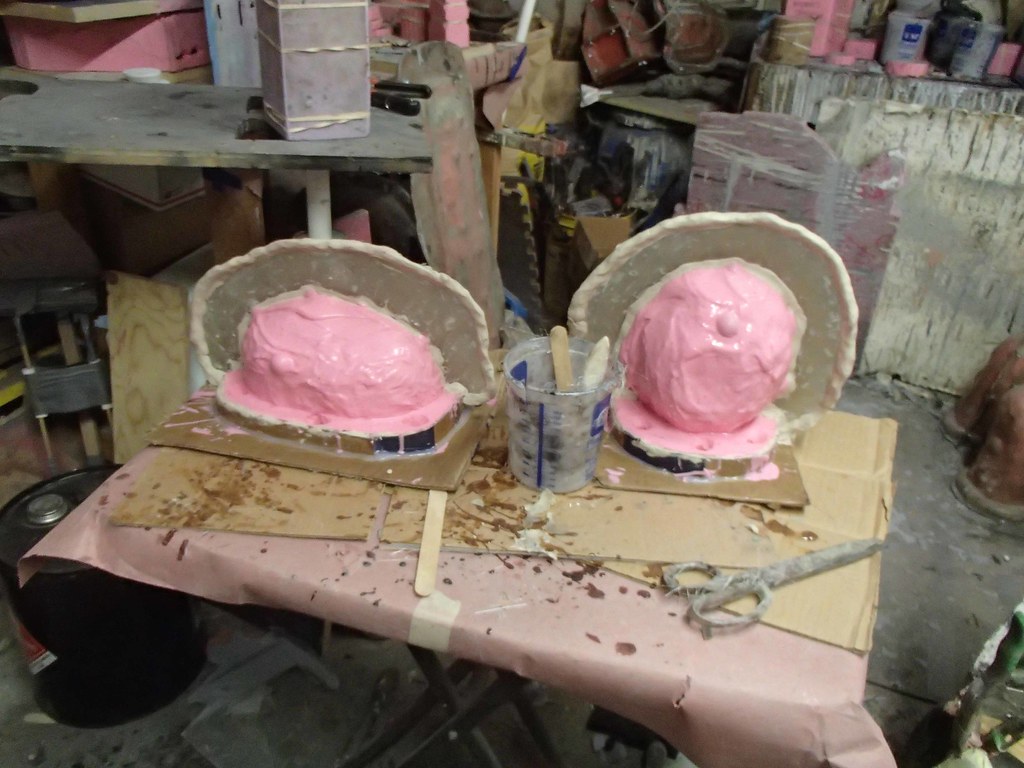
After smoothing and a gloss coat, the main body and the lower jaw were both molded in much the same way as the top of the head. Since the pour spout for the main body had a weird recess around it though, I had to start by filling the recess so it wouldn't trap any air bubbles:
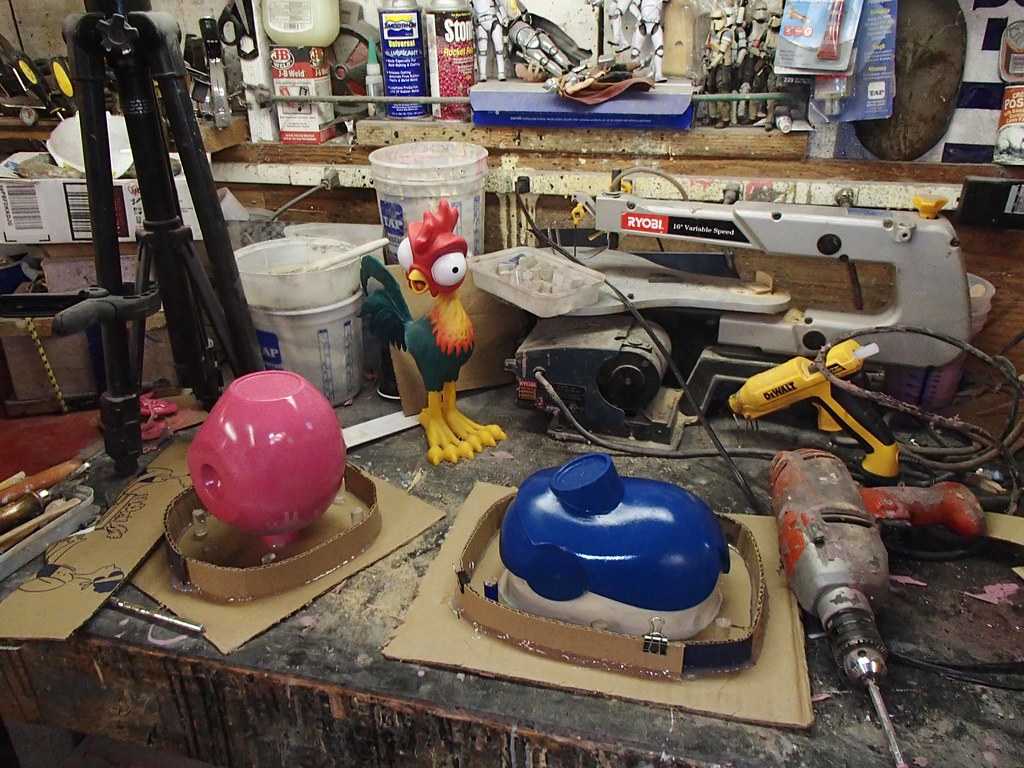
When that cured, it was mounted upright for molding:
The print coat was poured on and left to cure:
Once that had firmed up a bit, I went ahead and built up a few more layers of silicone with a thixotropic additive to allow it to stay put on the vertical surfaces. Once is was somewhere between 3/8" and 1/2" thick, I poured on one more thin coat to smooth out the surface and left it to cure overnight.
Usually when I layer up a mold like this, I'll cover it with a box or a bucket while it cures so there's no chance of a wayward suicidal bug landing in the sticky goo. Technically it doesn't make much difference for the mold, but I'm not crazy about dead bugs stuck to my work.
This time I forgot to cover the molds and an entire kamikaze cult of fruit flies decided their ultimate destiny lay somewhere inside this blob of pink goo:

I have no idea how so many of these things turned up all at once. It's not like there was some rotting food source in the shop somewhere and I was constantly besieged by a plague of tiny little gnat-things all day. I can only imagine that at some point in the wee hours of the morning, after an all-night bender somewhere else, these guys showed up looking for an after-party and it didn't go well for them.
Once both halves of the mothermold were laid up, bolt holes were drilled along the flange:
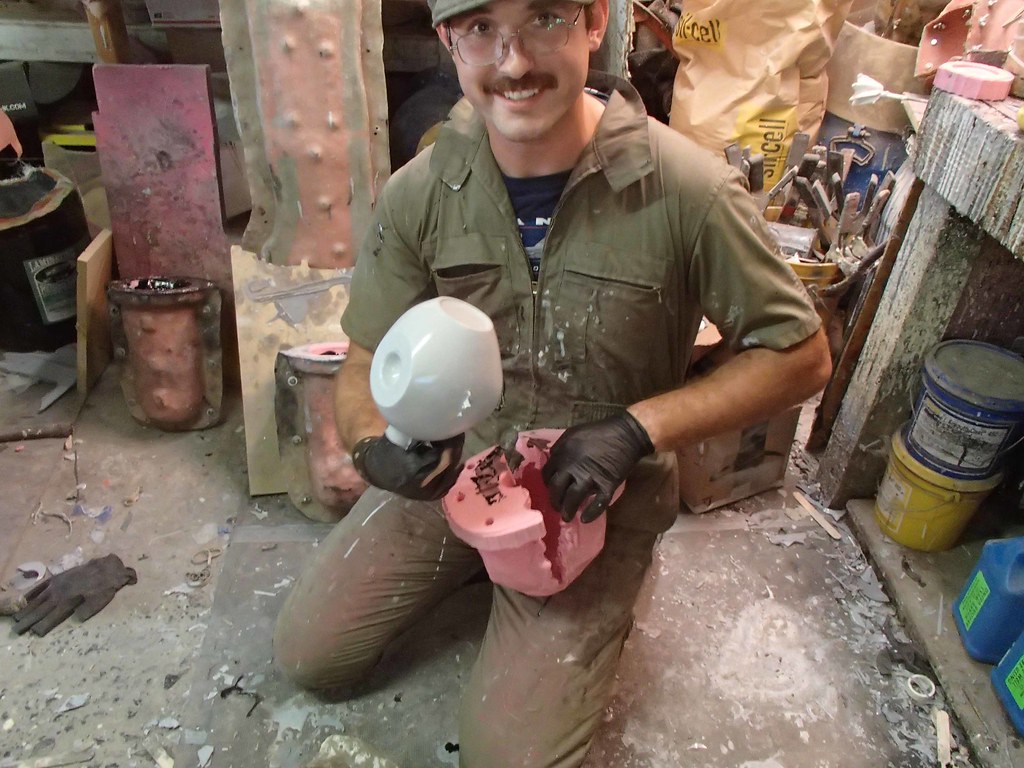
Then it was time to start rotocasting head and body parts. Ian handled most of that (with help from his ill-advised, cheesy moustache). Here's the main body, fresh out of the mold:
Of course, you never see just one of these Mouser bots at a time and I almost never make just one of anything. I had it in my head that once the molds are made, making three is only a tiny bit more work than making two. So I set my minions to work making more parts. Whenever anybody turned up looking to learn how to rotocast parts, I set them up with the Mouser molds in the corner so they could get some practice. Noelle did some of her very first casting here:

Each part had its mold flashing cut off and the eye hole cut out with a rotary cutter. I did most of that myself:


Necks
It turns out that the big roadblock to finishing this project was making the neck parts. Originally I wanted to make the necks articulated so they could be posed and (possibly, someday, eventually) rigged with animatronics so they would be able to move around on their own. This is a photo showing how far I'd gotten:

The original plan was a sort of compact tentacle mechanism covered by sections of ABS pipe to hide the wires and actuators inside. It was fresh from the half-bakery of my thoroughly fatigued brain and never quite got enough of my focus to come together.
So after years of backburner time, I decided to skip the animatronic neck for now and just make a static, rigid version. After a few minutes of poking around in CAD software, I'd worked it all out. Here's a render of the neck as designed in Netfabb:
Simple, isn't it? Makes you wonder why I didn't get to that sooner.
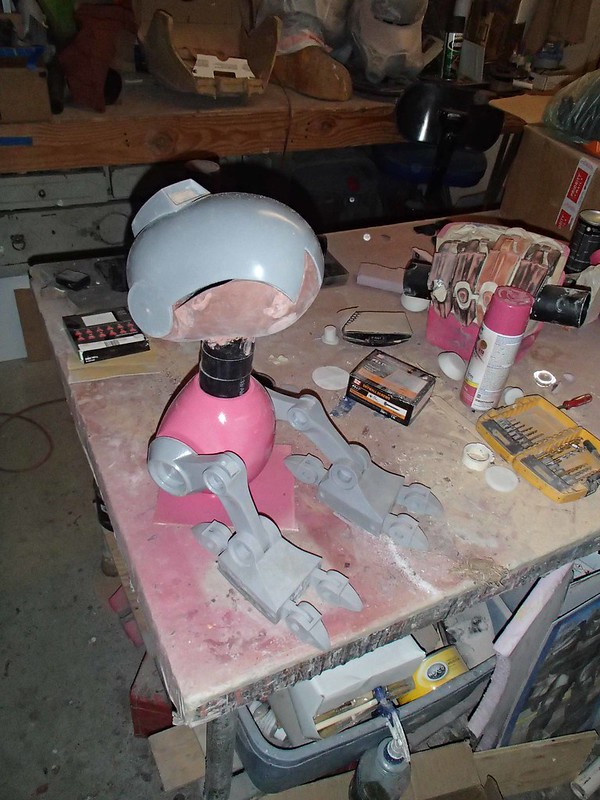
I started with attaching the upper legs to the body, then situating that assembly over the feet in order to make sure they could stand on a flat surface:

Then I messed around a bit with the head and neck positioning:

Even without making the segments of the neck poseable, they still manage to convey a bit of emotion. For example, this one is resting:

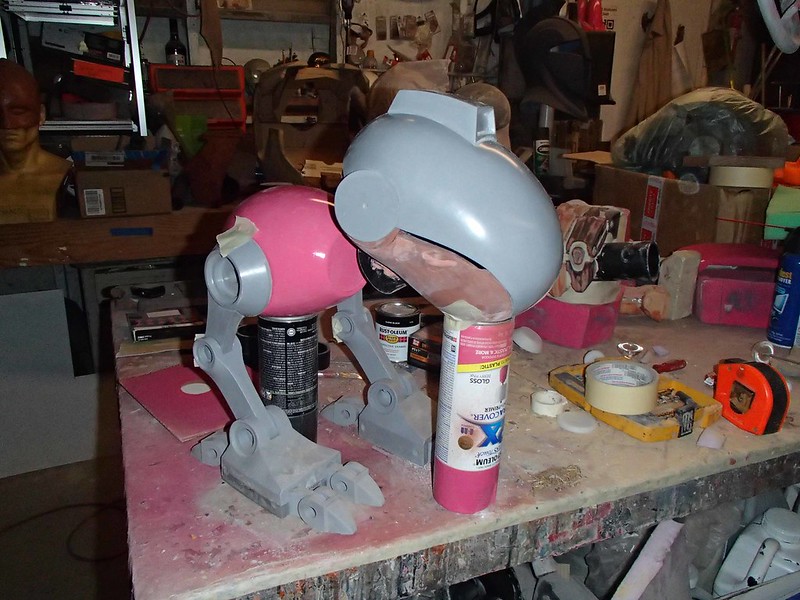
These two are... wrestling:
Seriously:


Then they were set aside to dry:

With the latex dried, they were given a couple of coats of satin white spraypaint:
The next day, the latex was peeled off to reveal the metallic "scratches" underneath:
Then I poured on a print coat in silicone rubber:
Once that had set up, I built up a few more layers of thickened silicone until the rubber jacket was about 1/2" thick. Then I added some silicone registration keys:
Finally, the whole thing was coated with a thin layer of silicone to smooth it out:
When the silicone had solidified, I cut out the portions that were covering the acrylic rods:
Then I plucked out each of the rods with a pair of pliers:
The next step was to build a clay wall over the top of the silicone rubber jacket:
This would form the flange where the two halves of the mothermold would bolt together.
The mothermold was fiberglass. I started by pushing some loose fibers into the peg holes:
Then laid up the mothermold with three layers of fiberglass mat:
Once that had cured, I removed the clay wall, smeared the flange with petroleum jelly, and laid up the second half:
When that had cured, it was time to drill holes along the flange, then pry it off of the mold:
After demolding the prototype, I rotocast a quick copy in urethane resin. Here it is fitted onto the other prototype parts in progress:
A quick mockup with the other parts and things were starting to really take shape:
So far so good.
Since I only cast the ends of the round hinge part, it gave me enough clearance for the lower jaw to fit inside as planned:
Then I printed new ear cap prototypes:
Finally, I added a piece of pipe to the bottom of the jaw to give me something to attach the neck to:
After smoothing and a gloss coat, the main body and the lower jaw were both molded in much the same way as the top of the head. Since the pour spout for the main body had a weird recess around it though, I had to start by filling the recess so it wouldn't trap any air bubbles:
When that cured, it was mounted upright for molding:
The print coat was poured on and left to cure:
Once that had firmed up a bit, I went ahead and built up a few more layers of silicone with a thixotropic additive to allow it to stay put on the vertical surfaces. Once is was somewhere between 3/8" and 1/2" thick, I poured on one more thin coat to smooth out the surface and left it to cure overnight.
Usually when I layer up a mold like this, I'll cover it with a box or a bucket while it cures so there's no chance of a wayward suicidal bug landing in the sticky goo. Technically it doesn't make much difference for the mold, but I'm not crazy about dead bugs stuck to my work.
This time I forgot to cover the molds and an entire kamikaze cult of fruit flies decided their ultimate destiny lay somewhere inside this blob of pink goo:
I have no idea how so many of these things turned up all at once. It's not like there was some rotting food source in the shop somewhere and I was constantly besieged by a plague of tiny little gnat-things all day. I can only imagine that at some point in the wee hours of the morning, after an all-night bender somewhere else, these guys showed up looking for an after-party and it didn't go well for them.
After scraping off much of the bug carnage, it was time to build the mothermold:
Once both halves of the mothermold were laid up, bolt holes were drilled along the flange:
Then it was time to start rotocasting head and body parts. Ian handled most of that (with help from his ill-advised, cheesy moustache). Here's the main body, fresh out of the mold:
Of course, you never see just one of these Mouser bots at a time and I almost never make just one of anything. I had it in my head that once the molds are made, making three is only a tiny bit more work than making two. So I set my minions to work making more parts. Whenever anybody turned up looking to learn how to rotocast parts, I set them up with the Mouser molds in the corner so they could get some practice. Noelle did some of her very first casting here:
Eventually, things kinda got a bit silly. Instead of the three I'd planned to make, we had four complete sets of parts and, for some reason, an extra body. So I asked someone to make the remaining set of parts for the fifth body so it wouldn't be time and materials wasted. Then, because that someone didn't know how to count, we had five complete sets of parts and two extra feet. So I asked someone else to make the remaining parts to go with the extra feet. Because they couldn't count either, we ended up with six complete sets of parts and an extra jaw. So, bright and early the next morning while nobody else was around, I cast the parts to complete the seventh and final (for now) Mouser.
Then I hid the molds so nobody else could make any excess parts and compel me to make even more Mousers.
Then I hid the molds so nobody else could make any excess parts and compel me to make even more Mousers.
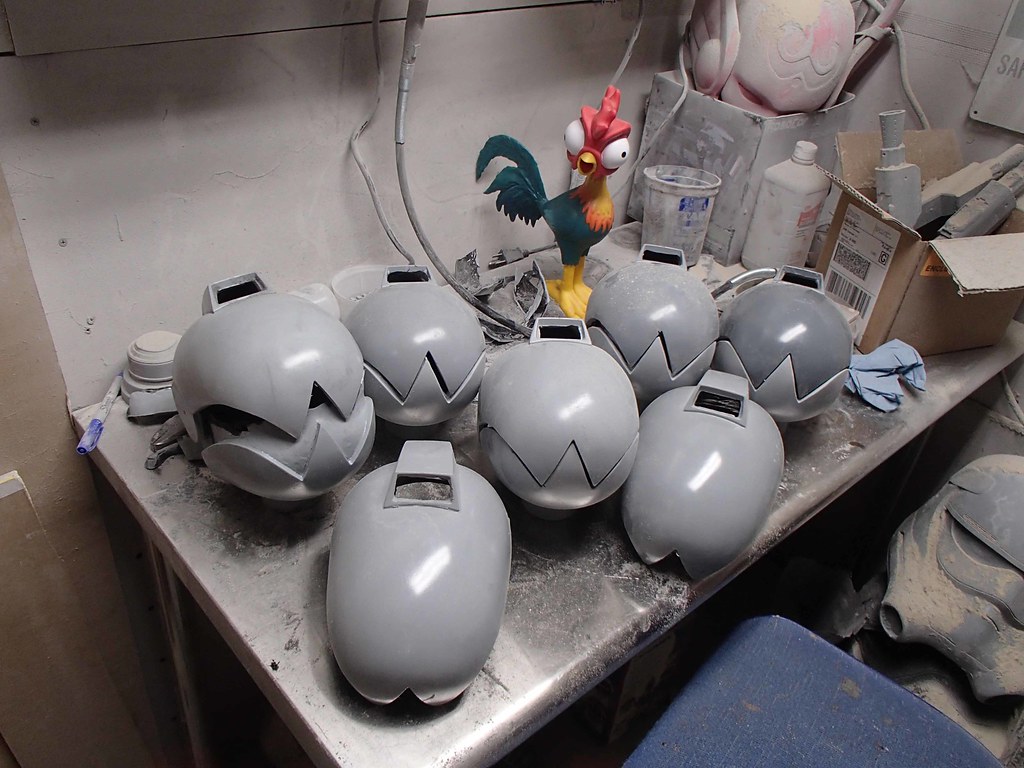
With the casting finished, they just needed prep work:
Each part had its mold flashing cut off and the eye hole cut out with a rotary cutter. I did most of that myself:
Then Agatha, one of my reluctant helpers, was tasked with sanding off the mold lines and smoothing out any rough patches:

Madison helped too:

Though I can't quite recall what she actually got done:

Then we set up a few painting pads in a well-ventilated area and Charlotte laid on a coat of primer:
Agatha followed behind and gave each piece a base coat of satin nickel paint:
Once the paint had dried, the parts were moved around from bench to table to shelf in the workshop for a few days while we didn't get to them. Eventually I needed the bench space more than I needed the non-stop reminder that these things were still not finished and each set of parts was individually boxed up and labelled so I'd have seven little boxes tucked away in the shop, each with a complete set of base painted Mouser parts, just waiting for me to finish them.
The only thing they needed at this point was a flash of inspiration. Or a deadline. Or anything.
Years passed.
Then, just a short while ago, my friends at Reynolds Advanced Materials invited me to put something on display at their table at Adam Savage's SiliCON in San Jose. This felt like as good a reason as any to go ahead and finish at least one or two of these guys. So I decided to dust off this project and see what was left. The first thing it needed was...
Necks
It turns out that the big roadblock to finishing this project was making the neck parts. Originally I wanted to make the necks articulated so they could be posed and (possibly, someday, eventually) rigged with animatronics so they would be able to move around on their own. This is a photo showing how far I'd gotten:
The original plan was a sort of compact tentacle mechanism covered by sections of ABS pipe to hide the wires and actuators inside. It was fresh from the half-bakery of my thoroughly fatigued brain and never quite got enough of my focus to come together.
So after years of backburner time, I decided to skip the animatronic neck for now and just make a static, rigid version. After a few minutes of poking around in CAD software, I'd worked it all out. Here's a render of the neck as designed in Netfabb:
Simple, isn't it? Makes you wonder why I didn't get to that sooner.
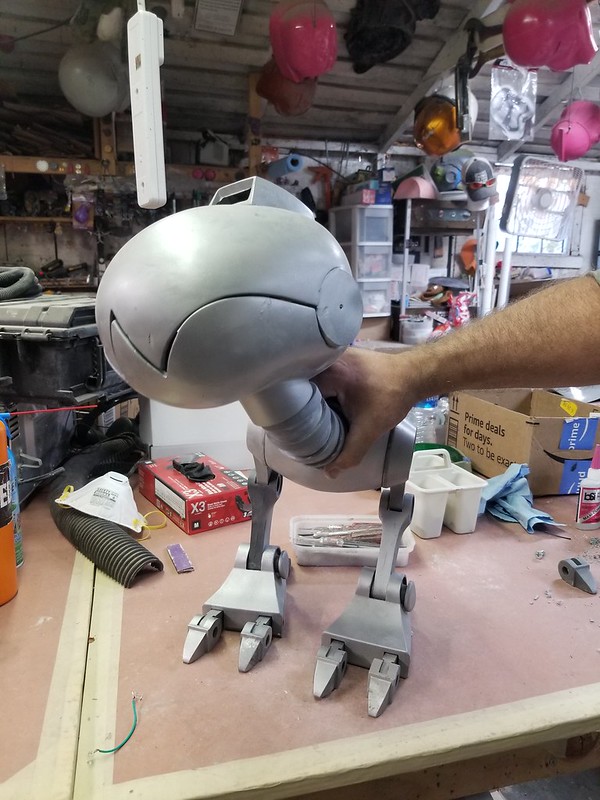
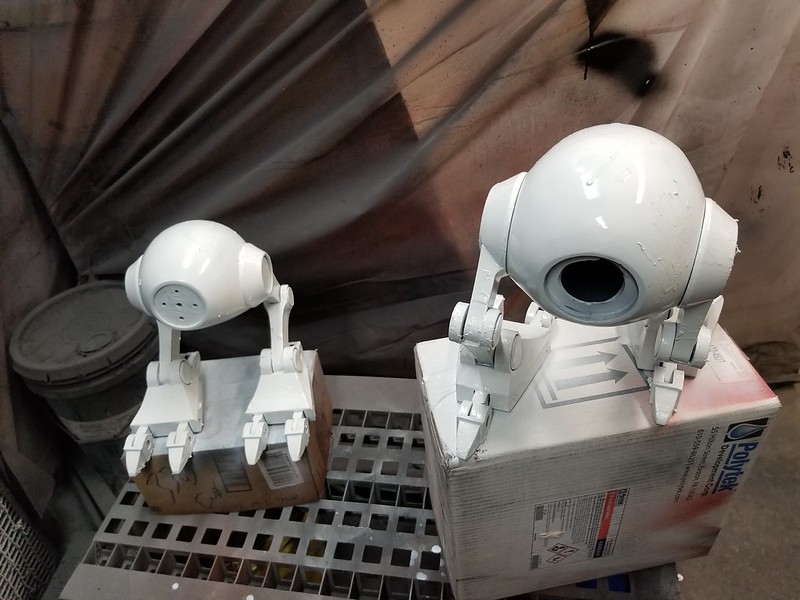
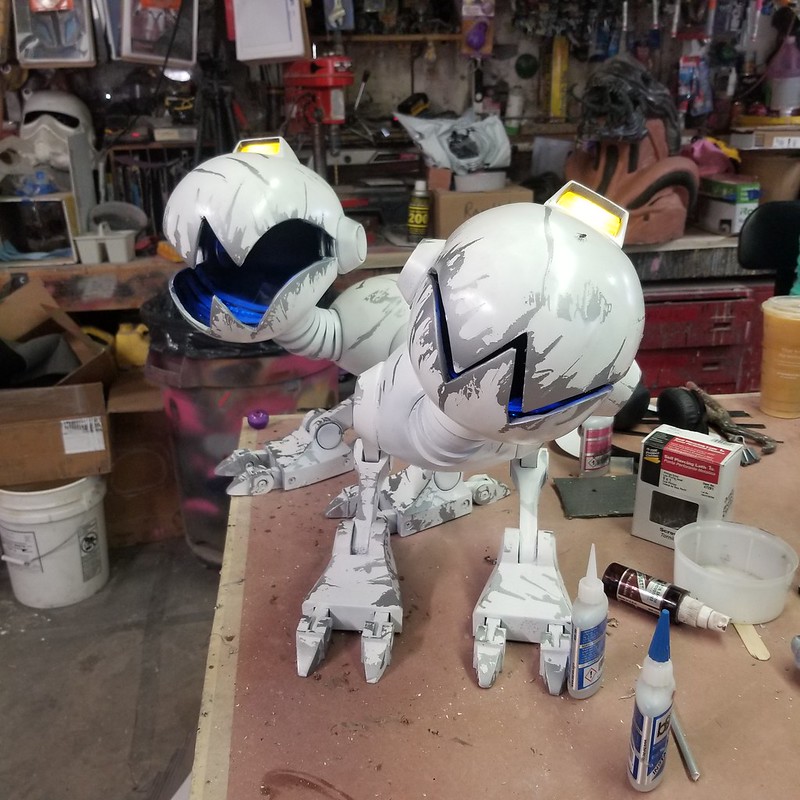
Normally I'd mold and cast these, but given the rush I was in, I opted instead for just printing them on my Elegoo Saturn MSLA printers. After a bit of cleanup, they were given a coat of the same satin nickel paint as the rest of the bodies. Then it was time to finally assemble everything.
I started with attaching the upper legs to the body, then situating that assembly over the feet in order to make sure they could stand on a flat surface:
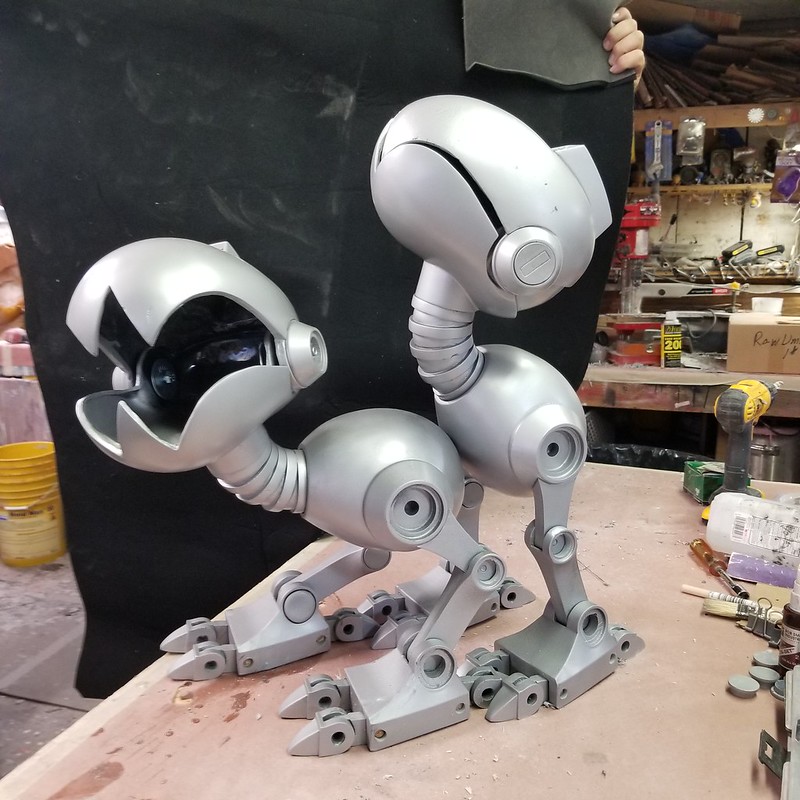
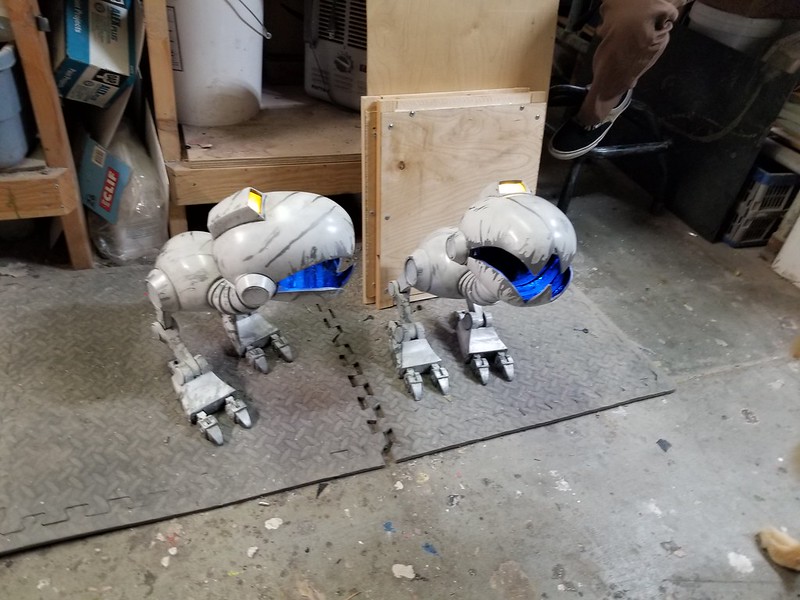
Then I messed around a bit with the head and neck positioning:
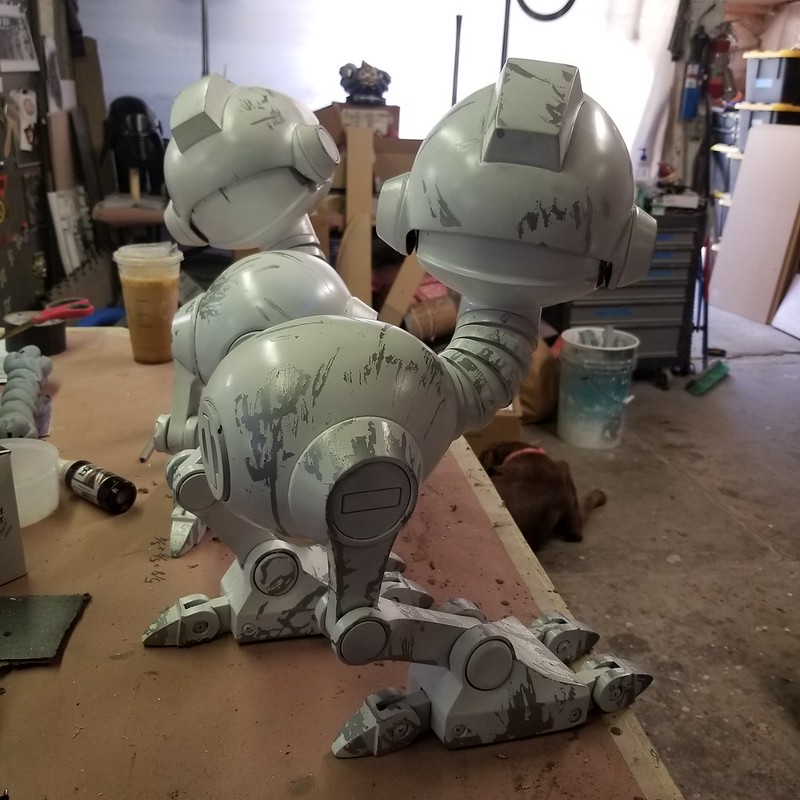
Even without making the segments of the neck poseable, they still manage to convey a bit of emotion. For example, this one is resting:
This one is attentive:
These two are... wrestling:
Seriously:
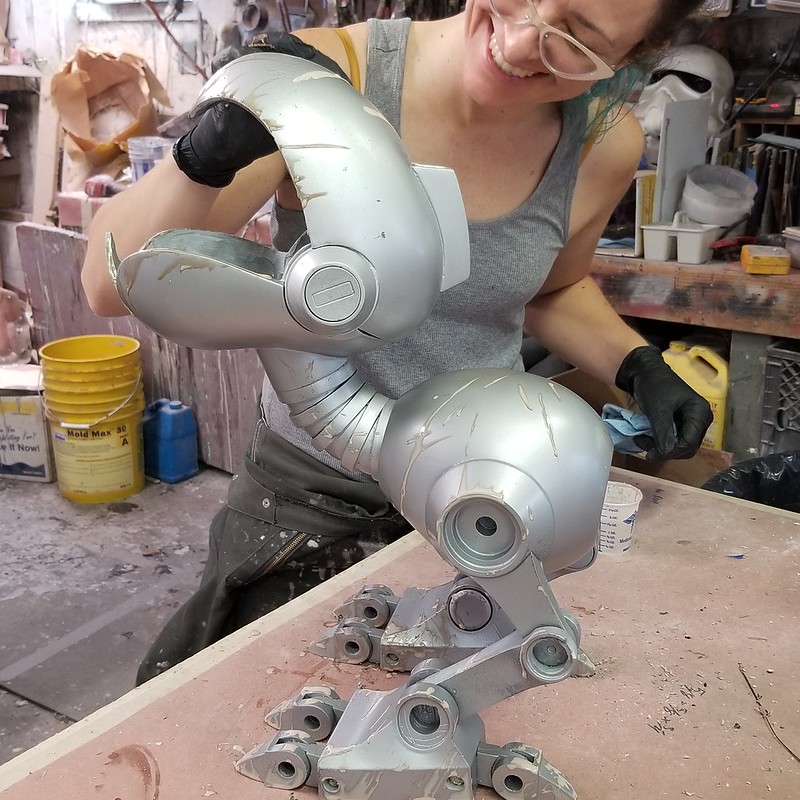
Once I'd settled on poses for both of them, it was time to finish the painting. I decided they'd look a lot better in a very distressed white paintjob. To that end, Rachel started masking off some scratched areas with liquid latex:
Then they were set aside to dry:
With the latex dried, they were given a couple of coats of satin white spraypaint:
The next day, the latex was peeled off to reveal the metallic "scratches" underneath:
They still looked less than great at this stage, so the next thing was to give them a judicious blackwash to help the details pop out a bit more:
Adding Lights
From the beginning I had it in my head that some elements of this little robot build would be animatronic. That part of the build was still a long way off, but since I really wanted something to bring this build to life, I figured the least I could do was install a couple of LED lights.
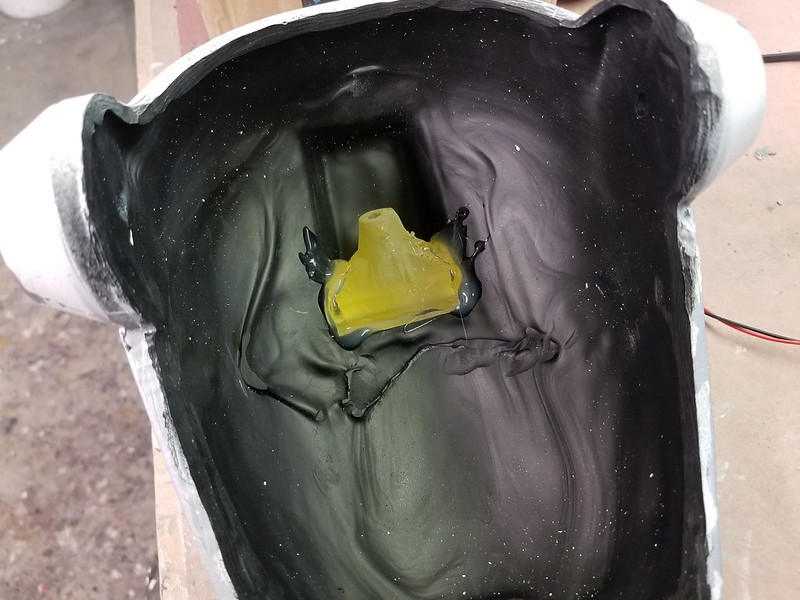
To diffuse the light and make the "eye" lens look a bit more interesting, I printed this block of yellow transparent resin with some hollow tubes inside:
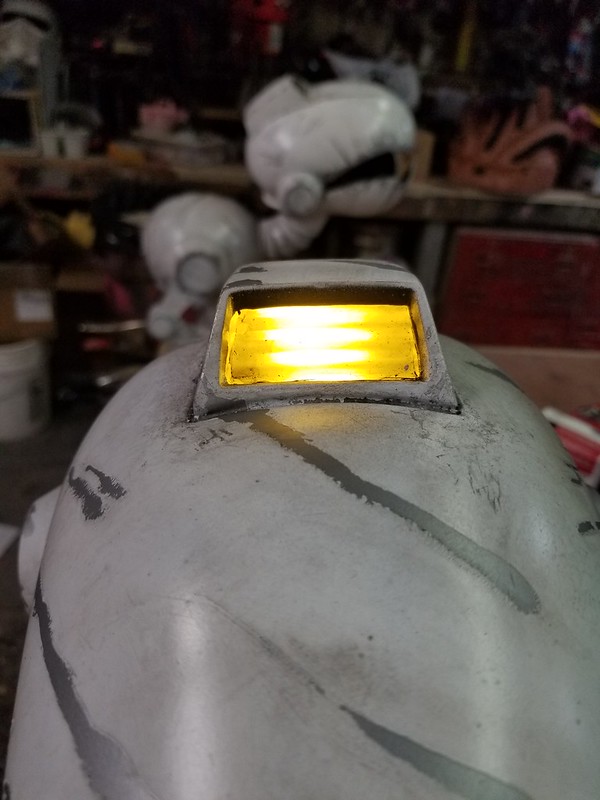
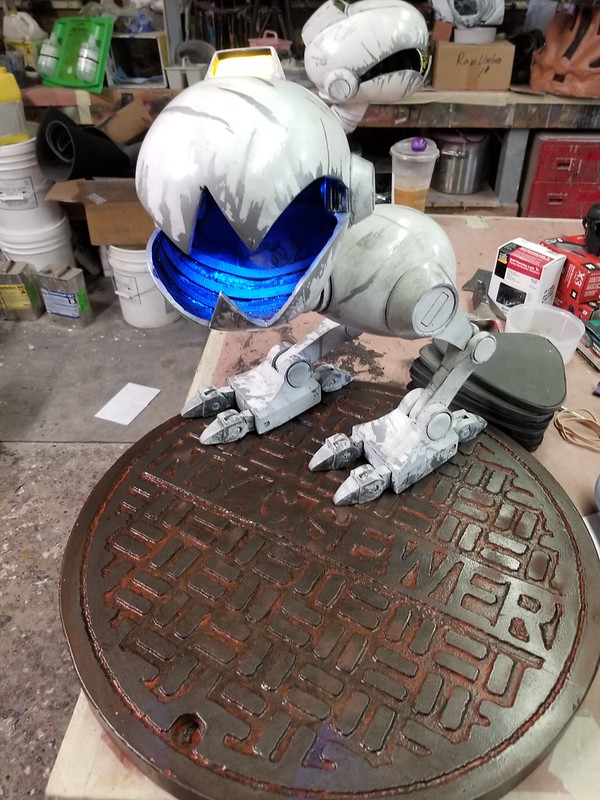
Blue LEDs were installed in the mouths to add another tiny element of visual interest:
And just like that, they were mostly done:
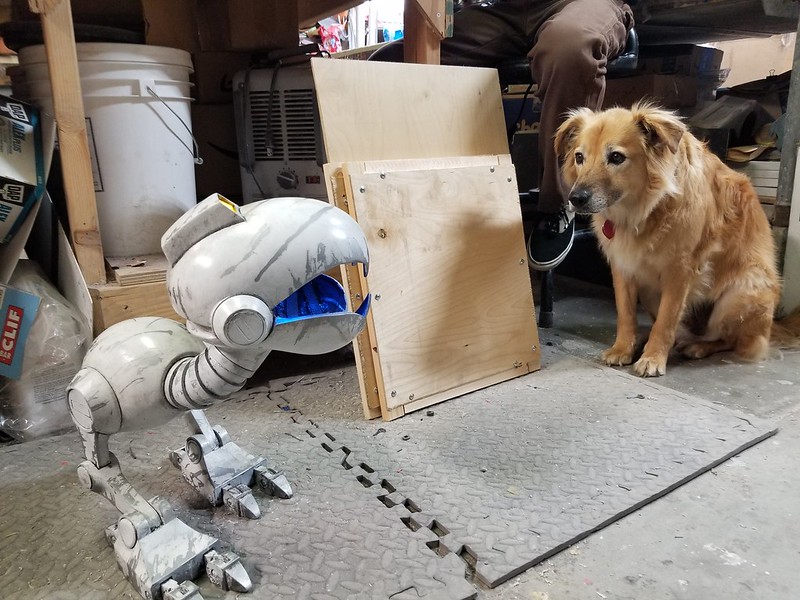
Leeloo was not a fan of the mouser bots:

Once it was painted and weathered, the mousers were screwed into place:
And that's a done thing:

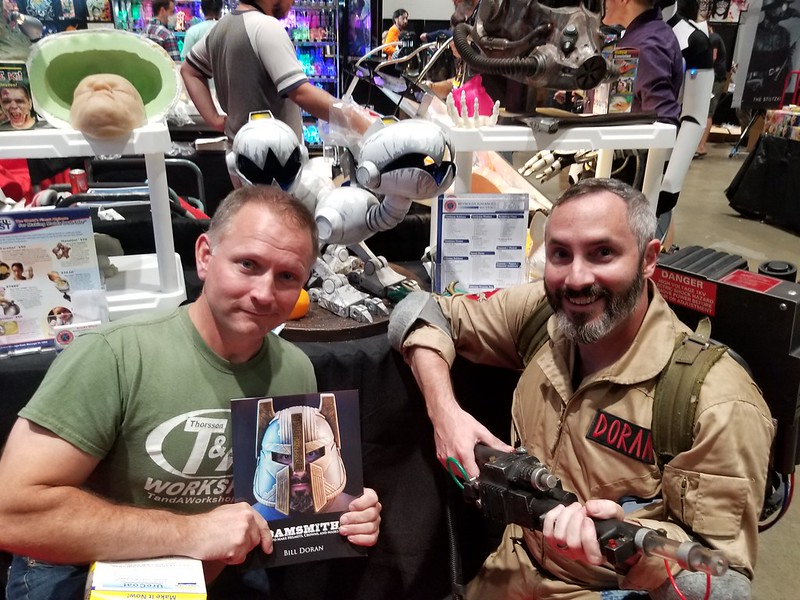
These guys spent the whole of SiliCON with Adam Savage on display at the Smooth-On booth, but for some reason the only photo I took of them was this one with my friend Bill:
Once the convention was over, I took them back home. But since I have no place to put them, I decided they'd fit in well for a while with ED-209 at Fundemonium in Rohnert Park. So this is where you find them now:

I'll probably relocate them sooner or later, but they look pretty at home here:

I'm glad to finally be "finished" with this silly little project, but somewhere in the shop I still have the parts tucked away to make five more of these. Then there's also the molds in the storage bin in case I get a really wild hair and decide to make even more. Not sure what I'm going to do with all of those things, but then again you never see just two of these little bots at a time.
Stay tuned...
*I don't think Baxter Stockman was actually a mad scientist. A scientist performs experiments, complete with control groups and specific variables, to verify various hypotheses. This guy was a mad engineer. That's what I want to be when I grow up.
From the beginning I had it in my head that some elements of this little robot build would be animatronic. That part of the build was still a long way off, but since I really wanted something to bring this build to life, I figured the least I could do was install a couple of LED lights.
To diffuse the light and make the "eye" lens look a bit more interesting, I printed this block of yellow transparent resin with some hollow tubes inside:
Blue LEDs were installed in the mouths to add another tiny element of visual interest:
And just like that, they were mostly done:
Leeloo was not a fan of the mouser bots:
In order to make them easier to transport and harder to knock over, I used my Carvewright CNC machine to whittle out a quick and dirty NYC Sewer manhole cover:
Once it was painted and weathered, the mousers were screwed into place:
And that's a done thing:
These guys spent the whole of SiliCON with Adam Savage on display at the Smooth-On booth, but for some reason the only photo I took of them was this one with my friend Bill:
Once the convention was over, I took them back home. But since I have no place to put them, I decided they'd fit in well for a while with ED-209 at Fundemonium in Rohnert Park. So this is where you find them now:
I'll probably relocate them sooner or later, but they look pretty at home here:
I'm glad to finally be "finished" with this silly little project, but somewhere in the shop I still have the parts tucked away to make five more of these. Then there's also the molds in the storage bin in case I get a really wild hair and decide to make even more. Not sure what I'm going to do with all of those things, but then again you never see just two of these little bots at a time.
Stay tuned...
*I don't think Baxter Stockman was actually a mad scientist. A scientist performs experiments, complete with control groups and specific variables, to verify various hypotheses. This guy was a mad engineer. That's what I want to be when I grow up.