If you attended the Bay Area Maker Faire this year, hopefully you noticed one of my armored Spartans from HALO3 standing on top of the booth.
Since I couldn't count on any of my friends to spend 72 hours standing still on top of an 8-foot tall box without bitching about it, I needed to come up with a mannequin. Since mannequins are pricey (and usually strike inappropriately effeminate poses) I had to make my own.
Rather than spending days sculpting the perfect heroic male form to fit in my armor, I talked my friend Alex into coming by so I could use him as a model for building a duct tape double.
It turns out talking him into it only took a four-line phone call:
ME: Hey man, are you busy tonight?
ALEX: No, you wanna do something?
ME: I was hoping you could stop by the shop so I could wrap you in duct tape and cut all of your clothes off.
ALEX: Sounds good, I'll be there.
All too easy...
After find an appropriate victim, the process of creating the mannequin is quite simple. To begin with, have your model wear clothes that they won't mind destroying. Here's Alex in an embarassingly Google-able photo of clothes he never wanted anyone to see him wearing again:

The next step is to mummify them with six or seven rolls of duct tape:
 When it gets to the point where the model can no longer move, you've built up enough thickness. Try to resist the compulsion to knock them over or draw lewd pictures on them.
Now it's time to cut all of his clothes off (including the duct tape). Remind your model to wear appropriate undergarments unless you want this already awkwardly intimate experience to bring your relationship even closer.
Free of the duct tape cocoon, Alex was able to put his normal clothes back on. Then and it was time to close up the seams on the duct tape duplicate:
When it gets to the point where the model can no longer move, you've built up enough thickness. Try to resist the compulsion to knock them over or draw lewd pictures on them.
Now it's time to cut all of his clothes off (including the duct tape). Remind your model to wear appropriate undergarments unless you want this already awkwardly intimate experience to bring your relationship even closer.
Free of the duct tape cocoon, Alex was able to put his normal clothes back on. Then and it was time to close up the seams on the duct tape duplicate:

With the seams re-sealed stuff the double with newspaper:

At this point you've got yourself a pretty exact semi-rigid copy of the model that you can use for making whatever you need in the way of costumes and whatnot. This application is great if you need a quick and inexpensive dressmaking dummy. Up to this point, the whole process only took us about two hours.
But I wasn't building this thing for dressmaking. In order to go from "semi-rigid" to "durable-enough-to-leave-unattended-in-a-crowded-pavilion" I decided to reinforce it by adding a layer of fiberglass mat and cloth everywhere:
 Yes. Everywhere.
Because of the potential for being overcome by noxious fumes while working with polyester resin, it's important to work outdoors or in a well-ventilated area and use adequate safety gear. Miners used to use canaries to indicate when the atmosphere turns poisonous. When the canary keels over dead, it's time to evacuate.
Being not indigenous to my area, canaries are expensive. I use chickens instead:

No chickens were harmed in the making of this statue:

When dressing the statue, I used all of my reject castings. These were the leftovers I had laying around where there were obvious flaws in the surface or thin, weak spots in the casts. Until now I wasn't sure why I'd been keeping these around. Now at last they had a reason to be.
While I was cranking away on a few other projects, I had my friend Matt screw all of the parts onto the fiberglass body with plain drywall screws.
Here's Matt drilling it in the butt:
 At the end of the day, here's Alex's stunt double with everything but hands and a face:
 Here's the whole thing dressed up with a coat of red primer:

As you can see from the picture above, in addition to the drywall screws I also used expanding foam to glue the armor parts onto the statue and stabilize them a bit more.
When the whole thing was nearly painted, I built a framework to help it stand up. I had to because it had no feet. With the wood and pipe stand fabricated, I inserted it into the legs of the statue, flipped the whole thing over, and filled the legs with more expanding foam. Here's Mallory, my occasional workshop assistant, watching the foam overflow from one of the ankles:

Once the foam had cured, the statue was returned to its full, upright and locked position where all of the black details were picked out and a bit of weathering was added. At this point, he'd really come to life:

To finish him out, he needed a weapon:

The last thing was to mount him on the roof of the booth:
 .
.
I'm still collecting pictures from friends and family from this past weekend, but I figured I might as well go ahead and post a few of my favorites so far.
Here I am stacking things up to be loaded into the truck:
Here I am with some of my crew on Sunday afternoon in front of the booth:

Lots more after the jump. Click "read more" to see them.
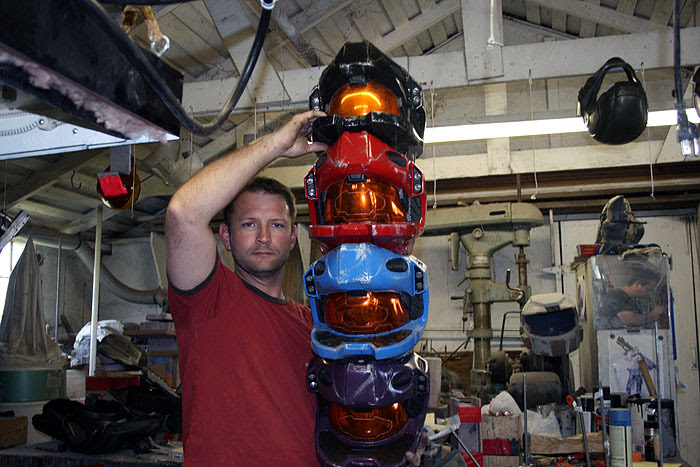
When I last wrote about this project, I just had the one helmet cast:

I've got more of them now:

While I was away in Japan, I also ordered all of the soft parts of the costumes. Just to make sure things looked right, I asked my sister to model them for me and shoot me some pictures:
 Clearly, she wasn't very happy about it, but I figure it's not much to ask after sending her her very own personalized helmet. On the other hand, her husband had a lot more fun with it:

Once I was back in town, I was able to dig through the boxes of other gear that had arrived and try it all on. I'm still waiting on the black MOLLE-style thigh panels, but the rest of the soft parts look about right:

The tactical fanny packs might be a bit too big though:

While I'm pretty happy with the way they looked fresh out of the box, they still needed some stitch work in order to be accurate to the game. My friend Breana had agreed to do the sewing work I needed on the shirts. Essentially, she was removing the sleeves from the fatigues and grafting them onto black t-shirts to make something like a combat shirt (occasionally referred to as "frog gear" in the US Marine Corps) so they'd look right under the armor and be tucked into the pants.
Somewhere along the way I started the paint work and put some primer on these guys:

I also went ahead and painted the parts that would be flat black in the end, but you can't tell against the black primer.
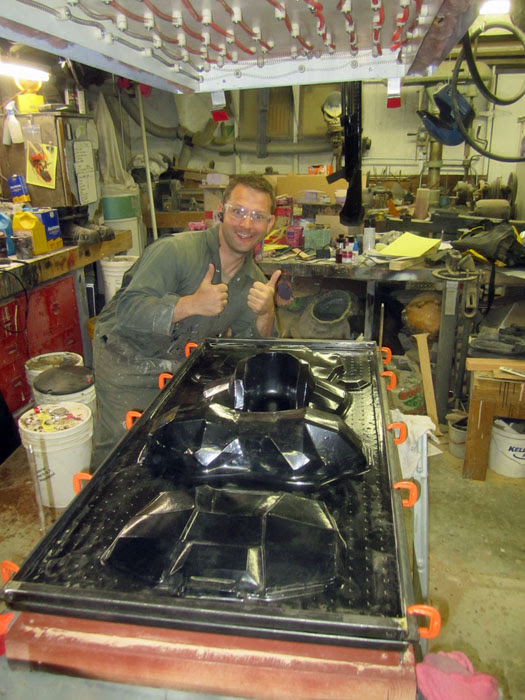
When it became clear that the other maker wasn't going to come through with the vacformed parts of the body armor, I decided I had to go ahead and make my own bucks and form my own armor. With just over a week to go, I had to go from concept to prototype to production to finished pieces. I'm not really happy with that other guy.
To make up for his failure, I started by downloading the pepakura models from the HALO costuming wiki and building the back and chest plates. Here's a shot of the back plate:
 And another from a different angle:
 Working late into the evenings, I managed to crank out the back plate, chest plate, and one of the knees. Pressed for time, I enlisted some help to build the pep models for other parts of the armor:
 Once the pep models were built, the next step was to cut them into formable pieces and reinforce them so they'd hold up to the pressure of vacforming.
Here's the first pull:
Once the pep models were built, the next step was to cut them into formable pieces and reinforce them so they'd hold up to the pressure of vacforming.
Here's the first pull:
 After some quick trimming, here's the first test-fit:
 The bucks still needed a bit of work, but the concept was proven sound. I am so happy I built this machine.
Once the bucks were adequately detailed for me to be happy with them, I gave them a quick coat of paint to help prevent me from losing them:
The bucks still needed a bit of work, but the concept was proven sound. I am so happy I built this machine.
Once the bucks were adequately detailed for me to be happy with them, I gave them a quick coat of paint to help prevent me from losing them:
 The whole costume can be easily made from only two 2'x4' pieces of sheet plastic with room left over for other pieces. Here's the first half of the pieces laid out on the forming table:
 The towel in the upper left is laid over one of my magnum pistol casts. The idea was to build a holster to fit it. Laying the towel over it makes sure there'd be room around the pistol so that it could slide in and out of the holster.
Here's a pull in .040" ABS plastic:
The towel in the upper left is laid over one of my magnum pistol casts. The idea was to build a holster to fit it. Laying the towel over it makes sure there'd be room around the pistol so that it could slide in and out of the holster.
Here's a pull in .040" ABS plastic:
 Here's the second half of the kit, also pulled in .040" ABS:
 You may have noticed that I pulled some of the parts twice. It turns out that there are a number of pieces that are interchangeable from left to right (i.e. many of the knee parts) so I only made one buck. I should've done this with the shoulder parts as well, but I was working faster than I was thinking when I built the forming bucks for the shoulders. Oops.
Since I was in a rush, I actually painted the base coat onto the armor parts before I even cut them out of their sheets:

For the color, I chose Olive Drab from the Ultra-Flat Krylon camouflage line. That, plus the texture molded to the ABS makes for a very convincing piece of military hardware.
It makes the helmets look pretty good too:

With all of the pieces formed and sprayed with their base color, the next step was to cut out all of the pieces and strap them all together with about a million feet of black nylon webbing.
Here's some of the rough cut pile of parts:
 Since the masking on the helmets didn't really do the job, I had Mallory go back and touch up the black parts of the helmets:
 She was rightly proud of her work:
 Taking a break from sewing up shirts, my friend Breana stopped by to help me with some of the rough cutting on the parts:
 Here's Trevor doing some smooth cutting and fitting some of the straps:
 Here I am test fitting one of the smaller chest plates:
 I'd also started work on some vacformed holsters for the Magnum pistols, but they didn't really come together and I need to take this design back to the drawing board:
 Since my sister Rose had agreed to wear one of these rigs, I test fit the shoulder armor to her (you can't see the collar piece under her hair):
 I also test fitted my sister Sheryl with a set just in case:
 The shoulder straps are repurposed from shoulder straps designed for old-school military ALICE backpacks. Each set of armor also uses up about ten feet of 1" nylon webbing, another four or five feet of 1/2" webbing, and a handful of parachute buckles and strap adjusters. Fortunately I'd already bought these parts in preparation for building the sets of armor that that other guy didn't deliver.
Once we'd strapped a few sets, Rose and my nephew went ahead and did some touch-up painting:
The shoulder straps are repurposed from shoulder straps designed for old-school military ALICE backpacks. Each set of armor also uses up about ten feet of 1" nylon webbing, another four or five feet of 1/2" webbing, and a handful of parachute buckles and strap adjusters. Fortunately I'd already bought these parts in preparation for building the sets of armor that that other guy didn't deliver.
Once we'd strapped a few sets, Rose and my nephew went ahead and did some touch-up painting:
 Meanwhile, my niece went ahead and separated the pile of soft parts into kits by size:
 Sheryl and Rose made a point to ham it up when I took some pics of them doing the last-minute prep work on the straps and buckles:
 The next day was day one at the Bay Area Maker Faire and all that was left to do was to dress everyone up:
 The combat knife pictured above is just a raw casting in black resin that's been riveted straight onto the chest plate.
I had at least one fire team dressed out all weekend:
The combat knife pictured above is just a raw casting in black resin that's been riveted straight onto the chest plate.
I had at least one fire team dressed out all weekend:
 Here they are with one of my ODST suits (made from a kit by the talented Sean Bradley):
 The plan for the Marines was to have them act as escorts for the folks in my Spartan costumes at the Maker Faire. This way the folks in the much heavier suits could have someone to watch their back and keep them from tripping over things:
 Apart from that, I just told them to go out, walk around, have fun, and get pictures. This they did.

 Somewhere along the way they were found by one of the other costumers from the 405th.com HALO costuming forum. He goes by the username Sir Tsaboc and here's a shot of him in his excellent ODST armor with a couple of my marines:

Charlie's Angels anyone?


 Here they are posing with a couple of the members of the San Mateo Police Department:
 HALO 4: Guitar Halo...


 The armor still needs some refinement, but I'm pretty happy with how it all came out. At this point it may be some time before I get back to tinkering with them though.
I've also learned that 9mm magazine pouch is just the right size for storing a tube of lip gloss. Who knew?
The armor still needs some refinement, but I'm pretty happy with how it all came out. At this point it may be some time before I get back to tinkering with them though.
I've also learned that 9mm magazine pouch is just the right size for storing a tube of lip gloss. Who knew?
.
