
I don't blog enough. Most of this is because I don't like to post anything that isn't a complete packaged project from beginning to end, soup to nuts, cradle to the grave. This usually ends up meaning that I wait until the months-long build is complete, I'm exhausted, and I've forgotten half of the details of how I did a thing.
So to avoid that problem, and give me more frequent things to write, I'm going to chronicle this project incrementally, chronologically. Making it a point to update each week with the steps I've taken and not leaving out any wrong turns or mistakes I make along the way.*
So here we go.
A while back I got to talking to the talented young Jeffrey Santos about collaborating on a few projects. You may remember Jeff as the 3D sculptor who tuned up all of my statue scans for the Skeletor costume build. Like me, he's a Warhammer 40K fan and we quickly narrowed down a list of awesomeness that we plan to bring to life.
First on the list: a genestealer:

The earliest version of these beasties appeared in the first edition of the Warhammer 40K rulebook, but it wasn't until the release of the game "Space Hulk" that they really came into their own. Since then, there's been about thirty years worth of development added to their lore and they've become a pretty intriguing part of that universe. If you'd like to know more about them, there's an in-depth article here: LINK.
But you're not here for the lore, you're here for the build. So at this point, we need to start with an overall scheme for how we're going to turn my unassuming 5'7" average human frame into a lanky, four-armed monster with a chitinous exoskeleton and digitigrade feet.
Those feet are one the main challenges. We want a dog-legged monster that's walking around on it's tiptoes with super long feet. I don't have super long feet and walking around on tippy toes gets tiring pretty quickly, so I'm going to need some assistance. A few years back I came across this instructable (LINK) detailing the construction of a pair of digitigrade stilts for a werewolf costume.
Here's what they ended up looking like:

You may ask yourself, "why were you making these a few years back?" and you'd be right to ask, because it was a fascinating project. Here's how far it got:

Now it's on the "one of these days" list.
Back to the ridiculousness of digitigrade stilts, here's a video clip of me trying them out:
So that was the hard part to engineer, made by a whole other version of me from the past (thanks past me). The only real problem is that they're a bit on the bulky side. We'll work out a solution to that later.
The next challenge is the extra arms. The foremost pair of arms for the purestrain genestealers end in a pair of three-fingered claw arrangements, but lucky for me, the lower/back pair end in a very humanoid pair of five-fingered hands. So, starting with a very rough 3D scan of me for scale, Jeff went ahead and digitally sculpted a ribcage that I can fit my shoulders and head into like so:

Jeff's a bit taller and leaner than me, so these parts will fit him too.
Now we need to figure out what to make these bits out of. In the older artwork (and some of the newer stuff) the genestealers were blue and plurple.

The blue parts were the hard shell parts and the plurple parts were the soft, fleshy, bare skin parts. So the plan of attack is to make all of the hard shell pieces out of fiberglass wherever we'll need the structural strength and the plurple parts will be rubber. At this point we haven't completely decided if they'll be slipcast latex (cheap, readily available, kinda stiff, not very durable) or silicone (expensive, tougher to find, super flexible, and longer-lasting). But we can make that decision when it comes time to actually mold those parts.
For now, we're starting with the hard shells.
So once we were happy with the general shape and details, I got to slicing up the pieces and printing them out on my fleet of Zortrax M200 FDM Printers:
Splitting the huge pieces up into lots of little pieces means I can put multiple machines to work simultaneously to cut down on wait time. So the parts come out like so: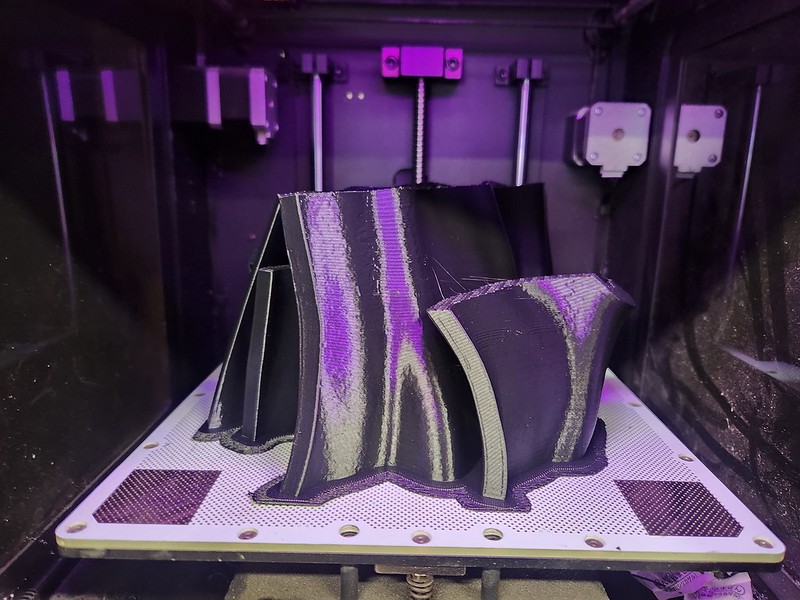
Usually I'll print pieces in higher resolution to take advantage of the exceptional detail capabilities of the Zortrax printers. But since these are blobby organic shapes without any straight lines, sharp corners, or tiny bits and bobs that we need to carefully replicate, I was able to select the thickest layer height these machines can print at and print the parts much faster. So in the space of a day I had all of the chest parts printed:
Then, the pieces of the back started stacking up pretty fast too:

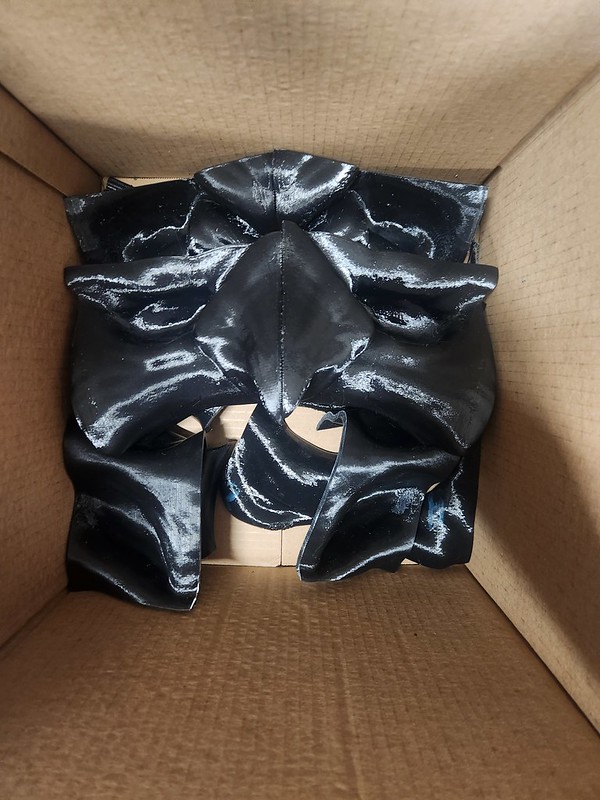
The next step is to start assembly. I make this easier by laying out all of the slices first:

Then it's just a matter of lining up the parts and gluing them together with some CA glue:

Jeff did a solid job of sizing the parts, so the ribcage fits just right into my armpits:

And my head will be comfortably fitting in the base of the creature's neck:

Rawr:

Right now I'm still waiting on a couple more print jobs to finish up for the carapace, or top/back section of the torso. Then we can do a quick and dirty test fitting, rush through some prep work to get rid of the print lines, and start working out a mold making plan for these weird, complex shapes.
Stay tuned...
*Usually I'll edit out the parts where I get something dicked up because if someone's trying to reproduce a project for themselves, I don't want to waste their time with the ideas that didn't work. Also, it makes me look a lot cooler if I leave out the "oops, this was a really dumb plan" parts of my projects.
Those stilts are cool, but look like an injury waiting to happen. Have you considered just putting on black tights and "puppeting" the legs by only attaching them at the hip and feet?
ReplyDeleteAll stilts look like an injury waiting to happen. I just need a bit more practice on these and (more importantly) an actual bit of tread on the bottom of the feet to improve traction instead of just the metal foot bracket sliding across the smooth concrete floor.
DeleteI didn't consider the black tights kabuki-style legs because I intend on having the final creature able to appear in public at events where I won't be able to control the lighting or viewing angle and while I appreciate why someone might do it that way, if I can make it more realistic I will. My aim is to have this beast be as real as I can possibly make it and having the black tights sticking out will kinda undo the illusion.