

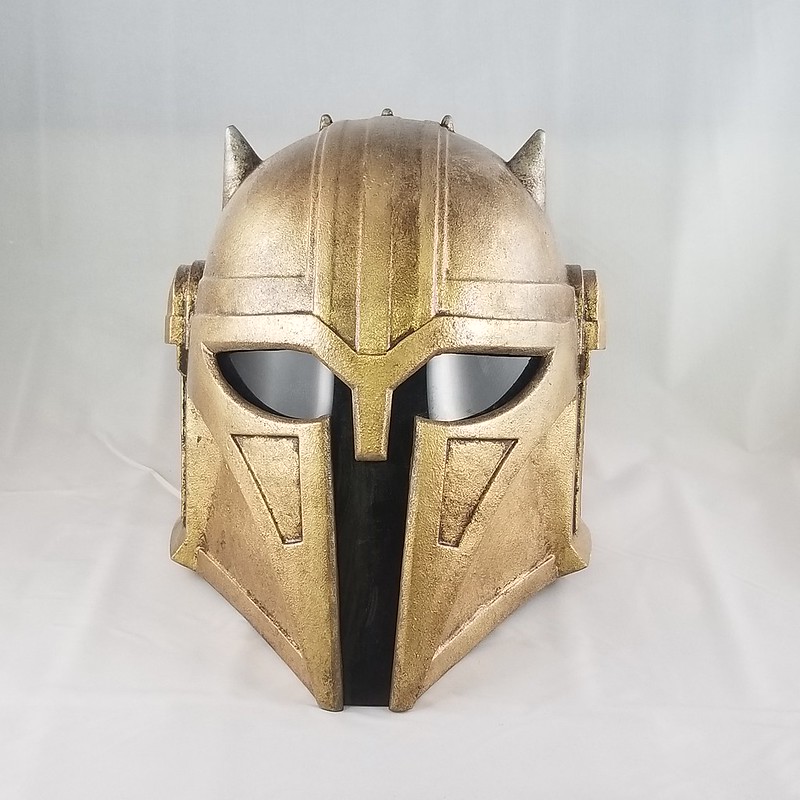
This is the Armorer. A sort of spiritual leader for the enclave of Mandalorians hiding out on the planet Nevarro. As the show progresses we see that she has the respect and deference of these legendary warriors and turns out to be a badass in her own right. Add that she's a maker of things and I couldn't resist the urge to bring this one to life.
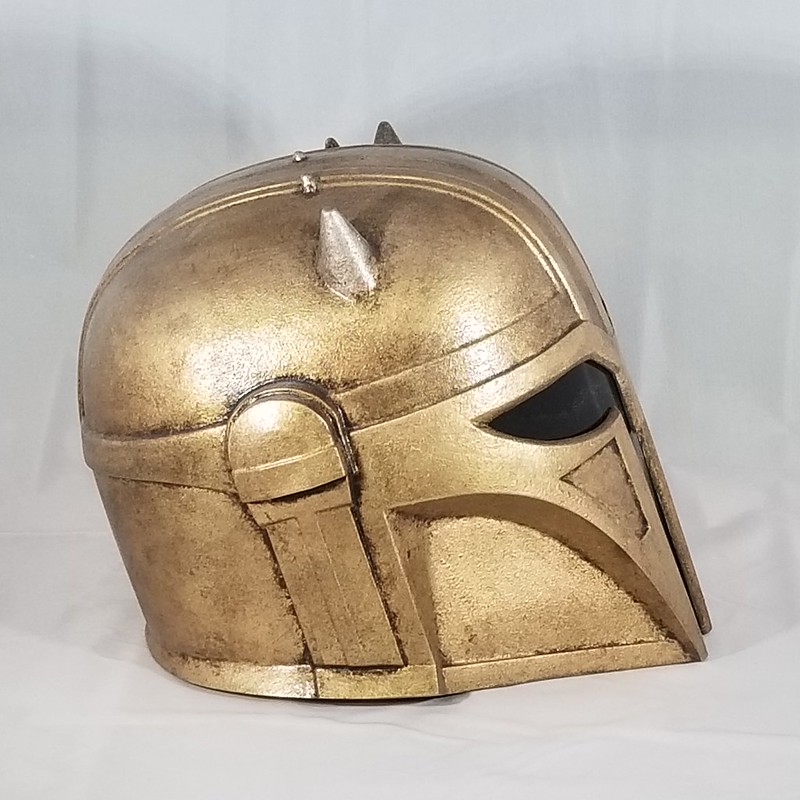
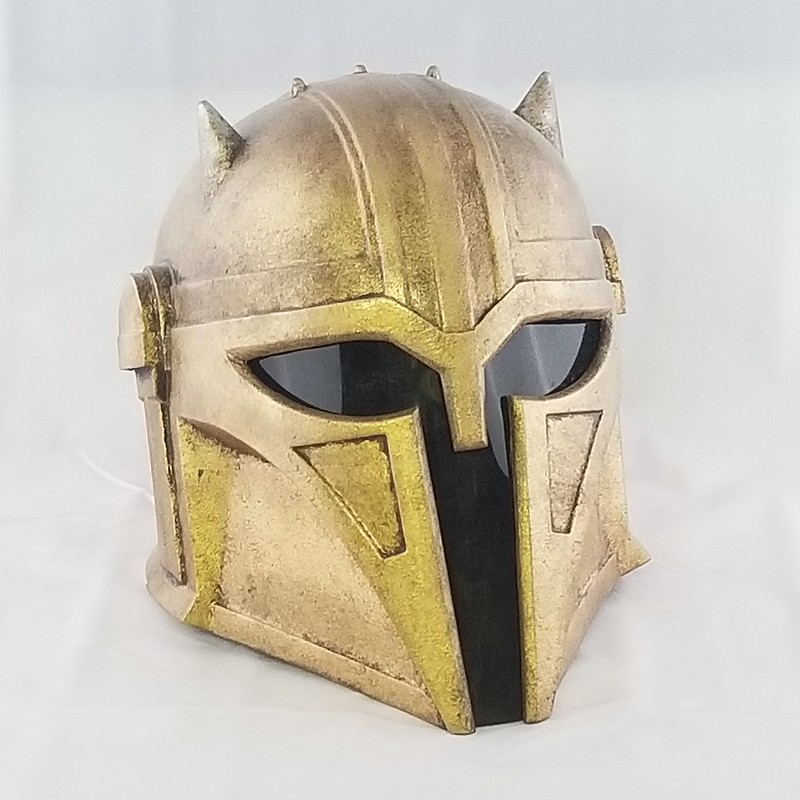
Here's the finished helmet:

To see a detailed explanation of how it was made, read on...
In this case, I started with a digital model by the amazingly talented Sean Fields. Here's a render of his model:
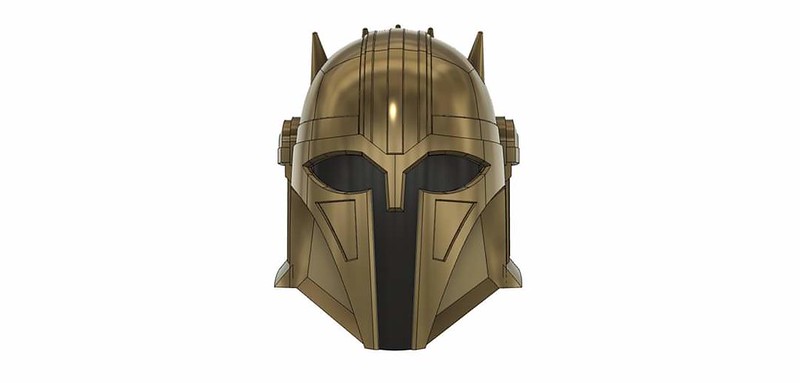
If you're looking to print your own, the model is available here: LINK
I printed my prototype in several parts in order to minimize support material and get it to fit better on my fleet of 3D printers. Here's the printed parts all stuck together:

Modifications
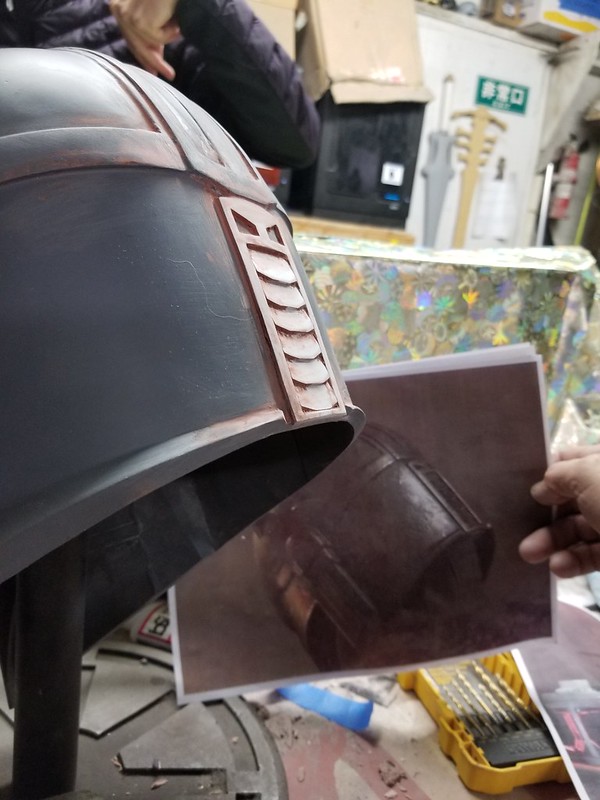
Sean did a pretty great job of capturing the overall look of the character, but there were not a lot of detailed reference images available at that early stage in the series. As time went on, there were a lot more details picked out in various screen captures taken from the show and it was clear that the physical model was going to need some adjustment. The first thing I needed to tweak was the shape of the eye holes. This was pretty quick work with some files and Bondo:
I also filled in the cheek indents a bit and added a bit more of a ridge to the eyebrow area:

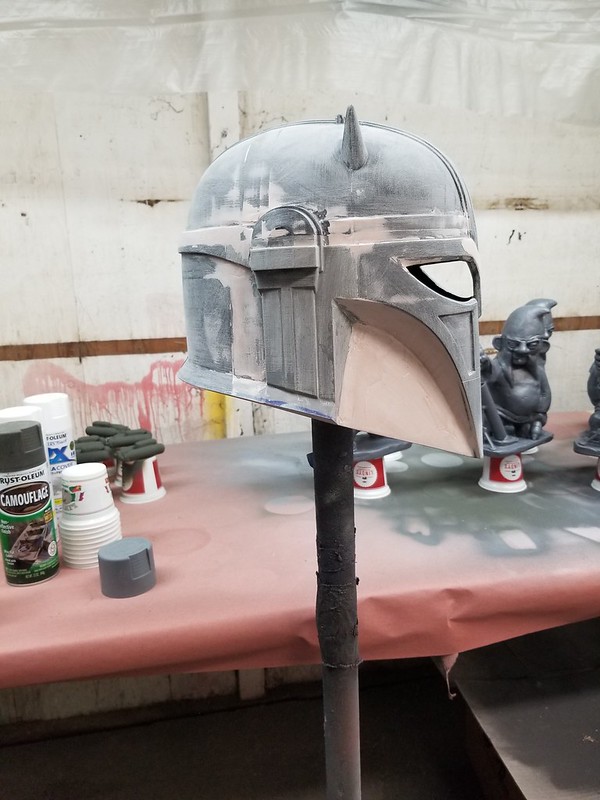
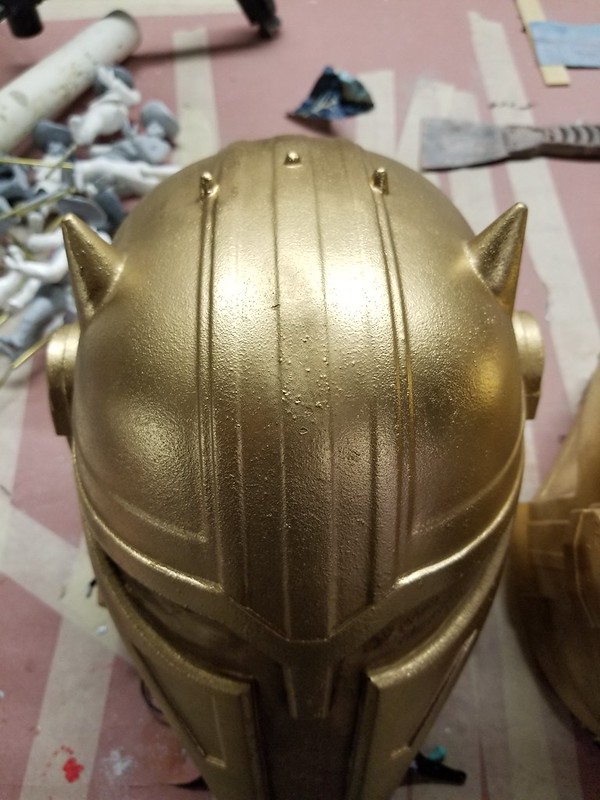
A quick coat of primer told me I was on the right track:

I also added a bit more girth to the two big horns on the sides, changed the angle of the tabs sticking out under the ears, and changed the raised lip at the bottom of the cheek indents. Here she is at a later stage in grey primer:
The biggest adjustments were at the back. Since there were only four or five episodes of the show available to watch at this point, the only image I could find of the back of her helmet was one very oblique angle in dim lighting. This was enough to get what I needed though:
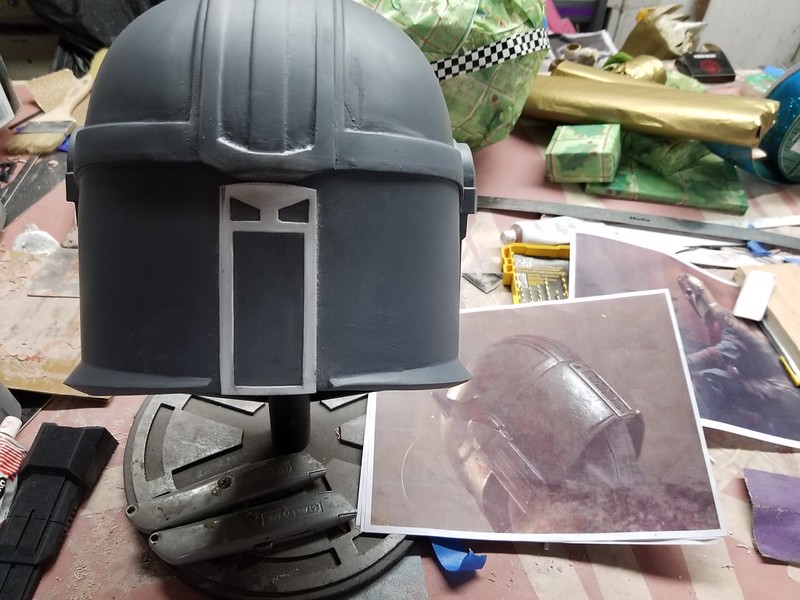
The louver details were made from sheet styrene and spot putty:
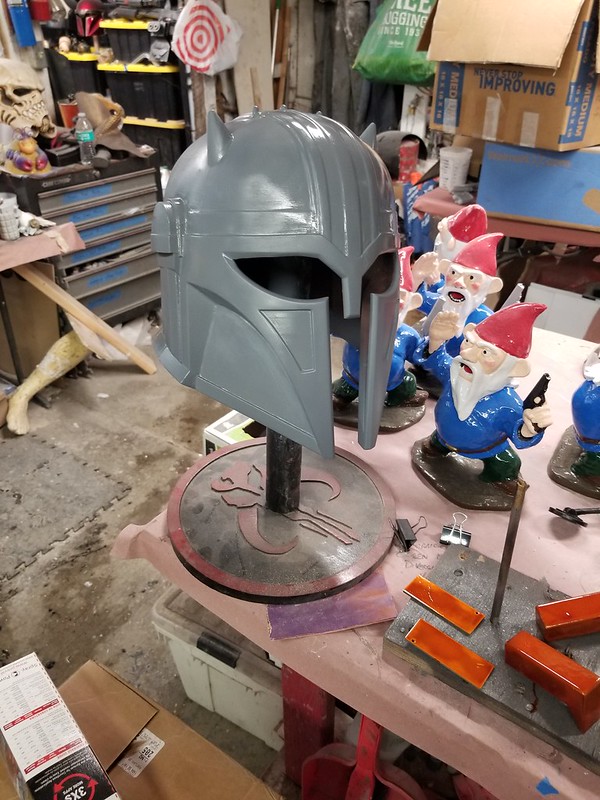
Another coat of primer to make it all one color and things were looking pretty good:
But first...
Texturing
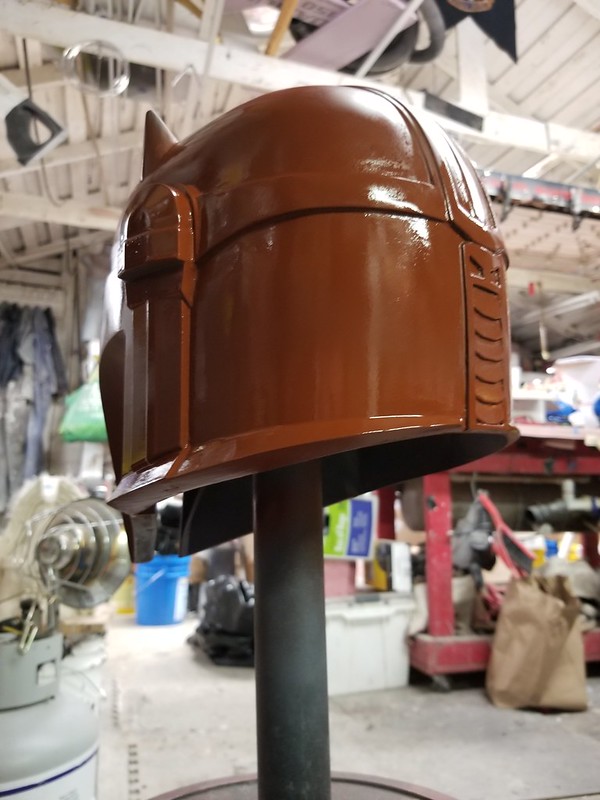
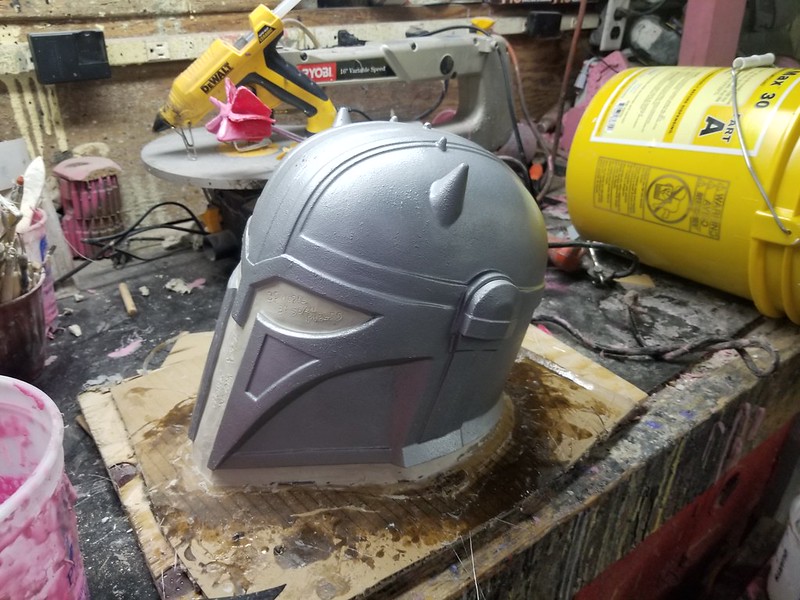
Even in the dim lighting she had in all of her scenes, it was clear that the Armorsmith's helmet wasn't smooth on the surface. In order to match the rough cast look, I piled on several thick layers of Rustoleum glitter effect paint. It was fabulous:

While the paint was still wet, it was stippled with a brush to clump the glitter bits together and raise up the texture a bit. Once it dried, I gave the whole thing a couple of coats of hammered effect silver paint:

Perfection.
Molding
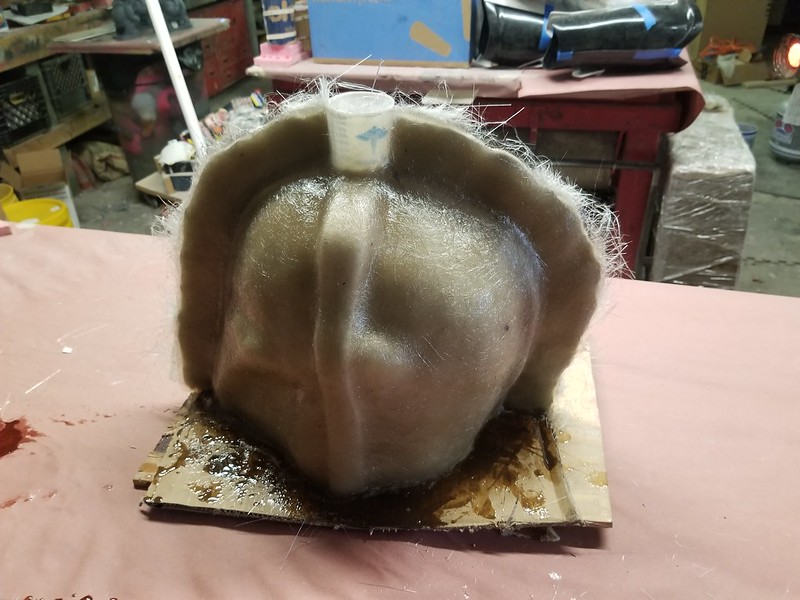
Since this was a relatively straightforward bucket shape, I decided the most efficient method to mold it was to build a matrix mold. First the helmet was mounted to a board and wrapped in plastic cling wrap. Then a 1/2" layer of clay was built up over the entire thing with ridges like so:

The ridges up the front, back, and sides of the helmet would allow air bubbles to escape easier as well as creating mold keys to hold the rubber jacket into the mothermold. The big mohawk flap would become the parting wall for the fiberglass mothermold. Here's the first half of the mothermold when it was laid up:
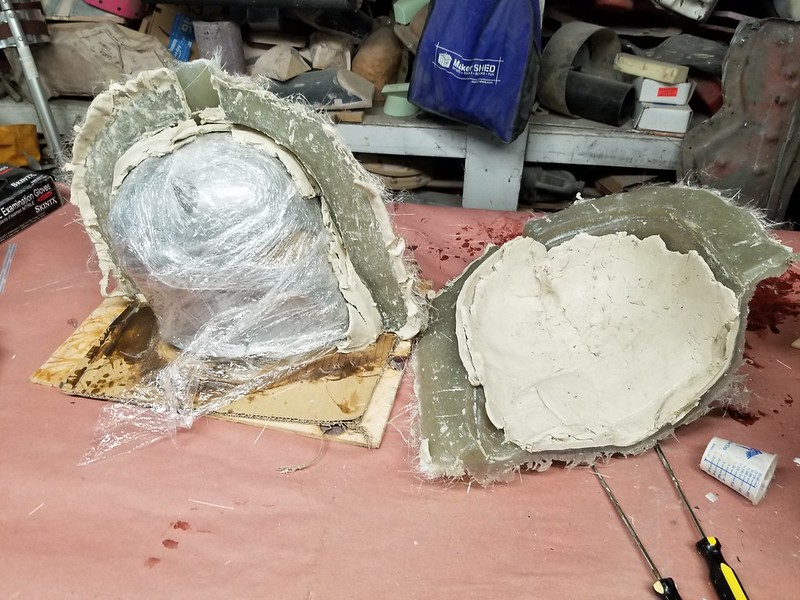
Then the clay parting wall was removed, the fiberglass flange was coated with a release agent, and the second half of the mothermold was laid up:

Once the fiberglass was completely cured, the two halves were pried apart and the clay was cleaned out:
The mounted helmet was then made ready for silicone:
I started by mixing up a thickened batch of silicone and packing it into all of the overhangs where bubbles would potentially be trapped:

Then the mothermold was put in place:
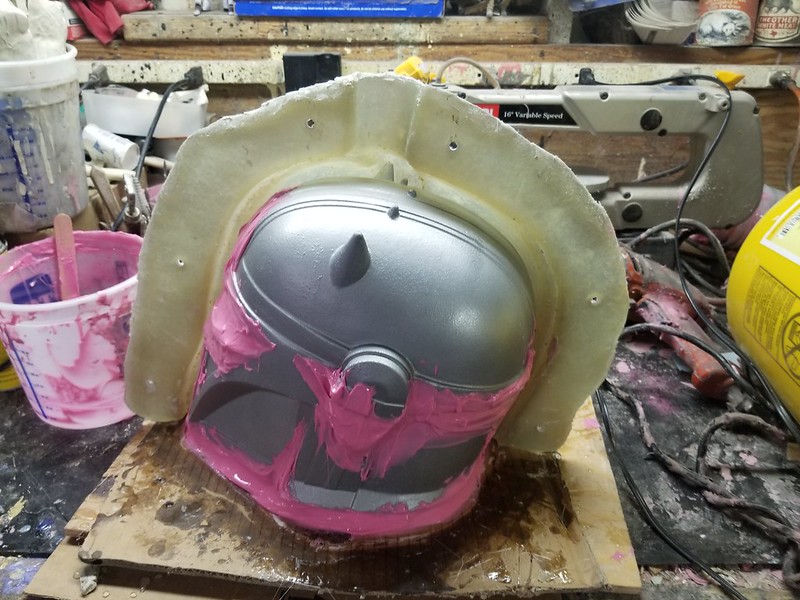
The two halves were bolted together:

Then I used hot glue to seal up all of the seams:

Once the glue had dried, the mothermold was filled with silicone poured in from the top:

The next morning, the mothermold was removed:
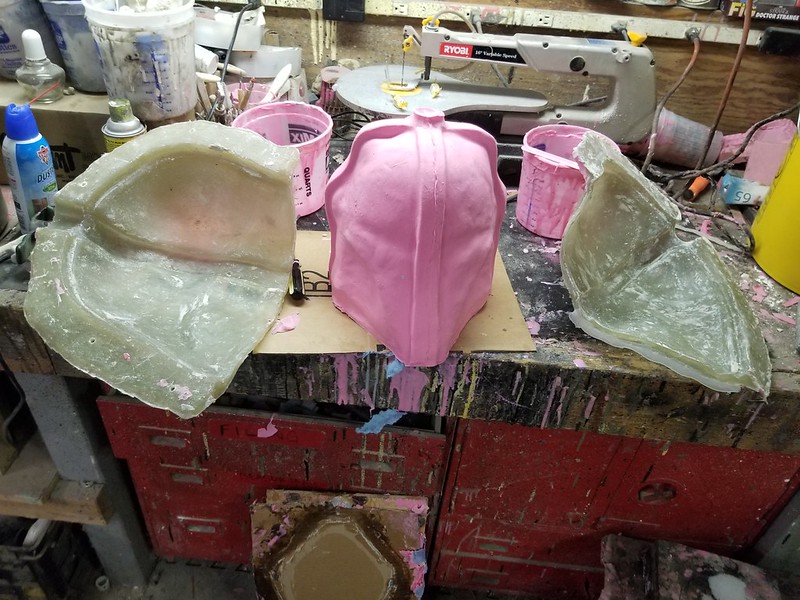
Then I removed the rubber jacket:
Casting Color in the Mold
In order to speed up the finishing process (and because the seamless mold means minimal cleanup work) I decided to start by dusting the mold with bronzing powder. Notionally, nothing sticks to silicone except for more silicone. So this metallic powder would cling to the surface of the inside of the mold during casting, but then bond with the surface of the resin. This creates an integral color layer that will essentially act as a paint basecoat. I started by dusting a little bit of platinum color into the horns:

The rest of the mold was dusted with an antique shade of reddish gold:
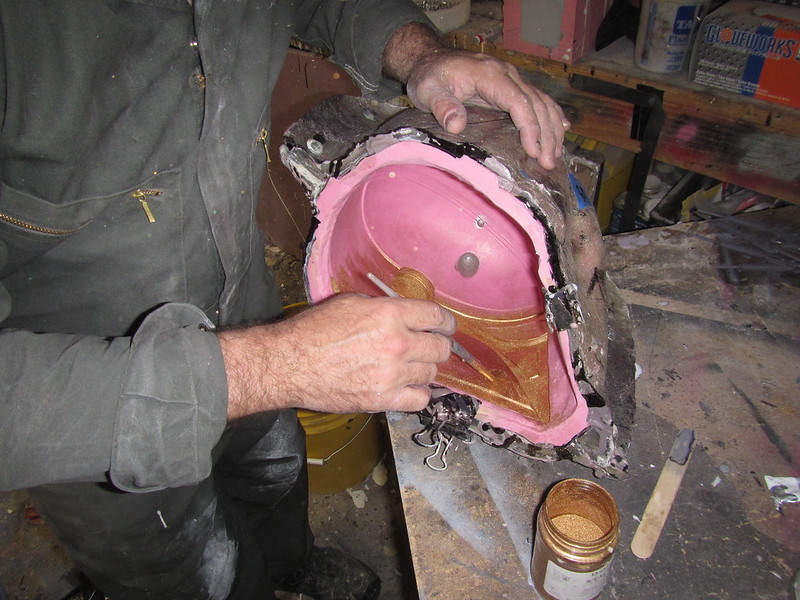

Once the whole surface was covered and the loose powder had been blown out, it was time for...
Rotocasting
Someone recently asked me to explain this process in greater detail. I suppose it's been a while since the last time I covered it, so here's the process for making a hollow shell in a mold.
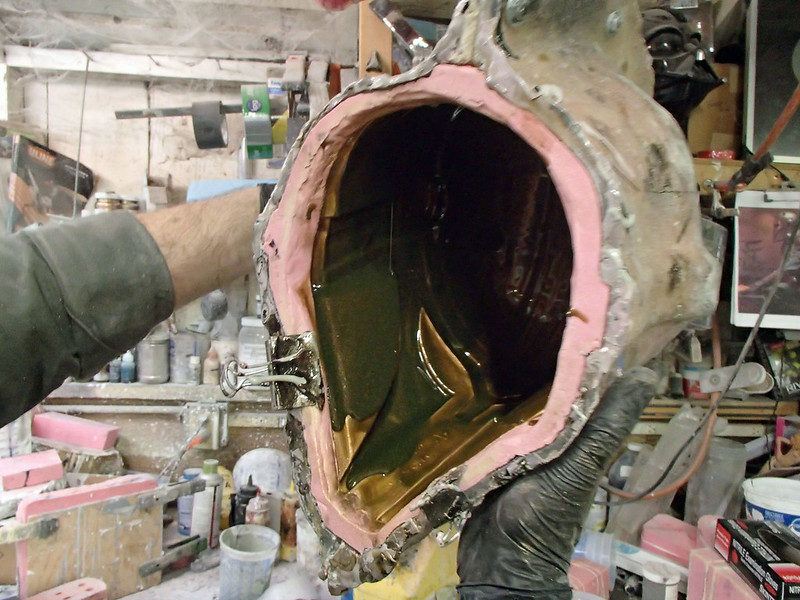
Start by mixing up a batch of resin just big enough to coat the entire surface of the mold interior. For a helmet of this size, it takes about 8 fluid ounces. Then pour it into the mold, taking care to not splatter it in and create bubbles:

Now roll the mold around, causing the resin pool inside to coat the entire interior of the mold:

As the resin begins to cure, it will also become more viscous and cling to the surface better:

The key is to keep the mold moving as long as the resin is liquid in order to prevent it from pooling in one place and making an unnecessarily thick spot:
Any deep recesses in the original model (such as the cheek indents on this particular helmet) create peaks inside the mold that can be difficult to cover. This just means being careful to let the resin drip from one side to the other and angling it so that gravity does the work for you:
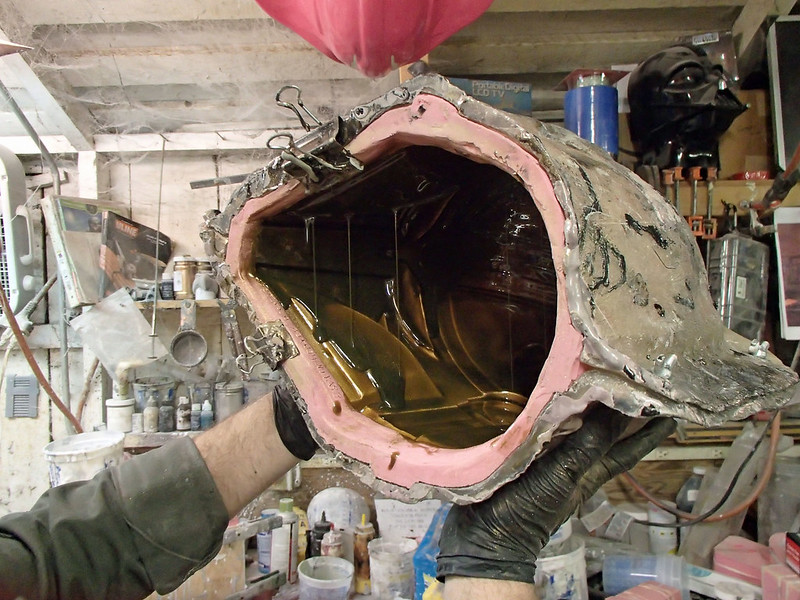
Once the resin is no longer flowing, you can go ahead and set the mold down and let it cure the rest of the way. As it cures, the resin will shift from translucent to opaque and the color change will be noticeable as it cures:

Once the first layer has cured, I waste no time in pouring in the subsequent layer and repeating this process.
Here we can see my associate Rachel rotocasting a layer of resin inside the helmet mold:
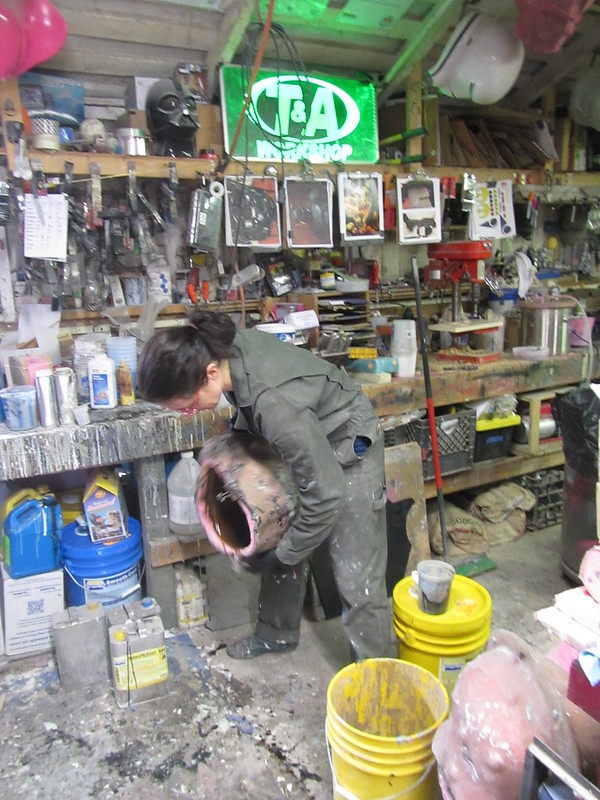
She does it backwards in order to avoid spilling the resin onto herself.
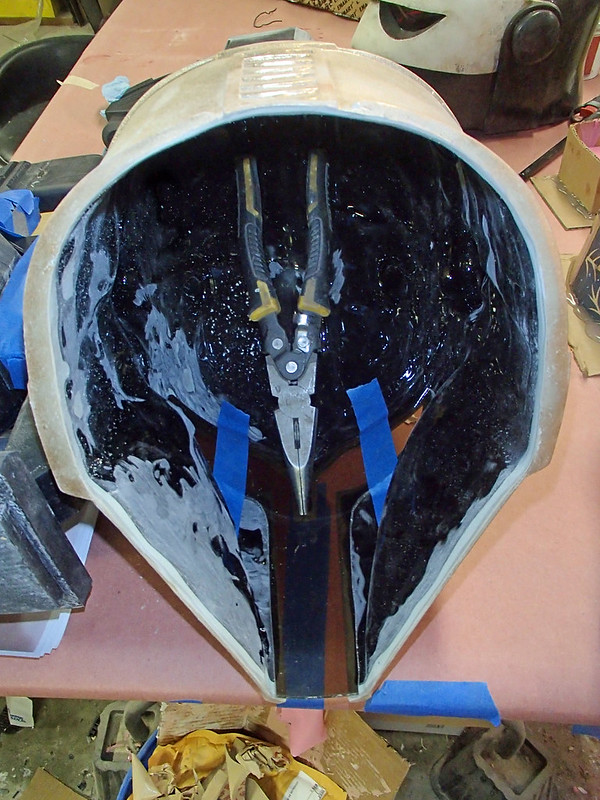
This helmet was cast in four layers of resin for a nice, even thickness all over. The first three layers were Smooth-Cast 300 tinted to a shade of yellowish brown so it wouldn't be as noticeable if there were any gaps in the metallic powder coverage. The third layer had a bit of microballoon filler added in to make it a bit thicker without adding much weight. Since Smooth-Cast 300 is a bit flexible, thin castings can prone to distortion if they're not properly supported. With this in mind, the final layer of resin was Smooth Cast Onyx, a stiffer (though more brittle) resin that has the added bonus of being jet black to give the inside of the helmet a nice finished look.
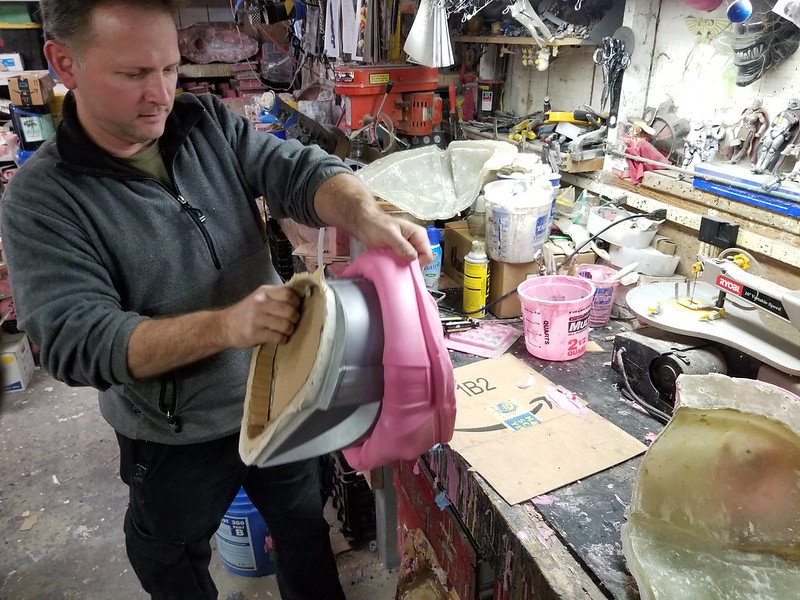
Once the resin had cured, it was time to demold the helmet. Just like removing the prototype, demolding the cast copy was a simple matter of de-gloving the mold:

Of course, I was unable to resist the urge to try on the first casting. This is the way:

The texture came out great:
Trimming
Triming started with a cutting wheel on the Dremel to remove the excess resin around the neck hole:

The T-visor area and the bottom opening were both rough cut with the cutting wheel:

Once the rough cutting was done, the next step was to clean up the edges with a sanding drum:

With the edges ground down, it was time to make the T-Visor:

Visor Forming
The T-visor was cut out of a piece of 1/8" smoke tinted acrylic:

With the shape cut out, the backing paper was peeled off and the acrylic was cooked in the shop toaster oven:

NOTE: If you decide to try this at home, make sure you're set up in a well ventilated area and don't have any distractions while you're heating the plastic. I usually stand by with pair of pliers so I can pull out the acrylic and flip it over every few minutes in order to ensure that it gets evenly heated. The heating curve is very sudden and with the oven set to 400°F it can go from "too rigid to form" to "boiling hot blistery mess of foaming plastic garbage" in no time at all.
ALSO NOTE: This toaster oven has long since been dedicated to melting plastic bits in my shop. Once you've done this once or twice, you'll never want to eat out of that toaster oven again.
Once the acrylic is hot enough to flex like a piece of leather, it's ready to go:
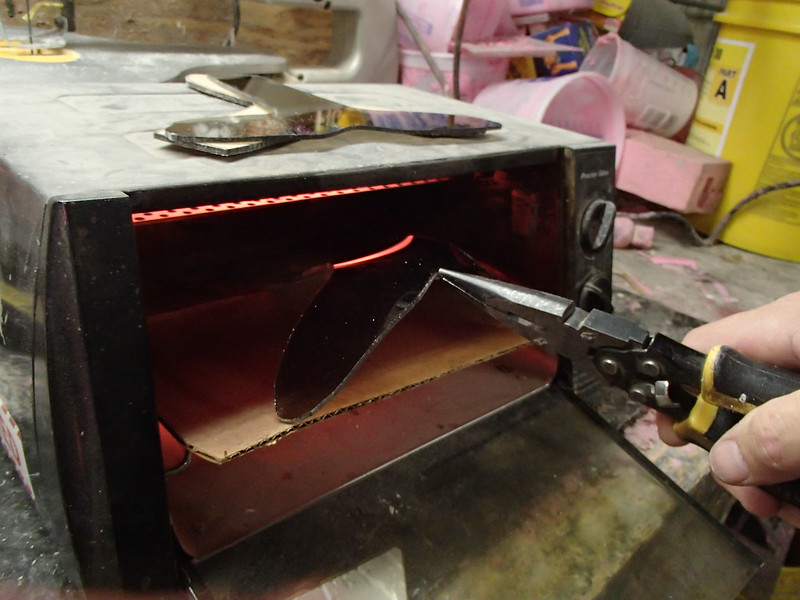
I pull it out of the oven and press it into place in the helmet:
When the acrylic has cooled back to room temperature, it'll keep its new shape:

Painting
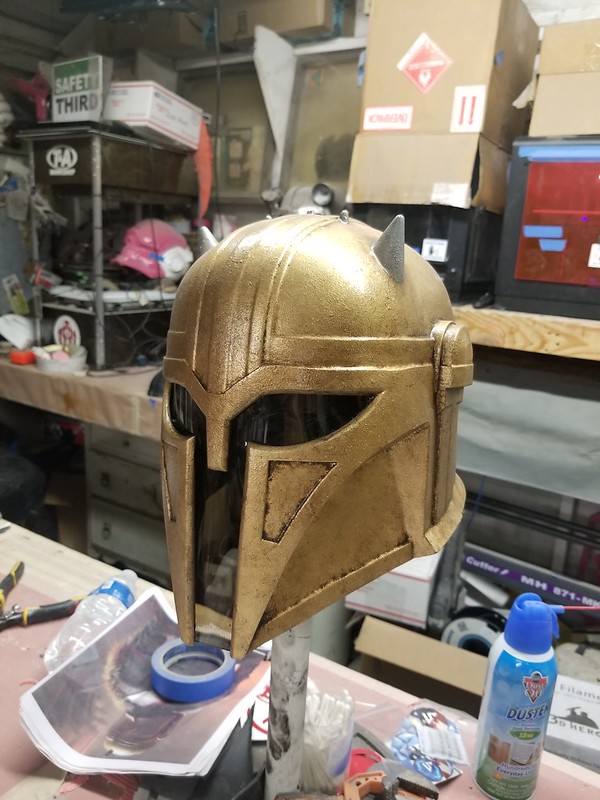
Before permanently installing the visor, the next step is to finish the paint. Since the cast surface already has a metallic finish that I'm pretty happy with, we pretty much just had to weather it. Here's Rachel in the middle of doing some washes with Raw Umber acrylic paint to add some grime into the recessed areas:

Once the brown grimy washes were dry, we drybrushed some gold paint onto the high points to help them stand out a bit more and a bit of aluminum paint on the horns. Then the helmet was given a couple of coats of gloss clear to lock everything in and make it a bit shiny. The final step was gluing the T-Visor in place:
To keep everything snug and comfy, I also install a set of helmet pads like these: LINK.
Then just like that, it's all finished:
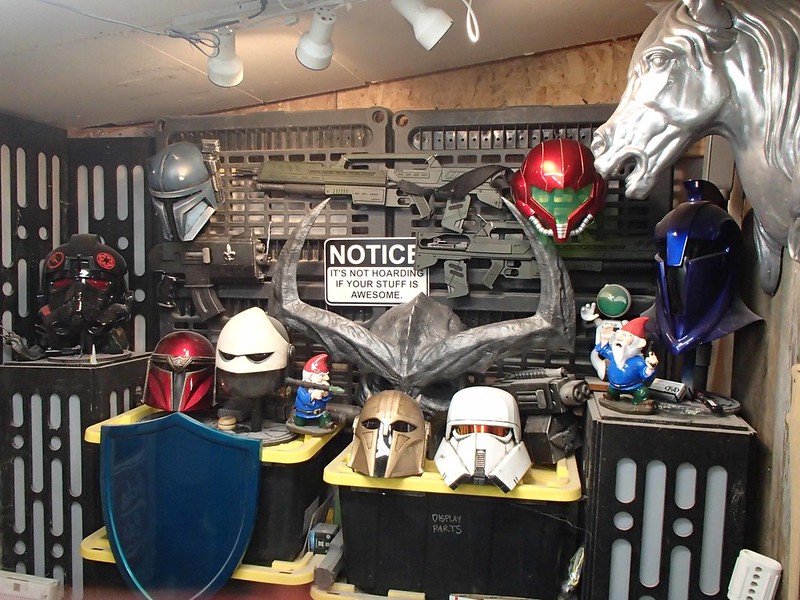
So that's one more recently finished project to add to the recently finished project wall:
Or is it? Naturally, now that I've started working on this one piece of her costume, I'm going to have to make the whole thing:

Stay tuned.
How do you keep air bubbles out of your silicon mold? De-gas in a vacuum chamber? Hope for the best?
ReplyDeleteExactly that. After the silicone is mixed and before it's poured, I de-gas it in a vacuum chamber.
DeleteThen, while pouring, I'm careful to keep it in a steady stream and not let it trap any new bubbles.
The mothermold is designed to allow any air inside to flow up and out.
The rest is just hoping for the best.