I get a lot of people asking questions about how I make the many things I make. Either that or commenting on how they could never do the things that I do. So lately I've decided to share my knowledge and write up descriptions of different ways I build things. The posts labeled "Propbuilding 101" will detail techniques ranging from those that require specialized skills to those that require specialized tools.
The first method I'll describe requires very little of either. All you need is a computer with a printer, some materials readily available at your local hardware store, hobby store, and office supply center, and some patience. Using a shareware program called Pepakura and techniques pioneered by the members of the 405th.com HALO costuming forum, I'll walk you through the creation of this Warhammer 40,000 Terminator helmet prop:

Believe it or not, the helmet in the picture above is made from PAPER. If you'd like to know how, read on...
First, you'll need to download and install a copy of Pepakura from the Tamasoft website: http://www.tamasoft.co.jp/pepakura-en/
You don't need to register the software for it to work. But does unlock a few more functions. Besides, it's so inexpensive you might as well go ahead and pay the registration fee if only to encourage them to keep making it available.
Once you've got a working copy installed on your computer, the next thing you'll need is a model to print out. If you're not a 3D modeller, you can find 3D models everywhere. The Tamasoft website has a gallery of models you can download for free, there are countless prop and costume forums where members are willing to share models for use in Pepakura builds, and if you have the appropriate conversion plug-ins, you can even use models from the Google Sketchup 3D Warehouse.
When choosing (or designing) your model, you have to weigh the complexity of the build against the amount of time and resources you'll have to spend making it nice and smooth. A high polygon model will be harder to assemble in the paper stage. A low polygon model will take more work when it comes time to fair it out. In this case, I've decided to build a high-poly model made by ObiWan of the 3D heretics forum which I found on the 405th, but you can download it here.
When choosing (or designing) your model, you have to weigh the complexity of the build against the amount of time and resources you'll have to spend making it nice and smooth. A high polygon model will be harder to assemble in the paper stage. A low polygon model will take more work when it comes time to fair it out. In this case, I've decided to build a high-poly model made by ObiWan of the 3D heretics forum which I found on the 405th, but you can download it here.
The next step is unfolding the whole thing and printing out the pieces. Once you've printed your model, it's time to assemble your tools and settle in for some quality time with your project. Here's what you'll need:
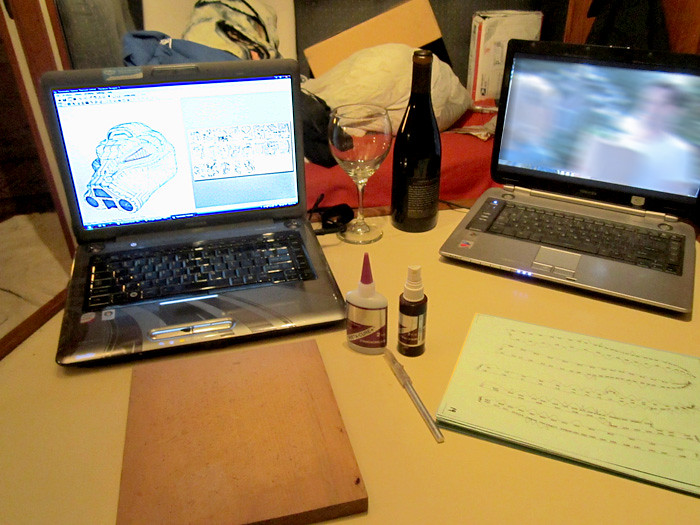

Pictured above is a well-lit work area with the pages of the pep model printed out on 110-lb card stock, a shiny, sharp hobby knife, cyanoacrylate adhesive and accelerator, a cutting surface that isn't the tabletop (or your lap), a computer with the model open in Pepakura so you can keep track of what you're doing, and another screen where you can watch a movie or listen to music or something else to distract you from the mind-numbing repetition of building a pep model. Finally, whatever kind of beverage you'll need while you're working.
Not pictured: spare blades for the hobby knife and Band-Aids.
Not pictured: spare blades for the hobby knife and Band-Aids.
When I'm building a pep model, I find it's easier if I don't cut out the parts until I'm actually ready to use them. I keep all of the printed sheets in order and use the "Check Corresponding Face" function to find the parts as I go along. If you cut all of the pieces out beforehand, you've basically just bought yourself the world's most insane 3D jigsaw puzzle.
As I cut the pieces out, I also use the knife to lightly score the fold lines so they'll crease easily. It's important to go along the center of the line and cut everything as precisely as possible. When building a paper model like this, errors compound, so a few misalignments early on will make for big weirdnesses later on.
To glue the pieces together, I use Insta-Cure. It's a cyanoacrylate adhesive just like Zap-a-Gap or Krazy Glue. I like it because it cures in a matter of seconds (or instantly if it contacts your skin) and can be catalyzed with a separate spray bottle if you don't like waiting. I don't like waiting.
The main drawback to this type of glue is that you will glue your fingers to your work. Guaranteed.
The main drawback to this type of glue is that you will glue your fingers to your work. Guaranteed.
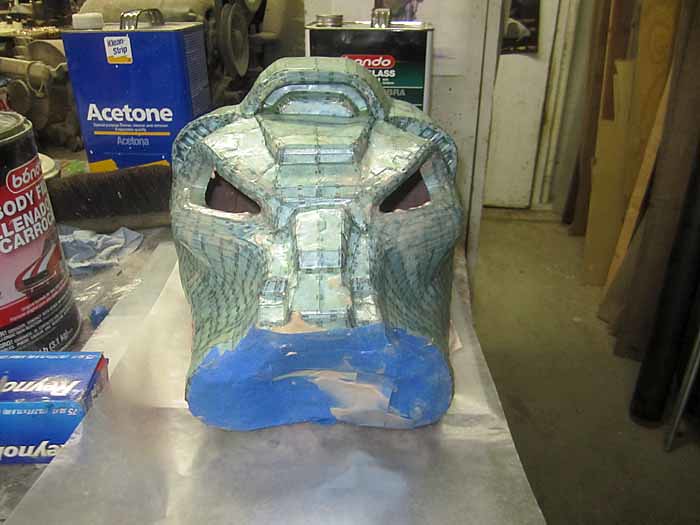
After a couple of long evenings of cutting, gluing, cursing, and peeling my fingertips off, here is the paper model fully built:
Once assembled, the next thing you need to do is to reinforce it so it won't be crushed the moment someone looks at it the wrong way. This is time for fiberglass resin, which you can get at your local hardware store. You'll also need a disposable container to mix your resin in as well as a disposable brush to spread it onto the surface. Muster your tools, take a deep breath, and read the label on the side of the fiberglass resin can.
That done, find an area outdoors or with plenty of ventilation so you aren't overcome by fumes from the resin. It's also a good idea to get a respirator designed to filter out organic vapors so you don't make yourself stupid by huffing resin stink.
The object now is to coat the whole model on the outside so it will hold its shape once the resin cures:
Now it's a bit stiffer, but it's not all that strong. You've got two options to strengthen it: fiberglass mat or "Rondo." Fiberglass mat requires a bit of skill, patience, and know-how, so I'll save that for some other article.
Rondo is a blend of fiberglass resin and Bondo auto body filler. Resin on its own is brittle. Bondo on its own is very thick and hard to slush around. Mixing the two of them makes a readily spreadable composite that's rock hard when it cures.
Rondo is a blend of fiberglass resin and Bondo auto body filler. Resin on its own is brittle. Bondo on its own is very thick and hard to slush around. Mixing the two of them makes a readily spreadable composite that's rock hard when it cures.
Lots of makers will swear by their particular blending ratios. You'll want to experiment to get a thickness that you're comfortable with. If you want it runny, use more resin. If you want it thicker, use more Bondo. Experiment to find what works for you. Just make sure you only mix up as much as you can use within about five minutes before it hardens and becomes a useless lump that you've got to chisel out of your mixing container.
It's a good idea to have a few mixing containers handy too.
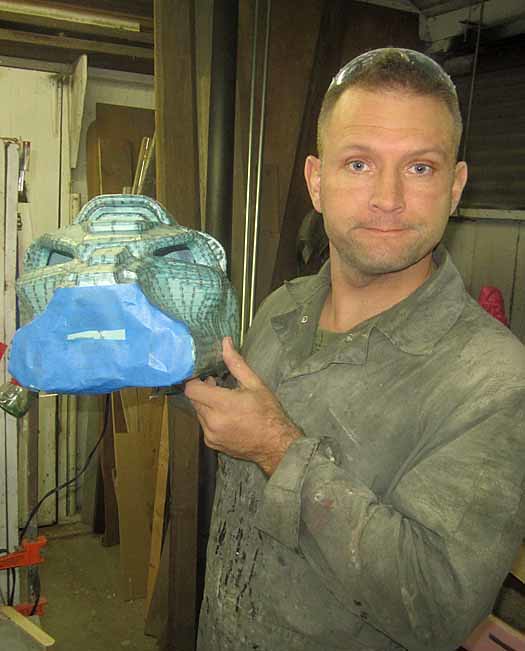
Before you get started, you need to make sure your pep model is ready to be coated inside. In this case, this meant sealing up the holes in the front end with masking tape so the goop wouldn't leak out:
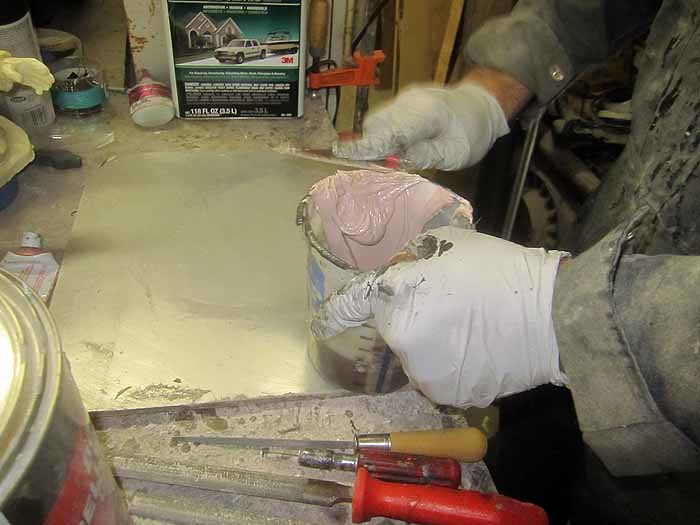
Shown here in the front row is a tool for scooping Bondo out of 1-gallon cans, two sizes of putty knife for mixing and spreading Bondo, two sizes of flexible spatula for spreading Bondo, a chip brush for spreading Rondo, tongue depressors for mixing resin, and a nice clean smooth surface for mixing Bondo. In the back row is the can of Bondo, a can of resin, and a 1-quart graduated mixing cup. You won't need gallon cans for a project of this size, but I go through a lot of both products, so that's that.
Here's how you make Rondo...
Here's how you make Rondo...
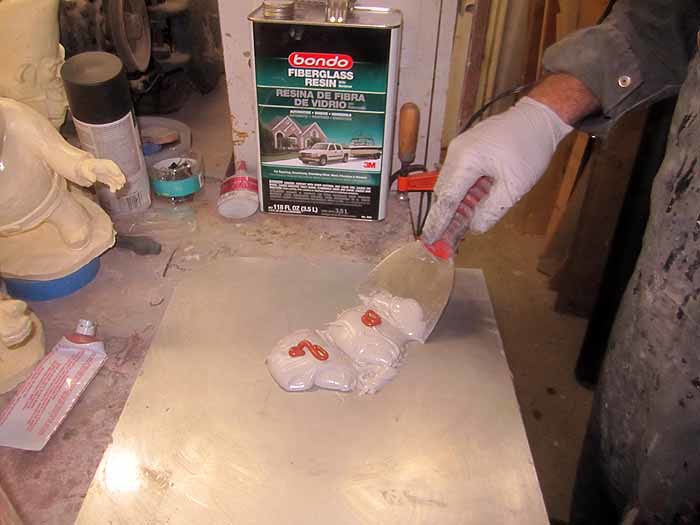
Don't use the same tool you use to mix the Bondo or there's a chance you'll contaminate your Bondo with hardener and have it slowly turn into garbage. For a helmet this size, you'll only want to take out a couple of blobs the size of golf balls. Or one blob the size of a baseball. Or two-thirds of a blob the size of a softball. It's not an exact amount, but you'll get the hang of it with practice.
Step 2: add slightly less hardener than the instructions call for:
The reason for skimping on the hardener is to allow yourself a bit of extra mixing time before the material cures. Remember, you'll have to mix up a batch of fiberglass resin too, so you don't want the bondo to harden too quickly.
Step 3: blend the Bondo:
If your workshop is as well-equipped as mine, you have a retired auto mechanic father who stops by whenever he gets bored with his antique car restoration projects to tell you what you're doing wrong. If you don't have such help, here's what Dad usually tells me when I'm mixing bondo:
- Keep everything neat and clean.
- Only let the Bondo touch one side of the putty knife so you can control where it goes.
- While mixing, periodically scrape the Bondo off of the working side of the putty knife so it can be blended back into the rest of the material.
- Scrape the Bondo off of the mixing surface from time to time as well.
- Continue mixing and scraping and folding the Bondo back into itself until it's all one uniform color.
- Make smaller batches, when you sand it all off you won't waste as much time and money filling the workspace with pink dust.
- Get a job.
That last one is apopros of nothing. It just comes up a lot.
Step 4: Once you've blended the Bondo and hardener thoroughly, mix up a batch of fiberglass resin that's about the same volume as your blob of Bondo in accordance with the manufacturer's instructions. Then scoop the Bondo into the resin:
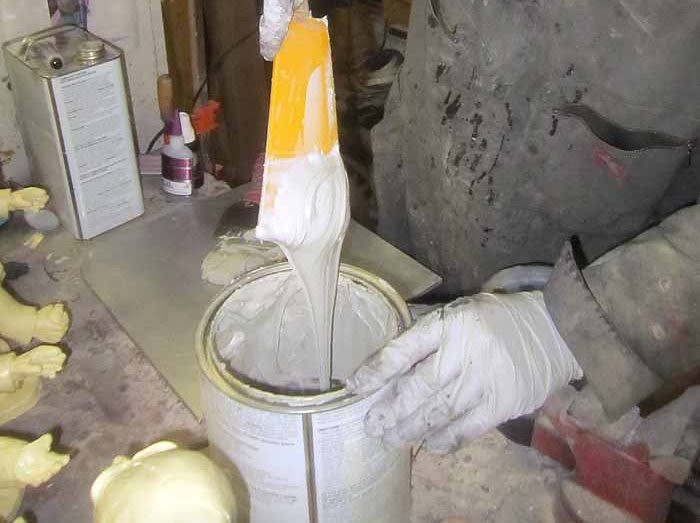
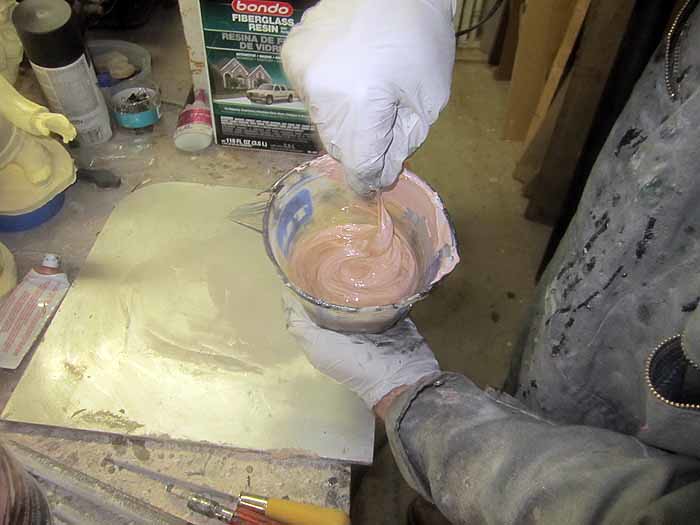
Step 5: Mix them together until you achieve an even consistency:
When it's mixed thoroughly, you've got yourself a blended goop with a viscosity somewhere between milk and mayonnaise, depending on your mixing ratio.
This goop is RONDO.
This goop is RONDO.
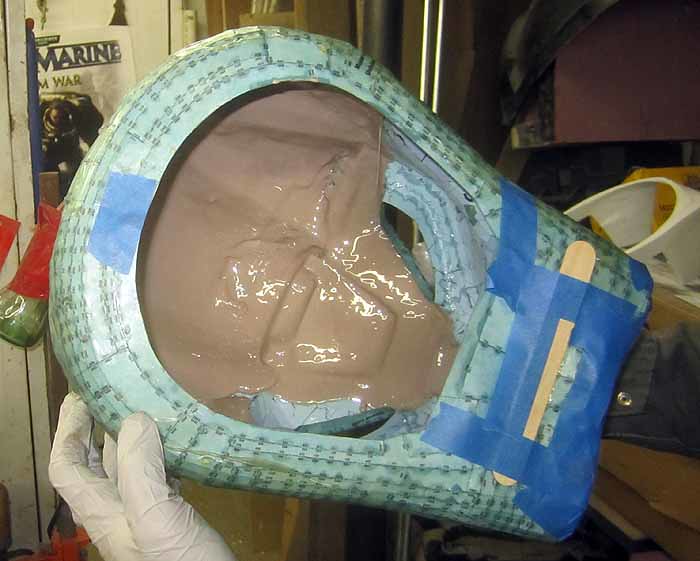
Step 6: pour the Rondo into the pep model:
Step 7: tip the pep model from side to side and front to back so the Rondo slushes around and coats everything on the inside:
During this stage of the project, you are guaranteed to have at least a little bit of liquid Rondo drip out somewhere. Make sure you cover the floor with your finest antique Persian rug to soak up any spills, then leave it where it is until the Rondo has cured and it glues the rug to the underlying floor.
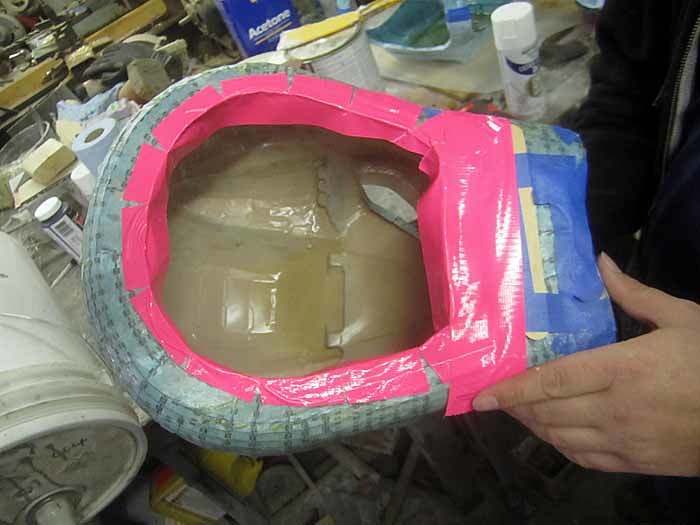
Step 8: Repeat. But first, it's a good idea to add a drip ring around the neck opening so you can make the bottom edge of the helmet thicker without just pouring Rondo all over the place:
It's also a good idea to lay down wax paper so your work doesn't glue itself to your worbench:
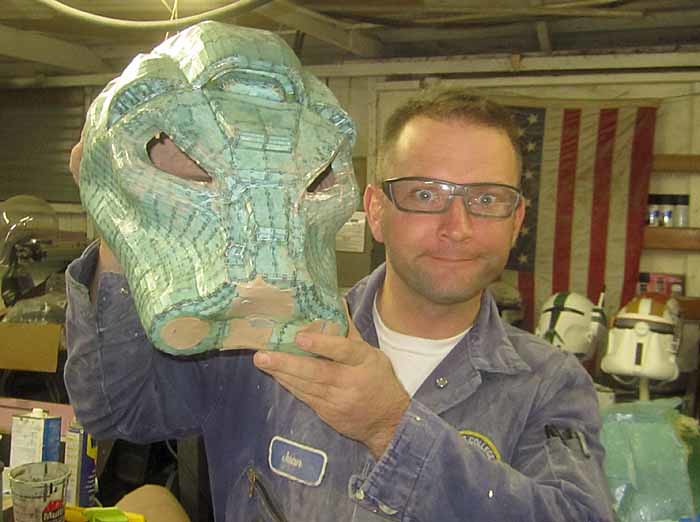
After enough iterations, you've got yourself quite a sturdy piece:
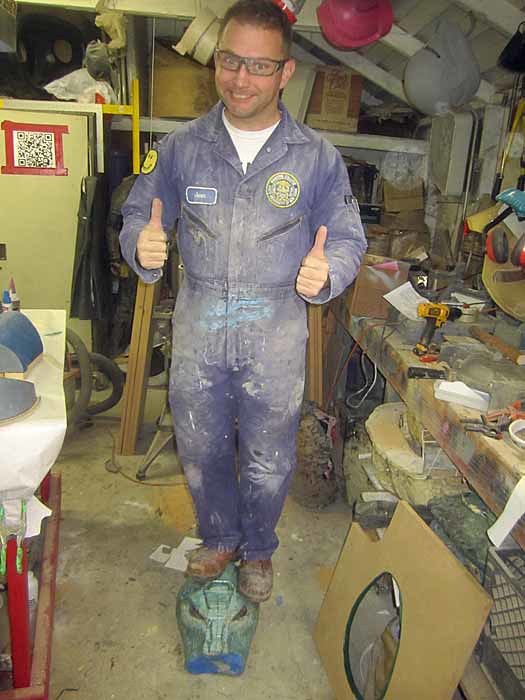
How sturdy? That depends on how many coats you layer on. I may have overdone it with this one:
There is no trickery involved in this picture. That's all 175 pounds of me plus steel-toed boots, heavy coveralls, and pockets likely filled with sanding dust and used rubber gloves standing on top of this paper helmet. I may have overdone it with the reinforcement, but it gives you an idea of what's possible.
Now you've got yourself a nice, strong helmet. You shouldn't wear it for motorcycling, but it will hold up to the rigors of costuming. With that done, the next step is to smooth the outside so it stops looking like a multi-faceted 3D model and starts looking sleek. This is a job for Bondo body filler.
Remember all of the guidelines I mentioned above about mixing and working with Bondo? They still apply. Here's the tools you'll need:
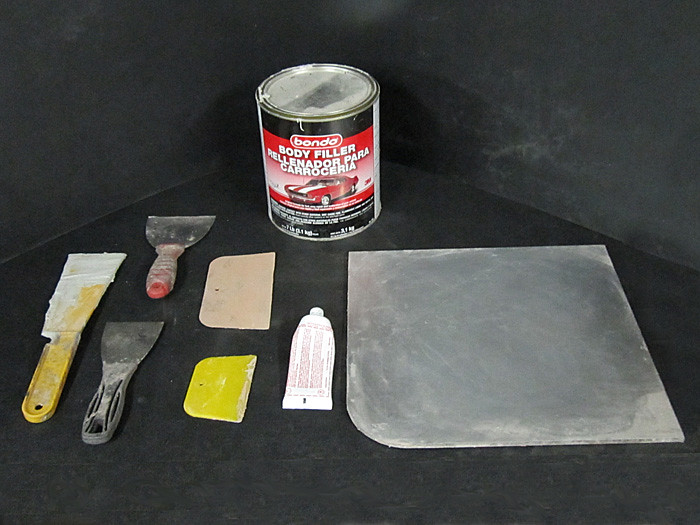

If you're paying attention, you've noticed that these are basically the same tools that you used in the Rondo phase, minus the fiberglass resin, tongue depressors and mixing cup.
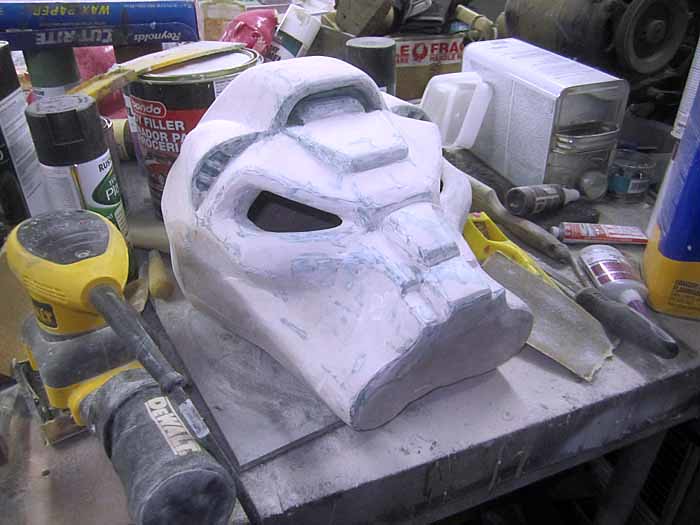
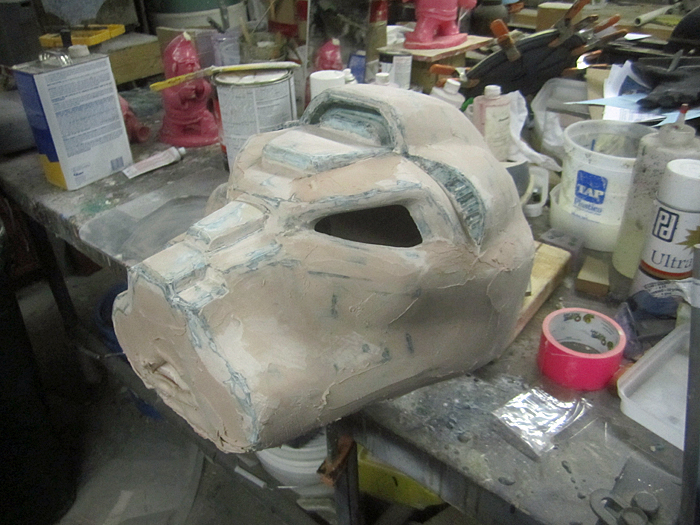
With a model that's already fairly smooth, you shouldn't need very much filler to fair out the shape. If you're using a low-polygon model, you'll need more to round out the facets. In either case, you need to resist the urge to pile on a lot of material that you'll need go grind down as soon as it cures. Instead, it's easier (and less messy) to build up several small layers and cut down on the amount of sanding you'll have to do.
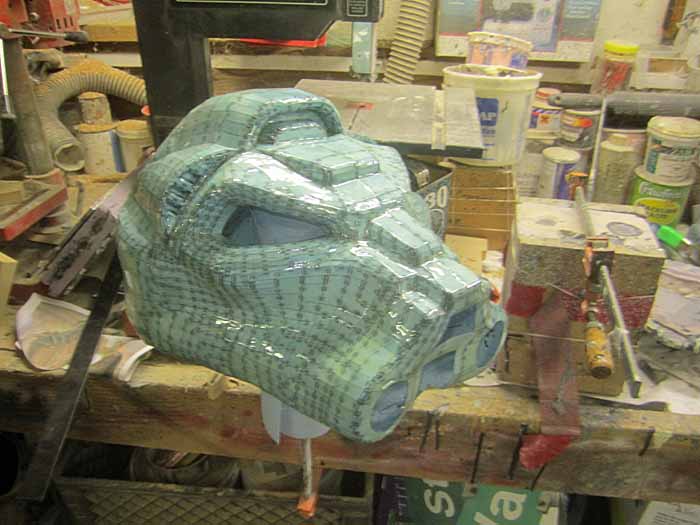
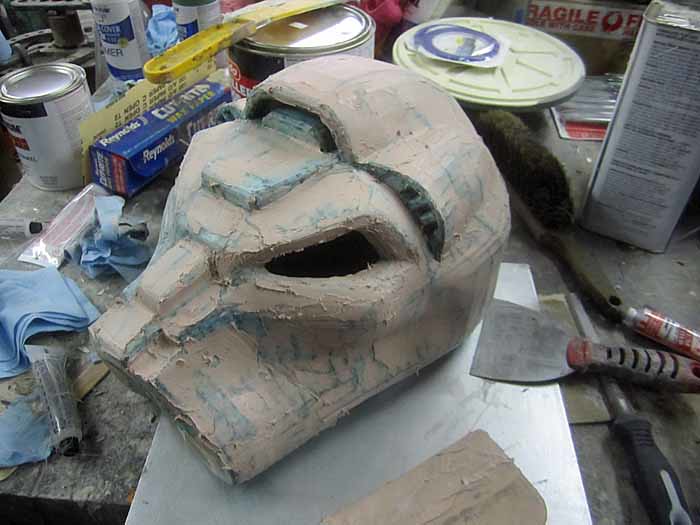
Here's you can see the first coat of Bondo on my helmet:
Here you can see the first coat sanded smooth:
Here's the second coat laid on:
And sanded:
After that, it needed more Bondo. Then more sanding. Then more Bondo. Then more sanding. Then more Bondo. Then more sanding. Then I slowly descended into a downward spiral of smoothing and shaping that I may never have recovered from if not for the timely intervention of friends and family who were able, after a lengthy and emotional intervention, to convince me that it looked "pretty good."
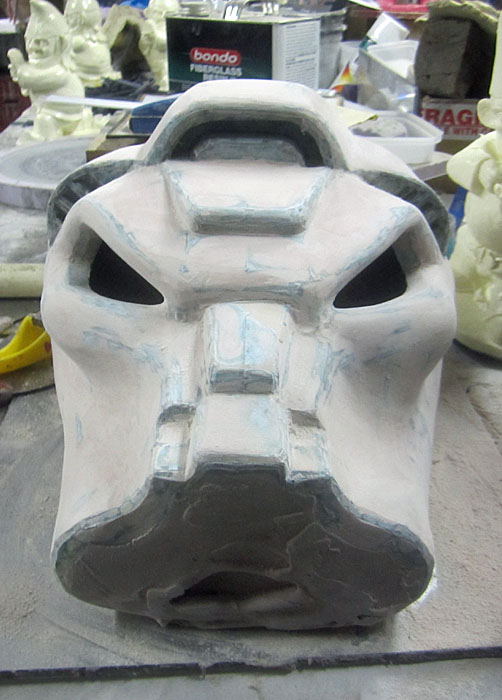
At this point (or much sooner probably) it was a good time to spray on a coat of primer to see where there were areas that needed a little more attention:
Most of the flaws at this point could be fixed with "Glazing and Spot Putty" another automotive product available at your hardware store designed to fill in pinholes and tiny scratches before spraying on your paint. With all of the small pits and pinholes filled in, you'll need to add the detail bits.
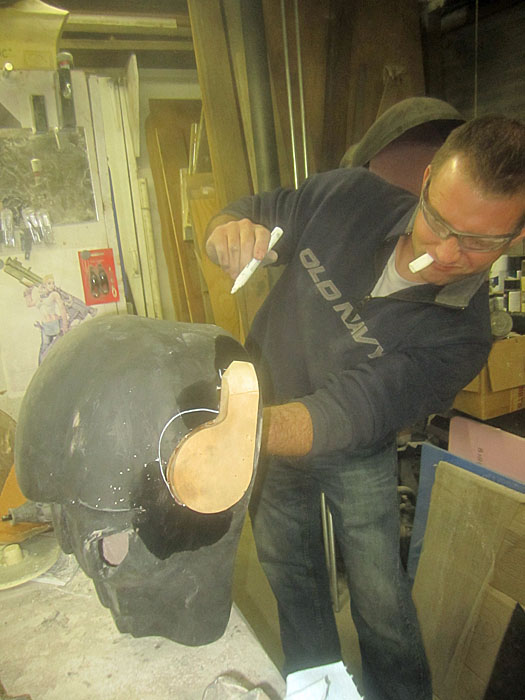
In this case I cut out some scrap MDF (that's Medium Density Fiberboard, available at your local home improvement store) and plastic sheet to make the ear details. Here I am attaching the MDF:
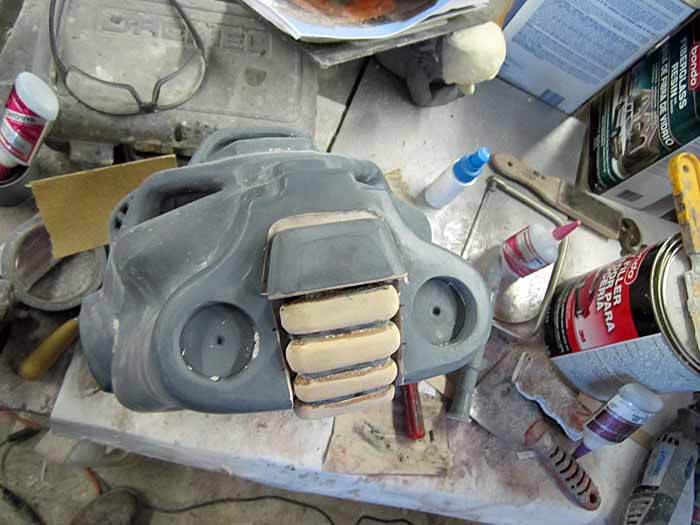
I used more MDF and bits of plastic sheet to make the nose and hose missing from the muzzle:
The holes on either side of the nose were fitted with some scraps of PVC pipe:
The rust-colored patches are areas that I touched up with more glazing and spot putty. Because I can't leave well enough alone.
After yet another coat of primer, it's time for painting!
Per the mythology associated with this character, this helmet would be hundreds of years old, a cherished relic passed from generation to generation but still subjected to the rigors of nearly constant combat. I wanted it to look like it was white when it was new, but aged and battered while still being well cared for.
There are countless methods for finishing a prop like this. The important thing about this build is that I wanted to be able to tell people that it was made of paper and have them call me a bold-faced liar. The best way to achieve this desired effect is to make it look as convincingly metallic as possible so that simulated scratches in the finish will seem to show bare metal.
There are countless methods for finishing a prop like this. The important thing about this build is that I wanted to be able to tell people that it was made of paper and have them call me a bold-faced liar. The best way to achieve this desired effect is to make it look as convincingly metallic as possible so that simulated scratches in the finish will seem to show bare metal.
In this case, I used the following things in my paintjob:
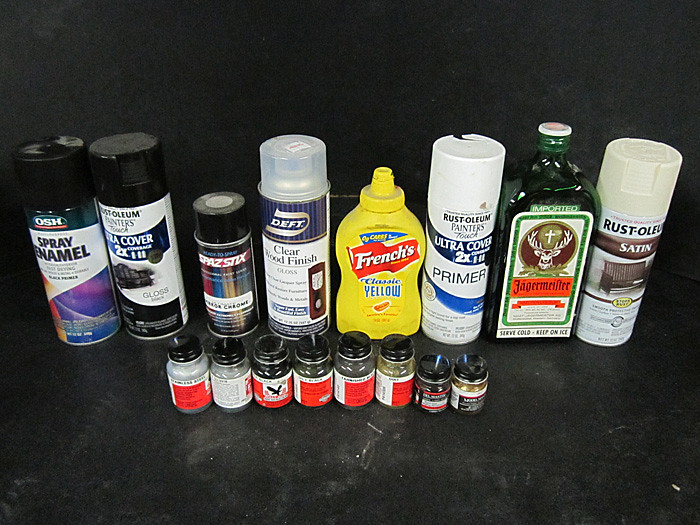
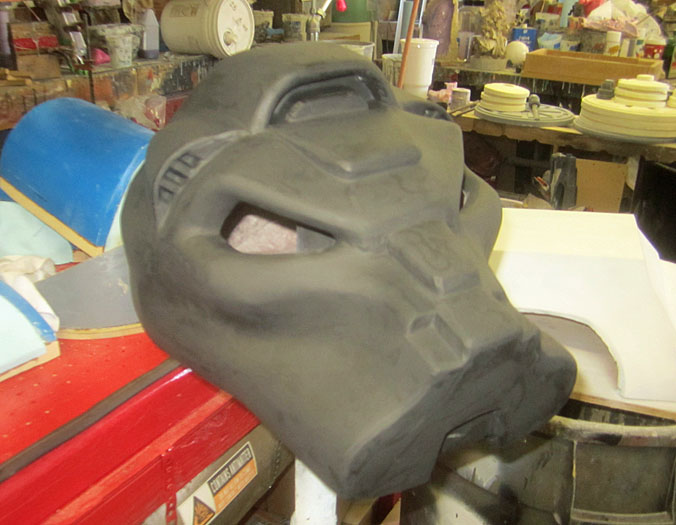
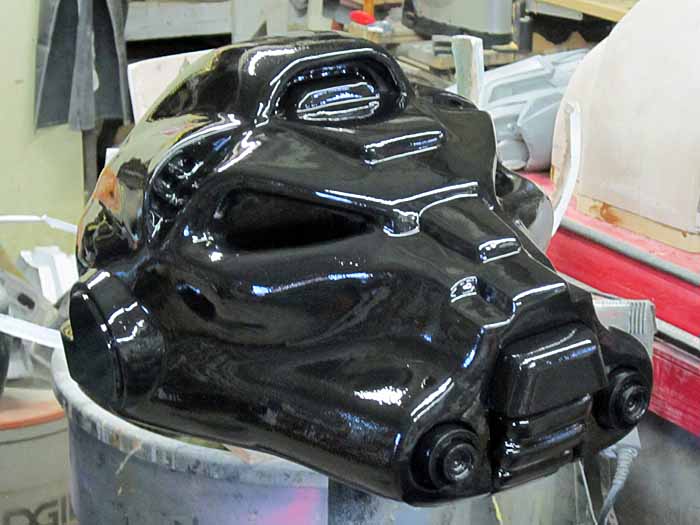
I started by spraying on a glossy black basecoat using Rustoleum spraypaint:

I started by spraying on a glossy black basecoat using Rustoleum spraypaint:
To make this paper helmet look convincingly metallic, I coated the glossy black basecoat with SpazStix Mirrorchrome:
The chrome paint itself is very delicate, so after it had set up, I gave it three coats of clear. Once the clearcoat was dry, I picked out all of the areas where I wanted scratches to show through to the bare metal with mustard:

Yes, mustard. Also known as French's Classic Yellow Mustard or "ew, gross, how long has this been in your shop?"
I use mustard because I was able to determine through a months-long series of clinical trials that it has just the exact right pH balance to counteract the corrosive activity caused by the solvents in the spraypaint.
Actually, no that's not true. In reality you can get away with anything viscous enough to stay where you put it. Ketchup will probably work. Salsa Verde will probably not. The point is to use something water-based that the oil-based paint can't stick to.
With the masking in place, I gave the whole thing a coat of white primer:
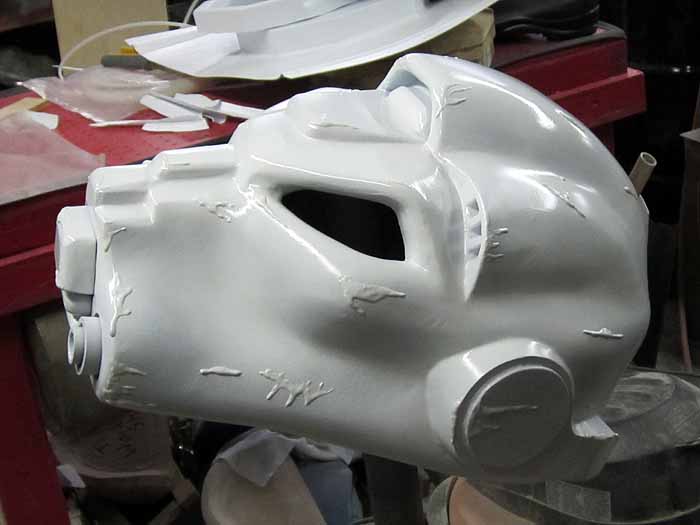
When the primer had dried, I applied more mustard to make scratches that would show through the topcoat to the primer.
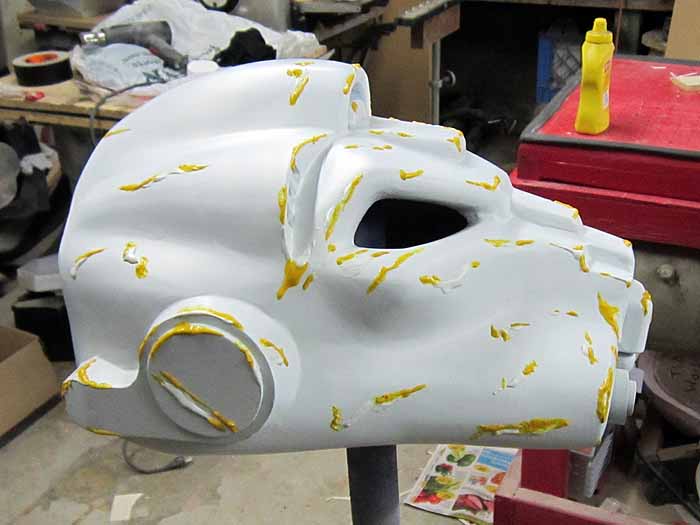
The topcoat was "Satin Shell White" from Rustoleum. I don't know why they call it "Shell White." I suppose "Bone White" is too morbid:
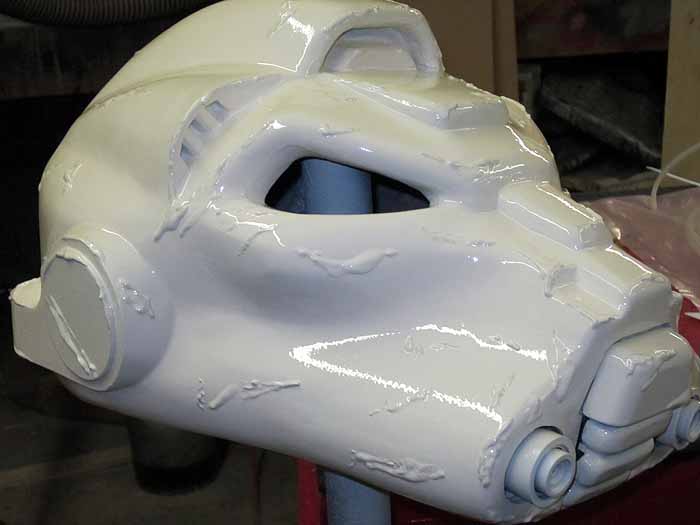
Once the topcoat had dried, the next step was to wash the whole thing, picking off all of the mustard blisters and adding a few scratches in the still-soft paint with a popsicle stick, a toothpick, and a fingernail:
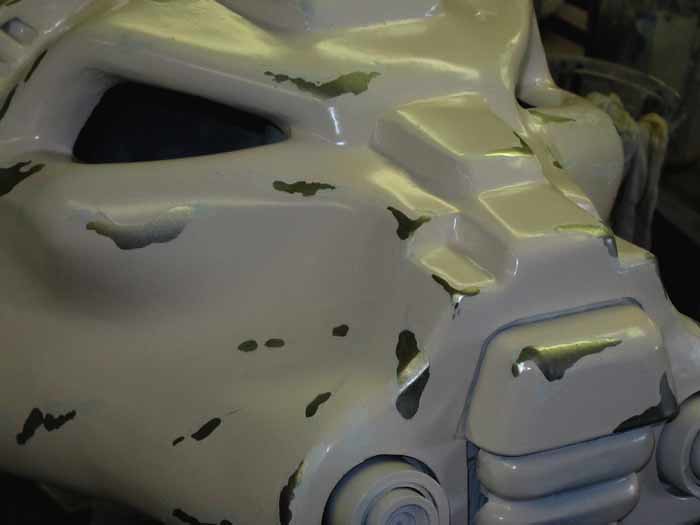
To age the whole thing, I do a quick blackwash with watered-down acrylic paint from the craft store:
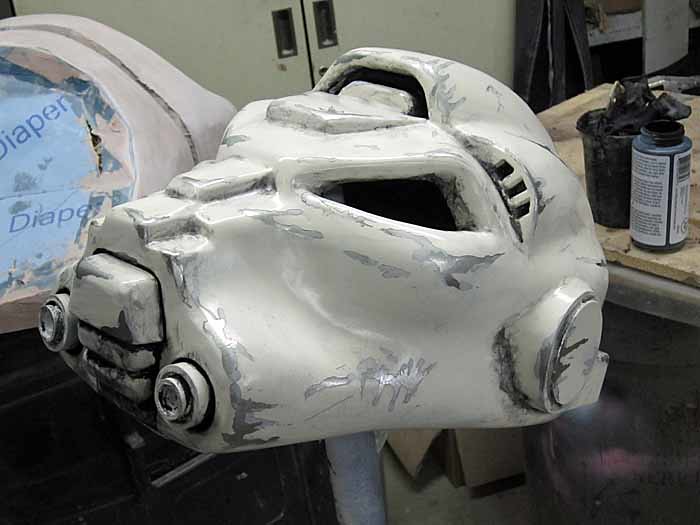
If you're not familiar with blackwashing, you can see the process explained in my build of Boss' helmet from Republic Commando.
Once the blackwash was done, I set about picking out the details and darkening the recesses with an airbrush:
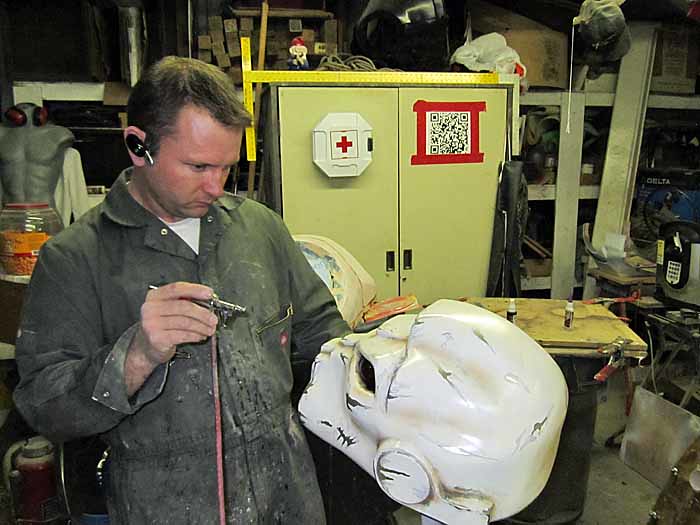
For the most part, the color I used was "Dirt" from the Polly Scale railroad colors line. I also used some "Steam Power Black," "Oily Black," and "Tarnished Black." I'm pretty pleased with the end result:
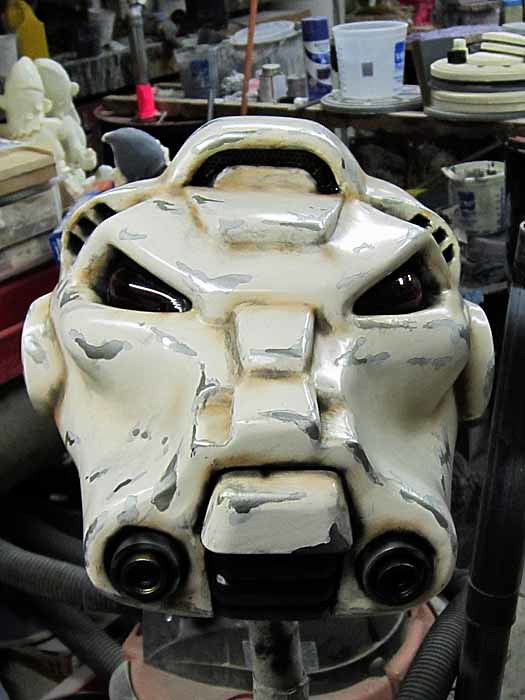
The nose hose detail was brushed with a couple of coats of flat black and the tusks were picked out with some silver and gold hobby paint before I added some age with Model Masters Burnt Iron metallizer in the airbrush:
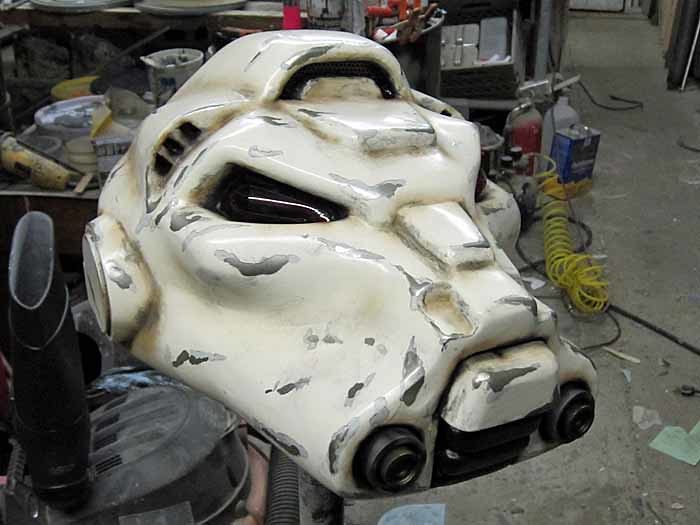
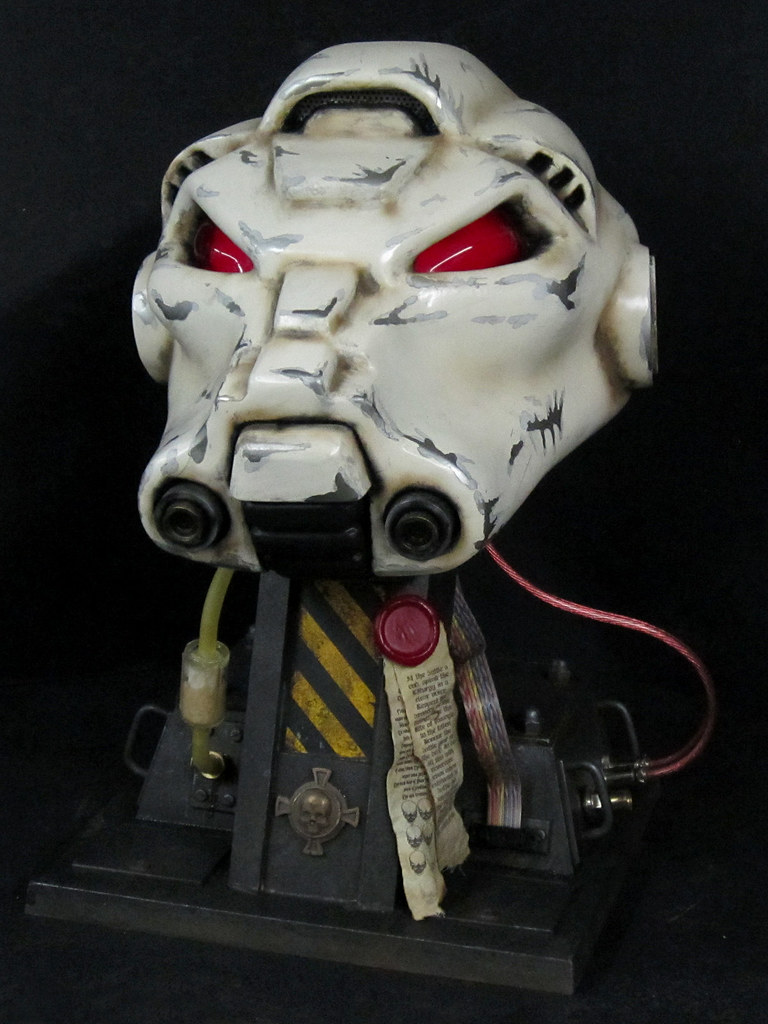
The eyes were formed out of 1/8" red tinted acrylic sheet from TAP plastics which I heated in a toaster oven until it became pliable and then pushed into place with a wad of paper towels until it cooled. This gives them a nice convex look. If you're not comfortable cooking plastics so they emit all of their poisonous chemicals, you could just as easily cut a section out of a welding faceshield from the hardware store or a tinted transparent report cover from the office supply store.
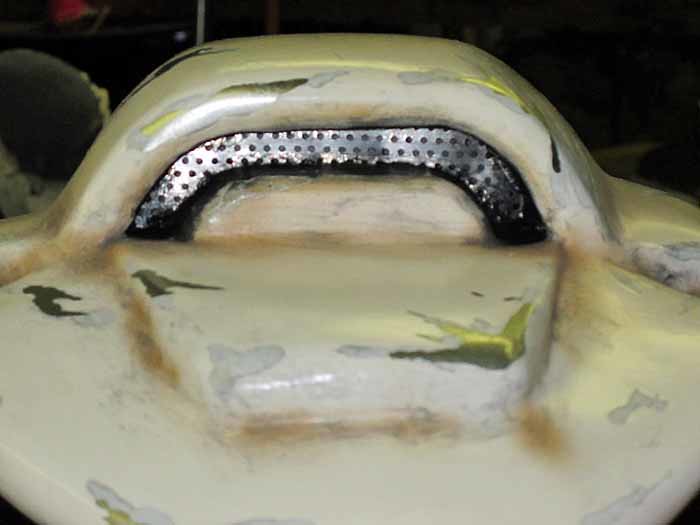
For the crowning detail, I picked up some decorative sheet from the hardware store and cut a piece to fit into the top vent:

If you're not familiar with blackwashing, you can see the process explained in my build of Boss' helmet from Republic Commando.
Once the blackwash was done, I set about picking out the details and darkening the recesses with an airbrush:

For the most part, the color I used was "Dirt" from the Polly Scale railroad colors line. I also used some "Steam Power Black," "Oily Black," and "Tarnished Black." I'm pretty pleased with the end result:

The nose hose detail was brushed with a couple of coats of flat black and the tusks were picked out with some silver and gold hobby paint before I added some age with Model Masters Burnt Iron metallizer in the airbrush:

The eyes were formed out of 1/8" red tinted acrylic sheet from TAP plastics which I heated in a toaster oven until it became pliable and then pushed into place with a wad of paper towels until it cooled. This gives them a nice convex look. If you're not comfortable cooking plastics so they emit all of their poisonous chemicals, you could just as easily cut a section out of a welding faceshield from the hardware store or a tinted transparent report cover from the office supply store.
For the crowning detail, I picked up some decorative sheet from the hardware store and cut a piece to fit into the top vent:
With the paint done, you can add some padding by gluing in some upholstery foam from your local fabric store so it fits snugly.
In this case, I was just planning it as a display piece. So the last thing was to cobble together a suitably interesting display stand from MDF, scraps of plastic sheet, and some random bits of wire and hardware:
In this case, I was just planning it as a display piece. So the last thing was to cobble together a suitably interesting display stand from MDF, scraps of plastic sheet, and some random bits of wire and hardware:
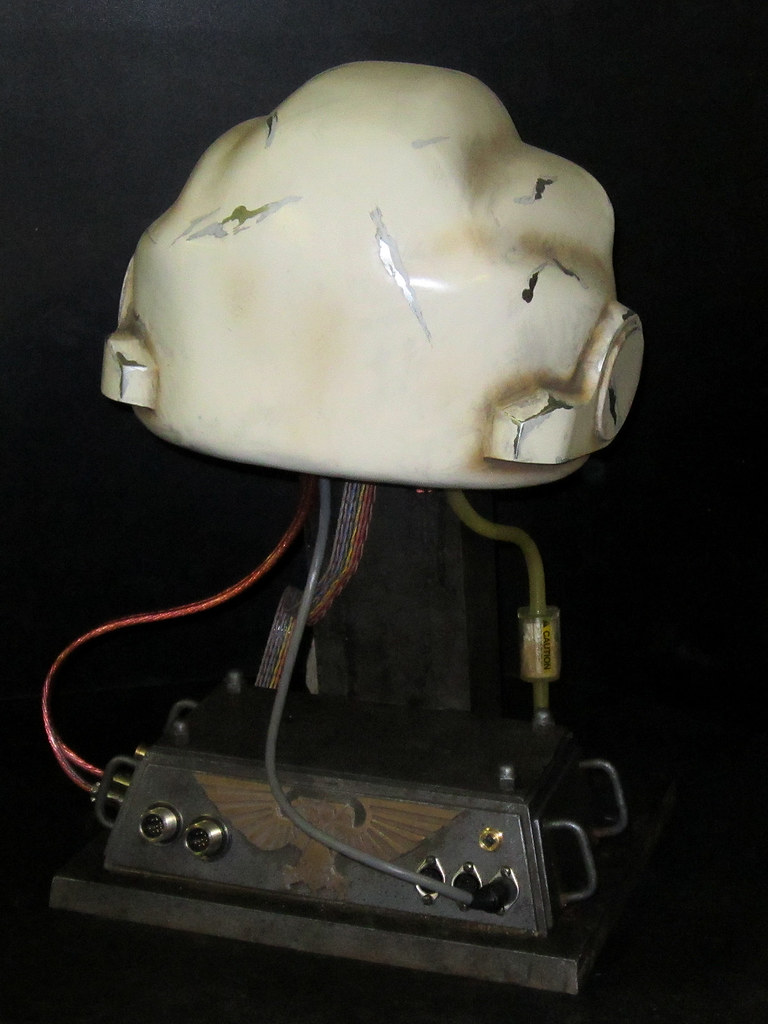
I'm quite proud of the finished result. Here it is from the back:
And from the front:
The total cost of materials that went into the helmet itself was somewhere around $45. Even the smallest bondo and resin kits you can find in the hardware store will contain enough material to build two helmets this size. If I'd bought all of the paints I needed all at once, they'd be another $70 or so. If I had to buy all of the tools I needed just for this project, add an additional $30 or $40 depending on fluctuations in the world tongue depressor market.
Not bad for a finished product that looks at least as good as any of the licensed collectible props I have in my collection.
I've got more projects coming along right now. Be sure to subscribe so you don't miss anything.
EDIT: If you found this tutorial useful, you'll find more like it in my book, "Make: Props and Costume Armor" available HERE.
This web site is completely unofficial and in no way endorsed by Games Workshop Limited.
Adeptus Astartes, Blood Angels, Bloodquest, Cadian, Catachan, the Chaos devices, Cityfight, the Chaos logo, Citadel, Citadel Device, Codex, Daemonhunters, Dark Angels, Dark Eldar, 'Eavy Metal, Eldar, Eldar symbol devices, Eye of Terror, Fire Warrior, Forge World, Games Workshop, Games Workshop logo, Genestealer, Golden Demon, Gorkamorka, Great Unclean One, Inquisitor, the Inquisitor logo, the Inquisitor device, Inquisitor:Conspiracies, Keeper of Secrets, Khorne, Kroot, Lord of Change, Necron, Nurgle, Ork, Ork skull devices, Sisters of Battle, Slaanesh, Space Hulk, Space Marine, Space Marine chapters, Space Marine chapter logos, Tau, the Tau caste designations, Tyranid, Tyrannid, Tzeentch, Ultramarines, Warhammer, Warhammer 40k Device, White Dwarf, the White Dwarf logo, and all associated marks, names, races, race insignia, characters, vehicles, locations, units, illustrations and images from the Warhammer 40,000 universe are either ®, TM and/or © Copyright Games Workshop Ltd 2000-2012, variably registered in the UK and other countries around the world. Used without permission. No challenge to their status intended. All Rights Reserved to their respective owners.

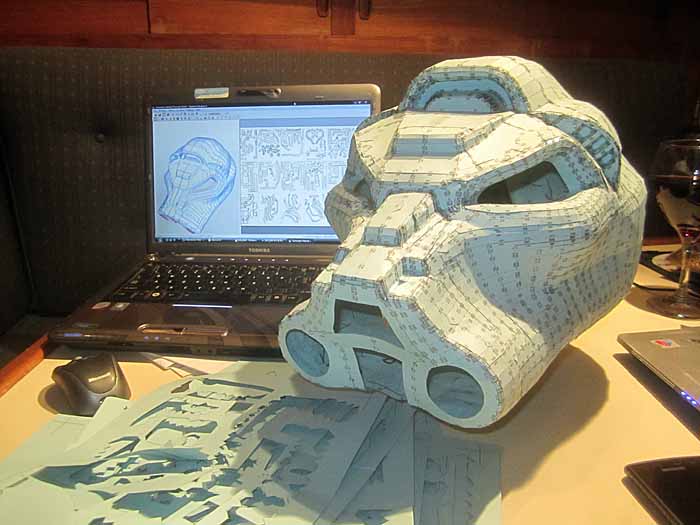






This is the stuff that Man-Crushes are made of.
ReplyDeleteThis gives me hope. Maybe I can actually make something like this. The Rondo-part freaks me out, though. I have no idea what kind of resin and stuff I can find in Norway and what the Norwegian words are for them... Oh well. I'll figure something out. Your painting is also very helpful. I love seeing the entire process, layer by layer. I'm looking forward to more 101 lessons from you :)
ReplyDeleteAnd by the way, someone I know in my country has painted his own Boba helmet. I've received some advice from him. Instead of mustard, you can also use toothpaste ;)
This is fantastic. All of your stuff is a great read, but the tutorials are the best. Looking forward to more propbuilding 101.
ReplyDeletecurrently I am working on a full space marine costume, and although I had been going the pepakura way, I have now come to realize I have been doing it all the wrong way, do you think that if I started now I and followed your method as above, would have the whole suit ready in two or three months?
ReplyDeletegreat job on the helmet, love reading your blog, keep it up.
Unless you make it your full-time job, I doubt you'll be able to finish a full costume in that time frame. Either way, good luck.
DeleteFinally! A fantastic step by step tutorial. In the future, might there be an article detailing how to "scale" the designs to different dimensions, or how to make the items wearable? My 5 year old daughter is really wanting a Halo: Reach Kat costume, but I'm hesitant due to the issue of scaling it to her frame.
ReplyDeleteIn the 2D pull-down menu in Pepakura you can designate the built dimensions of your model. You'll can change the size to whatever you need it to be. I'm not sure why people get hung up on this concept. Use a ruler. Worst case, you'll need to rebuild the paper model if it's sized wrong.
DeleteLove the attention to detail on the helmet, I made a HALO helmet with a similar process, but didn't put nearly as much time as I probably should have in improving the finish (it's really polygonal, sharp edges that don't stay sharp with too many coats to bondo or putty).
ReplyDeleteThe "Rondo" that you were talking about confuses me a bit. Did you add any MEKP into your mix? While Bondo and the fiberglass resin you used are both polyester-based, they're promoted differently and use different initiators to start the reaction, so I'd honestly be surprised if it produced the results it did for you without the other initiator.
You missed that line in Step 4 of mixing Rondo: "Once you've blended the Bondo and hardener thoroughly, mix up a batch of fiberglass resin that's about the same volume as your blob of Bondo in accordance with the manufacturer's instructions."
DeleteSo yes, MEKP was added to the polyester resin in order to make it go off.
Awesome, awesome, awesome!
ReplyDeleteI always look forward to seeing your unread articles appear magically in my RSS reader. It's like mana from some sort of a nerd heaven.
Oh the madness you have created :O Now I have to build one of these, great finished product and a great complete tutorial. Also thanks for publishing your pepakura file
ReplyDeleteAWESOME~
ReplyDeleteHow much time would you estimate that prop took to make? I have worked with paper folding in the past but find the assembly on the nice models overwhelming.
ReplyDeleteWow... simply wow... This has made me want to do this as well. Thank you for the Tutorial! I do, however, have a question, and maybe I missed it, but how did you do the eye pieces?
ReplyDeleteThanks!
hi mate!!!! searching the net i found your blog when i saw you it came to my mind "hey i know this guy"!!!hahaha i know you from the rpf,i am building an iron man costume but i need a little help with the mold,it's a simple question can i send you a pic to your email so you can give me an idea?
ReplyDeleteis infested with tutorials on the net but your step by step is really excellent!!!!
here is my blog
www.craftmodels.blogspot.com
thanks too much i will follow your blog!!!!
Actually, I've written a couple of how-to articles in this blog about making helmet molds. Look back through the archives and you'll find them. The most applicable one for you is probably my Republic Commando mold.
ReplyDeleteFantastic work! I can't wait to work on more quality stuff like that :)
ReplyDeleteThis has been the best Easter weekend reading this build. :)
ReplyDeleteI havea bit of an odd question . What kind of printer do you use? Also, my father and i are working on some nasty yard gnomes thatll hook up as sprinklers....lol. awesome work btw. Give me something to strive for, and the tuts are quite informative.
ReplyDeleteSo out if curiosity, where do you get most of your supplies from?
Sirk133333@yahoo.com
In the pic of the painting supplies, and the painting details that followed, you failed to mention when the Jaegermeister is used :) (I assume after the father and his "get a real job" comments have gone home?!)
ReplyDeleteBut all kidding aside, this is a fantastic tutorial. But can I ask about using Pep? what sort of poly count on my 3D model should I try to achieve before sending it to Pep? Does poly count even make much difference if it gets up there in numbers?
I thought the Jaeger was pretty self-explanatory...
DeleteI'm not much of a 3D modeller, but I can tell you that the higher the poly count, the more difficult it's going to be to keep the build nice and straight. If you've got any sculpting experience, you really don't want to have the pep model be much more than the "blocking" that establishes the general shapes so you can keep everything in proportion when you go back in and flesh out all of the details.
With practice, it'll all get easier.
You should make a Big Daddy costume from Bioshock. Challenge?
ReplyDeletehttp://images4.wikia.nocookie.net/__cb20100201053920/bioshock/images/e/ec/Bouncer_Rendered_Model.png
u have managed to inspire my new pc casing.
ReplyDeleteWhen I put together the paper model of my Aquila MK VII Space Marine helmet I built a bit of the model before completely I scrapped the unfold and did it again myself. My own refold was much easier to accurately assemble and used less paper. When it comes to this Terminator helmet, though... I don't even know what to do. From your pictures, it looks like we got the same PDO. I started tinkering with a refold, but the asymmetry of the model is already driving me a little crazy. Did you do any kind of refold, or did you just assemble the PDO the way you found it?
ReplyDeleteI almost always end up rearranging the unfolded parts. Because of the highly faceted nature of this model, I redid the unfold several times before I decided that it was good enough. The seams in the model still didn't end up being symmetrical, but I made most of the sections into L-shaped pieces so the additive errors from the pep build would end up correcting themselves along the way.
DeleteHey I gotta say this is all amazing and really helpful. I've read many of your different articles here and got really inspired and hopeful I can make stuff too..
ReplyDeleteBut I have a question.. I'd like to do a pepakura Combat Shotgun (Fallout, can be found on DeviantArt) but since the pepakura comes in color, how do I protect the outside layer of it without damaging the colors?
As well, since the COmbat Shotgun is a close object unlike a mask, how do I put the bondo in it?
Thank you for all your help
I can't think of any way to reinforce the paper model without messing up the colors on the surface. You're going to have to paint it after it's done.
DeleteRegarding filling the closed model, you'll need to use something less viscous than Rondo. If I was determined to use a pep model to build something like you're describing, I'd probably coat the outside with fiberglass resin as mentioned in order to make it watertight, then once it cures I'd drill a hole in one end and fill it with casting resin.
In all honesty, I wouldn't recommend building something like that with Pepakura. It's easier to just carve it out and build it up in wood and styrene. But whatever floats your boat.
To speak the truth this is a nice post concerning this topic. I got a pure solution from here. Also I can refer to you all Wasau paper here to get educational helps. Nevertheless will wait for more posts from the blogger. Thanks a lot…….
ReplyDeleteFunny Cool Photos Are Very Funny..I Like It
ReplyDeleteThis is amazing! I'll be using this to make my KILLZONE 3 Capture trooper helmet
ReplyDeleteHow do you do the sizing in Pepakura when you're ready to print?
ReplyDeleteAmazing work, thanks for sharing. I came across this article while looking for rondo tutorials and it definitely fit the bill. I do have a question for you, regarding the rondo step of your prop; a lot of other tutorials use fiberglass cloth or mat plus rondo, but unless you neglected to include the step, it appears that you don't.
ReplyDeleteIs this something that you've found to be overkill, or problematic in some other way?
Man I really could use your help. Im trying to make a helmet for myself I have yet to see anyone do and the one thing holding me back is how to get a 3D model of it in Pepakura
ReplyDeleteHey, I tried contacting you but I think your "Email" button is broken or something. I want to commission you for an airsofter's dream...a unique juggernaut suit (Call of Duty...not Marvel lol). Something terrifying on the modern battlefield and can take a beating while being lightweight but heavy-looking (bulky-ish). Something that will haunt the dreams of my enemies.......think you're up for it?
ReplyDeleteIncredibly descriptive and informative. Looking forward to trying it out for myself. Thank you for sharing your knowledge.
ReplyDeleteDo yo have a YouTube channel that you can show us in more detail how to do this with a full armor. And how do you do the rest of the armor because I'm trying to build a full clone commando
ReplyDeleteThe rest of the armor is built in the same manner. If you'd like to read more step-by-step tutorials like this one, you can pick up a copy of my book here: http://amzn.to/2nvnltj
DeleteIt explains this process in greater detail as well as a variety of other methods you'll find useful when the time comes to paint your armor and strap it all together.
ok. Thanks i will get it
DeleteThis was a fun read. Not only are you good at writing tutorials, but you also have a good sense of humor. I'm gonna use this when I start making my Dragonslayer Ornstein armor set.
ReplyDeleteIf you liked this, you should pick up a copy of my book: https://amzn.to/2WM77kN
DeleteIt's got loads more information and it's at least as much fun to read it.