About Me

My photo
I make toys for kids who don't want to grow up. I'm on the lookout for new projects. If you're interested in commissioning me to build something ridiculous, shoot me an email.

Friday, July 24, 2009

Goofy Project #1138: Trey's Helmet

INTRODUCTION:

For those of you who don't know, I've had a couple of costume parties lined up this summer. One was held at a fairly classy venue in Seattle while the other will be in Petaluma at a bit more kid-friendly location. My sister will be bringing her kids to the second one. Since she has two kids (and a husband) she will get to make four separate costumes. I don't know what she or her husband or her daughter will be dressed as, but a few weeks ago I found out about her son Trey.
Apparently she picked him up from school a while back and asked him how his day went. He replied, in the most serious tone an elementary-schooler could muster, "Mom," says he, "I've decided what I want to be for uncle Shawn's party."

"Oh?" she asks, "What's that?"

"Boba Fett"

So I get a call not long after that and my sister asks if I have any of the parts for the Boba Fett costume. I told her that while she was right to guess that I have the costume, she was wrong to guess that I'd have it in midget sizes.

At the time I was still camped out in a Washington, DC hotel room, needed a small project, and decided there was nothing I'd like more than to manufacture a miniature Fett helmet or two. I told my sister the rest of the costume would be up to her, but I'd be able to at least take care of that part. And so I began with...

Stage 1: The Prototype

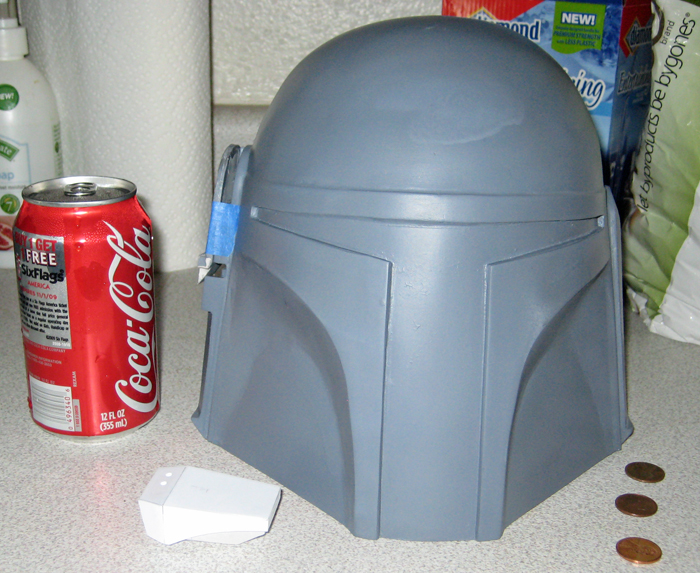
Surprisingly, the most difficult part of the Fett helmet to get right is the dome. My original plan was to fabricate the entire helmet using the Pepakura program and any of a number of readily-available 3D models of the character. Once the dome was built, I decided that I didn't like the way the rest of the model was coming together and ditched it in favor of a scratch-built version using various thicknesses of sheet styrene. Once it was all cobbled together, it looked like so:
Baby Fett bare
Then it got a healthy dose of primer:
Baby Fett primed
Then a bit of Bondo and a lot of sanding to perfect the rounded dome:
Baby Fett

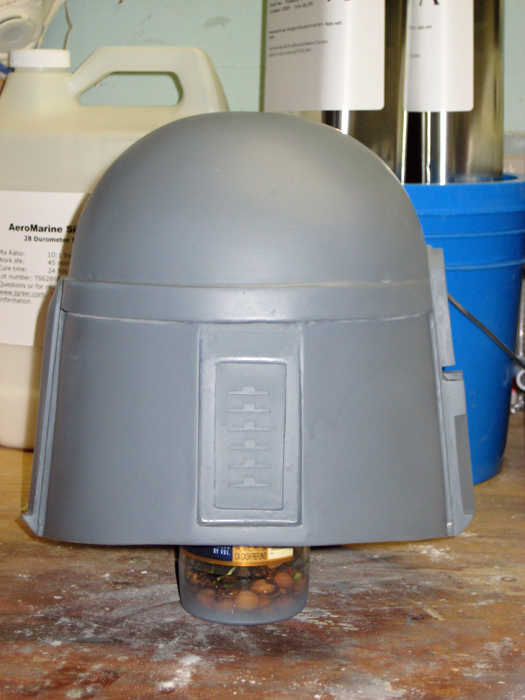
At this point the wyf and I had left Washington DC and driven to New Orleans, so there were a few days' delay before the prototype got it's final coat of primer:
Baby Fett2

Then it sat in the back of the car for a few more days before I got around to adding these annoying little notches and other details on the backside:
BabyFett5

Then I painted it lightish red like I tend to do with my prototypes, before moving on to...

Stage 2: Moldmaking

When you've got one of something and need lots of somethings, there's nothing easier than RTV (Room Temperature Vulcanizing) Silicone Rubber. It comes in a wide variety of flavors and colors and makes amazingly flexible, long-lasting molds. Depending on how it's mixed, you can pick up even microscopic details. It's expensive, but it's also worth the money. I buy mine from http://www.jgreer.com/, because they've got the best prices I've found as well as top-notch customer service.

The trick with moldmaking is to choose a mold material that works with you and to work around it's potential drawbacks. Silicone is expensive, so you want to use as little as possible. The problem is that it's also very flexible, so you need to build it up thick. The solution: a jacket and mother mold.

The jacket is the flexible rubber part that will pick up all of the minute details on the surface of the "master," also known as the prototype or original. Here I am coating the master with uncured silicone:
Moldmaking

Once the jacket has cured, the next step is to build a rigid "mother mold" that will hold the jacket in place. I'd go into greater depth explaining this, but you can just google the term "mother mold" and you'll find plenty of tutorials. I'll write up my own some other time.

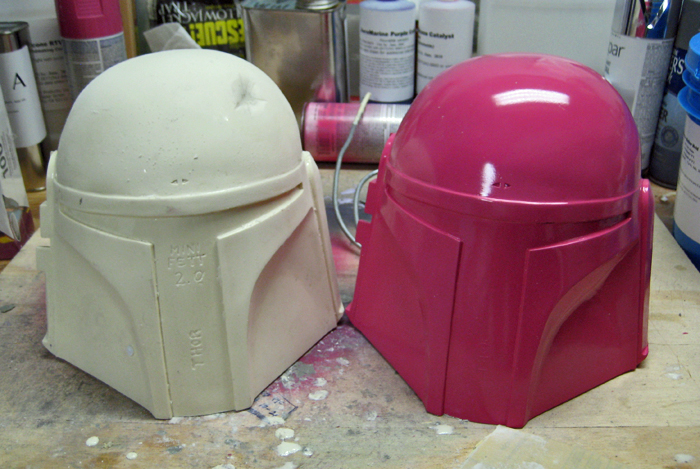
Once I had a working mold, I made my first casting. Since the undented version is styled after Jango Fett, the first copy had to be modified to make the Boba Fett helmet. In this pic you can see the new dented helmet on the left and the lightish red prototype on the right:
2Fetts

Stage 3: Funding

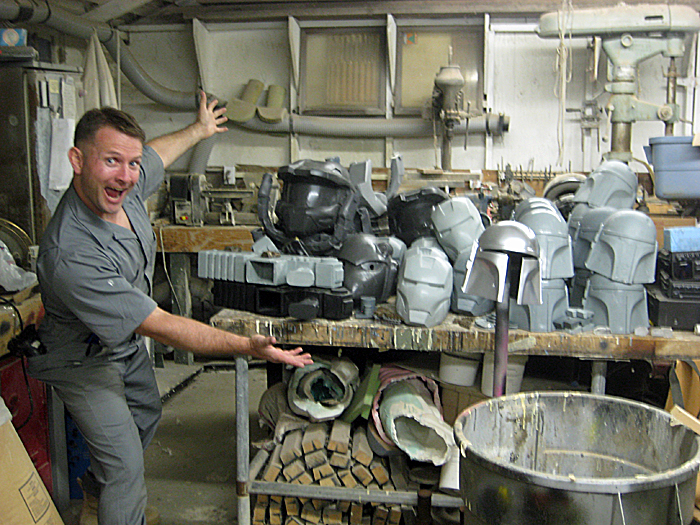
Like I said, silicone is expensive. While it's nice to have a helmet cast in urethane resin (also expensive) the only way for me to afford it on my current budget is to share the costs with similarly intense costumers who have a bit more cash and less time than me. Once I'd made a mold of the undented and dented helmets, it was time to crank out a few more and sell them. Here's the production run along with a few leftovers from other projects:
Casting Craziness

Stage 4: Painting

You can see in the photo above the one helmet painted silver in the foreground. That was casting #1, my nephew's helmet, at step 3 of what would end up being at least a thirteen step painting process. Step 1 was priming it. Step 2 was lightly sanding and then priming it again. Step 3 was painting it the best metallic silver I could find in a spray can. Steps 4 through 11 were masking off and spraying the various shades of green, grey, black, red, yellow, buff, and son on. Step 12 was to apply all of the hand-painted details with tiny little brushes. Finally, step 13 was to dust it lightly with three different versions of primer (rust, black, and grey) and then touch up the bare metal parts with silver paint again.

Here's a shot of the helmet around step 7 with the visor taped in place:
Baby Fett

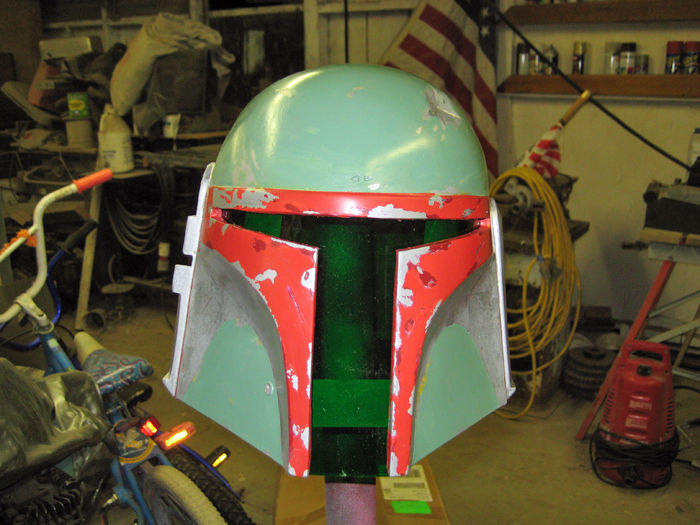
Before you ask, yes the visor is supposed to be green. The visor for the helmet used in production was made from a dark green welding faceshield that was cut to fit the t-shaped slot. It caused a few problems in some of the green screen effects shots when... Nevermind, I am a huge geek and nobody needs to know this stuff.

Once all that's done, it's time to glue in the visor:

The blue masking tape keeps me from coating the green visor in glue too. Once the glue is cured I have to touch up the areas of the paintjob around the visor. I suppose the smart answer would've been to glue the visor in first. Oops.

Stage 5: Upholstery and Whatnot

You can't have a helmet without some kind of padding. Usually I don't stop there. In fact, the last helmet I actually finished (Ana's Coast Guard HALO helmet) had headlights, port and starboard sidelights, and a defogging system with built-in ventilation fans. When I finish my next one, it will have all of that and a rear-view camera system, voice amplifier, wireless intercom, and a drinking tube. Fortunately, this little guy isn't going to need all of that.

Instead I've decided to settle for a simple headliner fabric glued to the interior of the helmet to make it a tiny bit easier to wear as well as a bit of foam rubber wedged into the top to add a bit more comfort.

Stage 6: Delivery

When my sister and her kids finally arrive, it will be time to wedge the helmet onto my nephew's head. The result? Stay tuned.

Sunday, July 19, 2009

Unseaworthy Vessel of the Week

Ever since my wife started doing the professional blogging thing, I've been enjoying the occasional story about the Coast Guard going out and rescuing someone from their own stupidity. While a lot of her stories tend to involve folks caught by surprise or suddenly unable to save their own lives, there were no shortage of folks who really just plain shouldn't have been on the water to begin with.

It's with these folks in mind that I would like to start periodically posting my favorite unseaworthy vessels as I find them. Today's entry comes from www.thereifixedit.com, a site about makeshift repairs and jury-rigged equipment.

Without further ado, I present the Beatnik Bass Boat:


In his defense, there's no shortage of flotation in the hull. Fortunately it looks like a fairly calm day on the local pond, so whenever his little car battery runs out of juice he'll eventually drift ashore.

I'd like to write something clever about the lack of lifejacket, running lights, backup propulsion, hull integrity, and so on, but I'm too distracted by this intrepid mariner's hairstyle.

Friday, July 17, 2009

Impractical Military Vehicle of the Week: the T-28 Superheavy Tank

I've been reading up a lot lately about superweapons and crazy military vehicle ideas from all over the world. These range from flying tanks to jetpacks and everything in between. While most of them just make me chuckle and a few of them have been added to my list of must-build projects, I figured it would be a good idea to share a few of my favorites here in my blog.

First up: the T-28 Superheavy Tank:


When it comes to gigantic WWII tanks, the Germans seemed to have had the majority of the loose screws. Still, once the US Army got wind of wind of the German Maus superheavy tank, they decided to build a ridiculously gigantic tank of their own. This American giant was dubbed the T-28 and two prototypes were built. To give you an idea of how big it was, here's a shot from Time magazine showing one of the prototypes between an M-22 light tank and a howitzer self-propelled gun:


The T-28 was armed with a 105-mm main gun and had just enough room in the magazine for 62 rounds. With 12-inch thick armor plating, this beast weighed in at 100 tons. By contrast, the ubiquitous Sherman tank of World War II weighed around 30 tons and today's M1 Abrams is around 66 tons.

In order to keep all of that weight from sinking it into the ground, the T-28 needed an extra-wide set of tracks on either side. The solution: add a whole second set of tracks outboard of the original set. At just a shade under fifteen feet wide, this tank was so wide that it couldn't fit down many European streets, so the outside set of tracks could be unbolted from the hull, bolted to each other, and towed behind the tank itself:


The T-28 was fitted with a Ford GAF V-8 gasoline engine, cranking out 500 horsepower. This gave it a top speed of 8mph and severely limited the tanks ability to climb over obstructions. It was also too heavy to make use of any of the Army's portable bridge systems.

Unfortunately, the two prototypes weren't delivered until after the war was over. One had the main gun mounted in the hull and the other had a more conventional rotating turret. During field testing, the turreted model was destroyed by an engine fire. The surviving prototype was determined to be too slow for mass production and before improvements could be made, the T-30 was developed with a 155-mm main gun and a 700hp engine.

The remaining prototype was discovered abandoned in a field in the 1970s and now resides at the Patton Tank museum:


I want one. But then I suppose I need to finish building my Sherman first.

Thursday, July 16, 2009

Hard Times for the Heart of Gold

When I went out to sea last year for my day job I had a long list of things to take care of on my boat before any serious amount of use. When I bought the boat she looked great but she was old and worn and thoroughly used. I went in knowing that I'd have to do a lot of electrical work as well as replacing all of the galley equipment and possibly the engine and generator. It was also pretty clear that the standing rigging (the collection of cables that keep the masts from falling down) was going to need some work too.

Even with all of her problems, she looked damned good:
Photobucket

The plan was to go out to sea, pay off all my bills, and then return to California with a fat checkbook and tons of free time about four months later. Then I got mobilized and sent to Afghanistank. That added almost ten months of waiting before I'd get a chance to get started on any of the repairs on the ever-growing list.

If you're a mariner, you know that any moment of neglect will have to be paid for with interest later on. By putting off required maintenance or repairs today, you can count on even more work to take care of tomorrow. So for the past year, every time I've thought of my boat, I've mostly been dreading the ever-growing pile of corrective maintenance that was waiting for me on board.

In an effort to get a bit of a headstart while I was still deployed, I convinced my parents to pull the sails and take them to Rooster Sails, an excellent sail loft in Alameda, California. Right before I was mobilized some of the seams had started to give out while Ana and I were underway, so I was figuring I'd probably have to replace them altogether. Still, I was hopeful that I might find some sort of sailmaking wizard who could resurrect them for just a bit more use.

That wizard turned out to be Rui Luis of Rooster Sails. Rui is one of the nicest guys I've ever met and made me a great deal as a way of saying thanks for my service in Afghanistan. He does great work too, and I can't recommend him enough to anyone in the market for sail repairs. If you stop by, tell him Shawn Thorsson sent you.

For every good thing that happens though, Karma feels a need to add a bad thing. While Rui was taking care of my sails, I was running into all sorts of problems getting the rigging taken care of. I'll admit that I wasn't doing very much, but that was because I was half the world away with less-than-reliable access to a phone or email. Over email, the folks at Hansen Rigging told me in February that they should be able to stop by sometime the following week, survey the rigging on the boat, and let me know what needs to be taken care of.

Fast forward from February to late June, through another dozen emails, and five more phone conversations in which they promised to stop by "next week," and they still hadn't sent anyone down to the boat. At this point I'd called for the umpteenth time and told the owner that I really needed a survey of the rigging done before I actually returned to the state.

So after months of coaxing, someone from the company ended up meeting with my father on the boat. Among other things, the rigging surveyor brought along a German Shepherd which apparently bit my old man early on in the meeting (which is reason enough to keep me from doing business with them). Then when he got to the boat he did some cursory looking around before deciding that there was no way that any of the gear was still serviceable.

His solution: move the boat down to their shop on the other side of the Bay, pull the masts out, disassemble them completely, replace all of the shiny parts, and then reassemble them, re-step them, and re-rig them.

The estimated cost: $13,000. That's US dollars.

The problem was that his estimate included repairs to a lot of pieces that I just plain don't need. All I asked for was the cost to replace the standing rigging, but they wanted to tear out the whole rig and rebuild it from bow to stern. While I can't do all that myself, I know I can pull the wire shrouds and stays off by myself, take them to a shop to have duplicates made in shiny new marine-grade stainless steel, and then re-install them without paying thousands of dollars in labor costs. I'd like to take credit for that idea, but Rui at Rooster Sails gave me that one too.

Anyway, once I finally got back to Petaluma in July of this year I was really worried about finding out what was waiting for me in my slip at the marina. It turns out that after ten months without me the boat still floats:
Return
The fact that it still floats is a minor success of sorts when you consider all of the extra weight in birdshit on board. On deck things were in a bit of disarray, but not so bad:
Deck Disaster

In fact, the only real surprise I found topside were these two little corpses:
Roadkill on Deck

The bird on the right makes sense to me. When birds die they have to land somewhere, so landing on my deck makes as much sense as anything. It's the gopher carcass on the left that has me troubled. There's no good reason to expect to find a gopher on a boat. Later I also noticed a little pellet of fur and teeth that suggest that there was some random raptor perching in my rigging for a few meals while I was gone. Cool.

But I digress...

After giving the decks a good sweepdown fore and aft, I set to work on the lower set of shrouds (the wires that keep the masts from falling sideways). I figure there's an upper set that will steady the masts as well, so things should be alright when I leave the lowers out for a week while new ones are made.

Here's a shot of me loosening the turnbuckles:
Turnbuckles
And here's a shot of me in the bosun's chair pulling the pins at the top ends of the mizzenmast shrouds:
Aloft
Fortunately, when I pulled the pins the mast didn't collapse.

For her part, Ana helped by hanging out down below:
Alow

The next day I took the shrouds down to the rigging shop at Svendsen's Boat Works where they'll be able to fabricate a brand new set in about five days. So now I've got the rigging problem about 25% solved.

All I have to do now is replace the generator, install a new refrigeration system, install a stove, replace all the wiring, have new canvas made, install an inverter, upgrade the interior upholstery, sand and coat all of the brightwork, get new cockpit cushions, repaint the spars, rebuild the roller furler, convert all of the cabin lights to LED bulbs, replace all the old plastic portholes with bronze ones, and scrub the diesel smell out of the bilges, and build a dinghy. No sweat.

Stay tuned for the next exciting chapter...

Briefly Back in Petaluma

This was my first time flying into the Charles Schultz Airport in Santa Rosa, CA. It's a tiny little airport with a tiny little airstrip and a tiny little terminal that somehow makes getting in and out a lot easier.

I don't know why it caught my eye and not Ana's, but there was a US Coast Guard HH-65 on the tarmac there when we landed:
HH-65
You don't really expect to see a lot of Coasties in land-locked towns, but whatever.

My mother was waiting for us in the terminal and apparently there was some nutjob in the terminal acting crazy. He was carrying a tiny US flag and kneeling and bowing in the passenger terminal while exclaiming that the other travellers were all Commies and deserved what was coming to them. I'd have snapped a picture of him, but he was already being hauled away by Sherriff's deputies about the same time as we were landing. I got to go outside just in time to see him being placed in a squad car while yelling "they're gonna kill me!" and somesuch to the onlookers.

I suppose it wouldn't be a proper welcome back to California without some sort of crazy.

Once we were back at the folks' house, it was time to sort through my mail, uncover my car, play with my dogs, assess the whereabouts of all my projects, and unpack a bit. I also got to chat with dad about his Rat Rod project and snap a few updated pics:
Ratrod front

Over the next few days we did a bit of running around in my fun little car:
Anapic1

Along the way we tried on a lot of hats:
Anapic2

I also made a few quick copies of some helmet sculpts I'd been working on:
Casting Craziness

While I was tinkering in the workshop one day, Ana took it upon herself to brush the dogs:
Dirty Dogs

After removing several pounds of fluff from both of them, she decided we'd be better off calling in the professionals. We took them both over to Petaluma Pet Groomers at 117 Washington Blvd. The staff there were wonderful and very patient and, after quite a bit of whining on the part of both of my sled dogs, they were returned clean and dry and fluffy. Now their whites are whiter and their colors are brighter:
Clean Kira

The weekend while we were in California coincided neatly with my scheduled drill weekend with the naval reserve. Since I've been out of touch with all things Navy, I figured it would make a lot of sense to run down to Alameda for the weekend. Since I'd be mired in all sorts of navular noise for the weekend, Ana went ahead and drove down to Long Beach to look at apartments.

Things started going wrong when I drove up to the building where my unit was training right before I deployed and found it completely locked with the lights out. Then I went over to the support center's admin shop where I learned that the unit I used to drill with now meets in a different city on a different weekend and since I was new to the unit the same weekend as I was processed for mobilization to Afghanistan, nobody thought to let me know about all of the changes. So basically I'd gotten myself the world's worst haircut for no reason at all.

All the same, I managed to sort out a lot of the administrivia that had been haunting me for some time now. The Navy now has posession of my medical records and several pounds of other official paperwork at this point, so at least I've got a bit less to haul around now. So that's the good news. The bad news is that I had to get up at ridiculous AM, drive an hour to Alameda, get a couple of hours worth of runaround at the reserve center, and generally waste my time.

By 0915 Saturday morning I was finished with all things navtastic and decided to stop and visit my newest 2nd cousin; Zoe Dell Thorsson:
Zoe Dell1

She's the freshly squeezed daughter of my cousin Desmond and his wife Laura and absolutely, cheek-squeezingly adorable:
Zoe Dell2

From what Desmond and Laura tell me, she was born 8 lbs 5 Ozs, and 19 inches long. Her bloodsugar was a little bit low at birth, but she has a high midichlorian count so she shows a lot of promise...

Ahem.

After spending an hour or so shaking the baby, I headed back to Petaluma where I finally got started on the much-prolonged work on board the Heart of Gold.

Unfortunately, writing about both a Navy drill weekend and my work on the boat would exceed the level of frustration and anger that this blog can host in one post. Stay tuned for some grisly yacht maintenance pictures and stories in the next post.

Wednesday, July 15, 2009

This Year's First Visit to Washington

The last post had us just arriving at my in-laws place in Washington. I've done a terrible job of updating my blog lately, so the events of two weeks ago are somewhat of a blur at this point. Fortunately I have pictures.

Here's a winning shot of the Space Needle in Seattle which I took while riding the monorail:

Space Needle
That same day we'd gone to the Seattle Science Fiction Museum. There were all sorts of fascinating items on display including original props, costume items, and studio models from all sorts of iconic TV shows and movies. Unfortunately, the only one I was able to take a picture of was this reproduction of Gort:
gort

After the museum and the monorail, we went to Gameworks in Pacific Place and I kicked my wife's ass at skeeball:
skeeball tix

I was able to redeem my 9,372 tickets in exchange for some $13.00 worth of toys at the end of the evening. Awesome.

Meanwhile, my father-in-law was kind enough to clear off some space on his garage workbench so I could make progress on a couple of my smaller projects:
Moldmaking

In the middle of the visit we took a long weekend and went with my in-laws out to their cabin at the lake. It's a nice place:
Lake Place
While there I snapped this winning photo of my wife:
Ana Lake I also beat her at every board game we brought along.

Then I posed heroically to celebrate my victory:
Hero Pose 289

Repeatedly:
Harpooneer

While we were out there, I also got to help my father-in-law take out his Hobie Cat for the first time since he bought it:
Lake Sailing It turns out I'm not very good with a catamaran, but at least it was a chance to get underway under sail for the first time since September of 2008.

After we returned to civilization, Ana and I got cleaned up and headed over to a party with a bunch of her old friends for the 4th of July. It was a great group of people who mostly happened to be huge geeks. How huge? The party was called "Bada Big Boom." Bonus points if you can name the reference alluded to there.

I entertained myself with the small wealth of bottle rockets they had while the rest of the guys were lighting off mortar shells and other nearly military grade explosives:
Badabigboom
Meanwhile, my charming wife was helping her old friends cram down as many Jell-O shots as they could handle:
Ana JellO

So it was a pretty cool visit with the in-laws and I got a lot done. There was more stuff that happened, but a lot more has happened since then.

From there it was on to Petaluma, but that's the next entry...